This is the wiki for products made by Fractal Audio Systems, maintained by members of the community.
November 2025: the wiki is updated with AM4 data.
Difference between revisions of "IR Capture"
m (edited for readability) |
m (edited for readability) |
||
| Line 160: | Line 160: | ||
==How to capture a factory cab== | ==How to capture a factory cab== | ||
| + | |||
| + | '''''Note: While we have the ability to (re)capture factory IRs, we lack the permission to distribute them. They are for our personal use only. Please respect this.''''' | ||
IR Capture can be used to turn factory cabs into external IRs. Here's a walkthrough, using an Axe-Fx III to capture a stock cab from the FM3: | IR Capture can be used to turn factory cabs into external IRs. Here's a walkthrough, using an Axe-Fx III to capture a stock cab from the FM3: | ||
Revision as of 23:51, 29 February 2024
Contents
Available on which products
- Axe-Fx III: yes
- FM3: no
- FM9: no
- Axe-Fx II: yes
- FX8: no
- AX8: no
About Impulse Responses (IR)
For more information see:
About capturing IRs
The process to capture an impulse response is explained in the IR Capture Guide. The Axe-Fx III Owner's Manual contains an updated version of this guide.
FRACTAL AUDIO QUOTES
[1] The quality of the power amp isn't really that important. As long as the response is flat. The Axe-Fx does some fancy math and removes the distortion from the measurement. Most solid-state power amps are very flat, their distortion performance is usually where they vary.
Mixer is not so important. The IR capture algorithm in the Axe-Fx removes any distortion from the measurement so even a cheap pre is fine. The mic, however, is definitely important.
[2] […] Tone Matching is a nifty feature and certainly useful but you'll get far more satisfaction by concentrating on capturing good IRs.
The single most important aspect of recording guitar amps is micing the amp. Therefore the single most important aspect of using your Axe-Fx is the IR.
People are too hung up on "matching" or "profiling" an amp but fail to realize that when you are doing that you are basically capturing an IR. If you capture the IR separately now you have an IR that is fully separated from the amp and therefore can be used with all models. Matching and profiling cannot mathematically separate the amp's frequency response from the cabinet frequency response.
Once you do this you'll be surprised at how accurate the amp models are. I do this all the time and find Tone Matching is unnecessary now (in fact many of the amp models have had their built-in matching data removed in the latest firmware). Any differences between the model and the real amp are so minuscule as to be immaterial. A little tweak of the tone stack or EQ is usually enough to remove and differences. Besides, once you get into mixing you'll realize that you'll be applying EQ anyways so tiny differences in EQ are irrelevant.
Moving the mic just a small amount drastically changes the sound. The best producers have mastered micing. You can only fix so much via EQ since EQ is essentially painting with a broad brush where mic technique is akin to using a fine-point brush.
[3] […] What an IR won't capture is any speaker distortion and speaker/guitar interaction differences. Speaker distortion is mostly irrelevant though since it is typically much less than the amp distortion. Furthermore, we simulate it anyways. Speaker/guitar interaction causes reinforcement of bass and low mids so playing through a cab at moderate to high volumes will sound slightly different than playing through the IR and listening through monitors or headphones. This becomes more prevalent at higher gains because there is more reinforcement at higher gains (this is why you can get controlled feedback easier at higher gain). The difference is so minute though that it doesn't really matter. It cracks me up that people nit-pick about minute differences when those differences are minuscule in comparison to the difference between the response of two monitors (even two of the same brand and model).
You can compensate for the difference in interaction by putting EQ before the amp block and boosting the bass and low mids slightly. Or use big monitors and crank 'em.
[4] The best way to capture an IR is to use the Axe-Fx itself. It employs several tricks that result in higher-quality data.
[5] The quality of the A/D and D/A converters when capturing IRs is unimportant. When using a sine sweep (as everyone does now) the distortion and noise are reduced dramatically. I would wager that even an 8-bit converter would yield results indistinguishable from the finest converters.
[6] You can shoot an IR of an IR. It's actually easier than shooting an IR of a speaker.
[7] The internal IR capture tool in the Axe-Fx works great but it won't export .wav files.
How to capture an IR
The process can be conducted using Cab-Lab or from the Setup menu on the Axe-Fx II or III.
Two methods are available:
- MIC only
- MIC+DI
FRACTAL AUDIO QUOTES
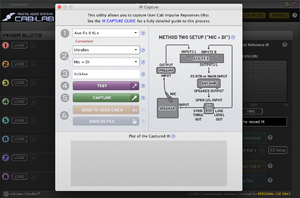
[8] […] The method used to capture IRs is set in the Global menu. Mic Only is the traditional method and uses a single input into Input 2 Left as the response from which the IR is derived. Mic + DI uses both Input 2 Left and Input 2 Right. The mic response (i.e. preamp output) is input into Input 2 Left as usual while the output of a DI box (or DI output on an amp) is input into Input 2 Right. Both responses are captured and the response from the Right input is used to correct the response from the Left input. This accomplishes the same thing as using Reference Compensation in Cab-Lab but is done at capture time rather than during post-processing.
The advantage to the Mic + DI technique is that it allows almost any amp to be used. A flat, solid-state amplifier is not required. Any amp, whether solid-state or tube, with or without integrated preamp can be used. For example a tube guitar head can be used as the “power amp”. You can even plug right into the front of the head (as opposed to using the power amp input or effects return), even if the head is set to heavy distortion. The unique capture technique of the Axe-Fx removes any distortion from the measurement and completely separates the amp response from the speaker response yielding a pure and accurate IR.
To use the Mic/Line + DI method do the following:
- Connect the line output of your mic preamp to Input 2 Left.
- Connect a DI box between the amplifier output and speaker input. Be sure to use a DI box that is specifically designed to work with speaker level signals and one that does not have any on-board cabinet emulation. You can also use the DI output of your amp if it has one as long as it is not a speaker emulated output.
- Connect the output of the DI box to Input 2 Right.
- Connect Output 2 Left of the Axe-Fx to the input of the amp.
- Set the IR Capture Method in the system settings to Mic + DI.
- Set the Input 2 Mode in the I/O->Audio menu to Stereo.
- Capture the IR as usual either using the front panel or Cab-Lab.
[…] You can also use a speaker attenuator that has a line out. Turn off the attenuation and connect the line out to Input 2 Right.
[9] […] Superior results may be obtained using the line out of an attenuator with the attenuation turned off, because the frequency response will typically have more low frequency extension than common DI boxes.
Some amps have DI or slave outputs that are simple resistive dividers and work great for this purpose. These include:
- Mesa Boogie Mark IV/V
- Mesa Rectifier Series
OTHER QUOTES
Yek:
[10] Note that in step 2 of the capture process, you should use a speaker cable (between Amp Out and DI In). In step 4 you can use a Humbuster cable (between Axe-Fx Out and Amp Input.
Parameters
Conventional deconvolution / Reverse filter processing
Note: This is only available on the Axe-Fx III.
This offers the choice between conventional deconvolution and reverse filter processing. In a high-noise environment, the reverse filter technique can provide better results. In low-noise environments, the conventional technique can provide slightly better bandwidth and magnitude accuracy. Earlier firmware used the reverse filter technique.
IR processing
Note: This is only available on the Axe-Fx III.
The IR processing parameter selects between Minimum-Phase
which transforms the IR into a minimum-phase version, Auto-Trim
which removes the leading silence, and None
which applies no processing at all. Note: earlier firmware always used minimum-phase processing. Read this: IR Properties
IR type
IR Capture can generate Standard, Ultra-Res and, for the Axe-Fx III only, FullRes IRs. This refers to the length/resolution of the IR. Standard
is the same as Normal
resolution.
Read IR resolution for more information.
Delay Compensation
Note: This is only available on the Axe-Fx III.
Delay Compensation allows compensating for time-of-flight delay when capturing IRs.
For example, when capturing far-field IRs there may be significant time delay due to the distance of the mic from the speaker. This can reduce the precision of the measurement if the delay is excessive.
To use the compensation, configure the graph to the Time display. Do a test sweep and note the waveform delay. Dial in the desired amount of compensation delay and repeat as necessary. Note that the speed of sound is roughly 1 ft/ms so a mic that is 10 ft from the speaker would incur roughly 10 ms of delay. Note that IR Capture Utility will automatically compensate for delays up to approximately 20 ms (1K samples). Correction is only required for delays greater than 20 ms.
Tips, tricks and troubleshooting
How to capture a factory cab
Note: While we have the ability to (re)capture factory IRs, we lack the permission to distribute them. They are for our personal use only. Please respect this.
IR Capture can be used to turn factory cabs into external IRs. Here's a walkthrough, using an Axe-Fx III to capture a stock cab from the FM3:
- Connect Axe-Fx III / OUT2 LEFT to FM3 / IN2 LEFT.
- Connect FM3 / OUT2 LEFT to Axe-Fx III / IN2 LEFT.
- Turn up the OUT2 knobs on the Axe-Fx III and FM3 hardware.
- Build a preset on the FM3 consisting of [IN2] - [CAB] - [OUT2]. Select the desired stock cab. Disable additional processing in the Cab block including Low/High Cut.
- Select MinPhase etc.
- Enter a name for the IR that will be created (press Enter after entering the name)
- Start capturing.
Notes:
- You can do this on the hardware only, but if you want an .IR file too for mixing, you need to use the IR Capture tool in the editor.
- On the FM3 you can use OUT1 instead of OUT2 if desired.
- If you're running the editor and have captured the IR to a user slot, its name will appear only after the cab slots have been refreshed.
About guitar speakers and microphones
Read this: Speakers and microphones
Direct Inject (DI) boxes
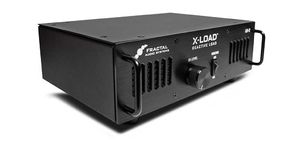
Fractal Audio's LB-2 can be used as a DI for capturing IRs. Read this: X-Load LB-2 Reactive Load Box
Other suitable DI boxes for capturing IRs include:
- Rupert Neve Designs RNDI, requires a phantom power supply. More information.
- Suhr ISO Line Out Box
- Suhr Reactive Load
- Pro Co DB1
- Whirlwind Director
- Whirlwind Direct2
- ART ZDirect

