The effects
Contents
- 1 The Effects
- 1.1 Noise Gate
- 1.2 Compressor
- 1.3 Gate / Expander
- 1.4 Multiband Compressor
- 1.5 Filter
- 1.6 Graphic Equalizer
- 1.7 Parameteric Equalizer
- 1.8 Crossover
- 1.9 Resonator
- 1.10 Chorus
- 1.11 Quad Chorus
- 1.12 Flanger
- 1.13 Phaser
- 1.14 Rotary Cabinet
- 1.15 Wah-Wah
- 1.16 Formant Filter
- 1.17 Vocoder
- 1.18 Pan/Tremolo
- 1.19 Delay
- 1.20 Multi-Delay
- 1.21 MegaTap Delay
- 1.22 Reverb
- 1.23 Amp Simulator
- 1.24 Cabinet Simulator
- 1.25 Drive
- 1.26 Pitch Shifter
- 1.27 Detune
- 1.28 Fixed harmony
- 1.29 Intelligent harmony
- 1.30 Classic whammy
- 1.31 Octave divider
- 1.32 Crystals
- 1.33 Advanced whammy
- 1.34 Arpeggiator
- 1.35 Custom Shifter
- 1.36 Auto Pitch
- 1.37 Synth
- 1.38 Ring Modulator
- 1.39 Stereo Enhancer
- 1.40 Effects Loop/Aux.Out
- 1.41 Mixer
- 1.42 Volume/Pan
- 1.43 Feedback Send/Return
The Effects
The following sections describe the individual effects and their adjustable parameters.
Noise Gate
The Noise Gate is not a routable effect. It is always connected directly to the main inputs. To edit the effect go to the page in the menu. The Noise Gate is always active but can be defeated by simply turning the control fully counter-clockwise.
The Noise Gate is a downward expander. Any signal below the threshold is reduced by the expansion ratio. This provides smooth transitions rather than abrupt open/close style gating.
Parameters
- THRESH - Threshold control. This sets the level at which the Noise Gate will start its downward expansion. If the input signal drops below this level it will be attenuated by an amount controlled by the ratio.
- RATIO - Sets the downward expansion ratio. For example, if the threshold is set to - 50 dB and the input level is -60 dB and the ratio is 2.0 the input will be attenuated by 20 dB.
- RELEASE - Release rate control. Sets the rate at which the Noise Gate attenuates the signal once the threshold has been crossed. Higher values will make the signal gradually fade once it drops below the threshold.
Compressor
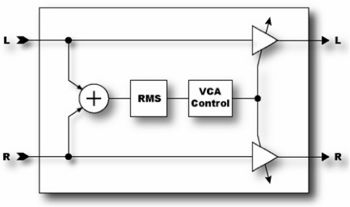
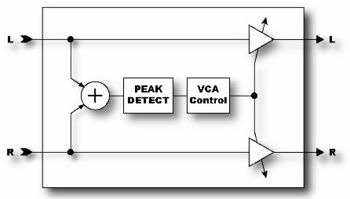
The Compressor reduces the dynamic range of the signal by lowering its gain when the input power exceeds a threshold. It is best placed at the start of an effects chain and is most effective when used with clean settings. Using a Compressor with high-gain distortion can lead to excessive noise or squealing. The Compressor can also be placed near the output of an effects chain if desired to even out the response if using, say, two different distortion types. The low-gain distortion can be followed with a Compressor to even out its response compared to a high-gain distortion. Otherwise the low-gain distortion will be too dynamic.
Parameters
- THRSH - Threshold control. The Compressor reduces its gain when the input power exceeds this value.
- COMP - Sets the gain reduction ratio. This is the ratio of input power to output power beyond the threshold. For example, if the threshold is -40 dB, the input signal is - 30 dB and the ratio is 2.0 the output will be -35 dB.
- ATT - Attack rate. Sets how fast the Compressor reduces its gain once the threshold is exceeded. Higher values equal faster response.
- REL - Release rate. Sets how fast the Compressor restores the gain once the signal has fallen below the threshold.
- LEVEL - Sets the output level of the block. This is the same control as on the MIX page.
- KNEE - Sets the "knee" type. A soft knee gradually varies the compression ratio around the threshold whereas a hard knee switches from no compression to the selected compression ratio abruptly at the threshold. With high compression ratios a hard knee may produce undesirable artifacts. In this case set the knee type to SOFT.
- DET - Selects the type of detector to use, RMS or Peak.
- MAKEUP - With this set to on compressor will automatically compensate for the gain reduction caused by the compressor. As you vary the amount of compression applied to a signal the output level will stay roughly constant.
- SCSEL - To use the sidechain you simply feed two (or more) rows to the compressor input, say rows 1 and 2. The row you desire to be the sidechain is set with SRCSEL. The remaining rows are summed and used as the input.
- FILTER - Filter is a high-pass on the detector input. This can be used to eliminate "pumping" and/or "breathing" if the source has a lot of low-frequency content.
Gate / Expander
The expander module is sort of a “compressor in reverse”. When the signal level is below the threshold the gain is reduced. The Axe-Fx UltraTM gate/expander block can be used as a gate or expander (as the name suggests).
Parameters
- THRSH - Threshold control. The Gate / Expander reduces its gain when the input power is below this value.
- ATT - Attack time. Sets how fast the Gate / Expander restores the gain once the threshold is exceeded. Lower values equal faster response.
- HOLD - Hold time. Sets how long the Gate / Expander holds the gate open once the threshold has been exceeded.
- REL - Release time. Sets how fast the Gate / Expander reduces the gain once the signal has fallen below the threshold.
- RATIO - Sets the gain expansion ratio. This is the ratio of input power to output power below the threshold. If the input power is -40 dB and the threshold -30 dB and the ratio 2, the output power will be -60 dB (two dB reduction for every one dB below threshold).
- SCSEL - Selects the sidechain input source. INPUT is the normal setting and selects the block input (sum of the rows feeding the block). The other settings allow isolating a single row as the sidechain input. The other rows are summed as usual. By using a row as the sidechain input you can use the compressor as a ducker or de-esser.
- LOWCUT - Sets the frequency of a highpass filter on the sidechain input.
- HICUT - Sets the frequency of a lowpass filter on the sidechain input.
Multiband Compressor
The Axe-Fx UltraTM contains a three-band compressor that is great for mastering or compression of a whole mix. It also works great after distortion to help thicken the tone. The basic principle of the Multi-Band compressor is that the input is divided into three bands using a crossover. Compression is applied to the individual bands and then the outputs recombined. This allows isolating bands of the input material and applying different amounts of compression. Multi-Band compression is the de-facto mastering tool and can really improve the final mix.
Parameters
- FREQ1 - Sets the crossover frequency between band 1 and band 2.
- FREQ2 - Sets the crossover frequency between band 2 and band 3. Each compressor section has it’s own menu page with the following paramters:
- THRSH - Threshold control. The threshold at which output compression starts to occur.
- RATIO - Sets the gain reduction ratio. This is the ratio of input power to output power beyond the threshold. For example, if the threshold is -40 dB, the input signal is -30 dB and the ratio is 2.0 the output will be -35 dB.
- ATT - Attack rate. Sets how fast the compressor reduces its gain once the threshold is exceeded. Higher values equal faster response.
- REL - Release rate. Sets how fast the compressor restores the gain once the signal has fallen below the threshold.
- LEVEL - Sets the output level of the band.
- DET - Selects the type of detector to use, RMS or Peak.
- MUTE - Mutes the output of the band. You can use the mute controls to audition one or more bands.
Filter
The Filter module is a simple programmable filter designed for general tone shaping. It allows a variety of different filters along with real-time control of the filter parameters. You can use the Filter module for quick, static tone shaping or for elaborate, dynamic tone manipulation.
It can be used as a straight gain block by setting the filter type to NULL. Another possibility is to use it as a treble booster (with more programmability than the one in the Drive module).
In the 60's guitarists began experimenting with booster pedals to increase the signal level into their amplifiers. This increased the amount of distortion their amps would produce. The more popular booster pedals had extra treble boost in addition to overall boost. This technique was essential to Brian May's tone on the early Queen recordings where a treble booster into a Vox AC-30 gave that unmistakable sound.
To use the Filter/Boost module as a treble booster set the TYPE to either HIGHPASS or BANDPASS. Experiment with the Q and FREQ controls to achieved the desired effect. Increase the level to increase the overall signal level out of the block.
The FREQ, Q, GAIN, LEVEL and parameters are all controllable. To attach a modifier to these parameters select the parameter and press ENTER. This brings up the MODIFIER menu. When any of these parameters are attached to a modifier an asterisk (*) appears after the name indicating such.
Parameters
- TYPE - Sets the type of filter. All the standard filter types are available. A NULL type has a flat frequency response characteristic.
- FREQ - Sets the center frequency of the filter.
- ROFFS - Sets the right channel frequency offset as a multiple of the left channel. A setting of 0.5, for example, would set the right channel frequency to half the left.
- Q - Sets the ‘Q’ of the filter. Higher values give sharper responses.
- GAIN - Sets the gain at the center frequency for the bandpass, notch, low-shelf and high-shelf types. This control has no effect with the other types.
- LEVEL - Sets the output volume level of the block.
- PAN - Sets the output panning of the block.
- BYP - Sets the bypass mode.
Graphic Equalizer
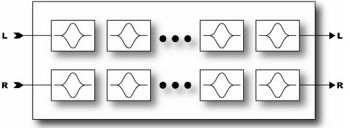
The Graphic Equalizer is an 8-band equalizer with band centers at 63, 125, 250, 500, 1000, 2000, 4000 and 8000 Hz. Each band can boost or cut up to 12 dB. Simply select the desired band with navigation buttons and use the value dial to vary the gain. The Q value of each band is 1.414
The Graphic EQ can also be used as a booster. To use the EQ as a booster simply emphasize the desired frequencies and set the level as desired. For a treble booster, for example, one might boost the 2K, 4K and 8K by 6 dB or so and turn the level up 12 dB. The parametric equalizers (see below) can be used in the same way by simply turning up the high-shelf gain and increasing the level.
Parameteric Equalizer
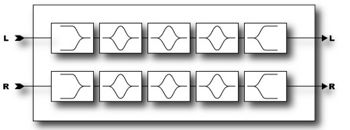
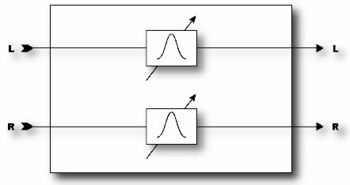
The Parametric Equalizer is a 5-band parametric-type equalizer comprised of a low-shelf filter, three bell filters and a high-shelf filter. To edit, select the band desired using the PAGE buttons. A graphical display depicts the response.
Parameters
- FREQ - Sets the center frequency of the band.
- Q - Sets the "Q" of the band. Q is a measure of filters bandwidth vs. center frequency. Higher Q's exhibit narrower or sharper response. Use caution as very high values along with high gain can cause output overload and clipping even though the apparent volume is low. Reduce the block output level if this occurs.
- GAIN - Sets the gain of the filter.
The outer bands have an addtional parameter
- TYPE - set the curve of the outer bands. Choices are now shelving, peaking and blocking (i.e. highpass).
Crossover
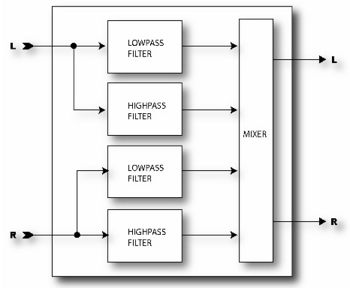
The Axe-Fx UltraTM contains two, two-way stereo crossovers. These crossovers contain 4th-order Linkwitz-Reilly filters. You can combine the two crossovers to form a three-way crossover with a little imaginative routing.
Parameters
- XOVER FREQ - Sets the frequency of the filters.
- FREQ MULTIPLIER - When set to X10, the crossover frequency is multiplied by ten.
- FREQ - Sets the center frequency of the band.
- LEFT LOW LEVEL - Sets the output level of the left input lowpass filter.
- LEFT HI LEVEL - Sets the output level of the left input highpass filter.
- RIGHT LOW LEVEL - Sets the output level of the right input lowpass filter.
- RIGHT HI LEVEL - Sets the output level of the right input highpass filter.
- LEFT LOW PAN - Sets the panning of the left input lowpass filter.
- LEFT HIGH PAN - Sets the panning of the left input highpass filter.
- RIGHT LOW PAN - Sets the panning of the right input lowpass filter.
- RIGHT HIGH PAN - Sets the panning of the right input highpass filter.
Resonator
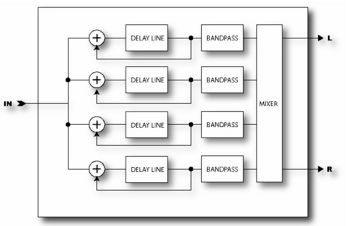
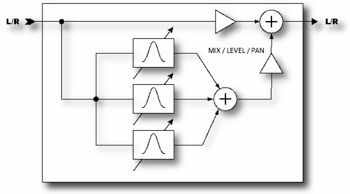
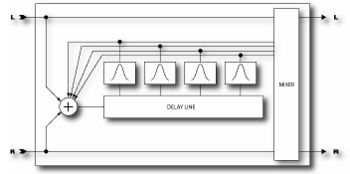
The Axe-Fx Ultra Resonator is four resonant comb filters in parallel. By tuning the comb filters a metallic or resonant timbre can be achieved from normally non-musical signals. The Resonator works best on transient signals like speech or percussion but can also be used to add unique character to musical inputs.
In series with each comb filter is a bandpass filter tuned to the same frequency. The position of these filters can be before or after the comb filters. They are shown in the after position in the diagram above.
The Resonator can operate in one of two modes: Manual and Chordal. In manual mode control of the filter frequencies is done manually. In chordal mode a base frequency is set and a chord type chosen. The filter frequencies are then set to match the type of chord chosen.
Parameters
- MODE - Selects between the two modes of operation: manual and chordal.
- INGAIN - Sets the level into the effect. Since the filters are very resonant overload can occur. This control can be used to reduce the levels.
- MASTER FREQ - Scales all the frequencies.
- MASTER LEVEL - Scales all the output levels.
- MASTER PAN - Scales all the output pans.
- MASTER Q - Scales all the bandpass filter Q’s.
- FREQUENCY n - Sets the resonant frequency of the selected filter.
- FEEDBACK n - Sets the resonance of the selected filter by varying the feedback.
- FILTER LOC n - Selects the position of the bandpass for the selected filter.
- FILTER Q n - Sets the Q of the selected bandpass filter.
- LEVEL n - Sets the output level of the selected filter.
- PAN n - Sets the panning of the selected filter.
Chorus
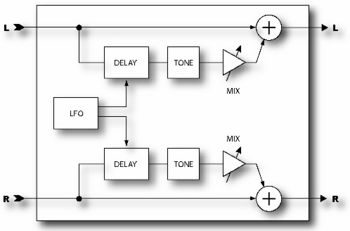
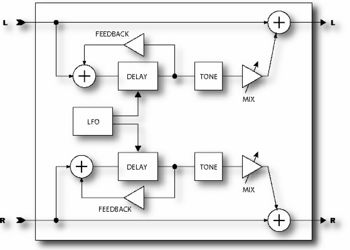
A chorus subtly delays the input signal by a varying amount and mixes it with the undelayed signal. The varying delay slightly detunes the signal so the result is one of multiple instruments playing in unison. The Axe-Fx Chorus is a stereo multi-voice chorus. It uses a very computationally demanding algorithm but delivers exceptionally smooth sounding ensemble effects. Each stereo channel in the chorus can have from one to four voices. Increasing the number of voices increases the fullness of the effect. For classic chorus sounds use two voices (one per side). For thick, full chorus effects use four or more voices
Parameters
Basic Parameters
- VOICES - Sets the total number of voices used in the effect. For example, a setting of 4 uses two voices per side.
- RATE - Controls the frequency of the Low Frequency Oscillator (LFO). Use low settings with higher depths for slow moving sounds. Increase the rate for vibrato effects. Set fully CCW to sync the LFO to the Global LFO1 oscillator.
- DEPTH - Sets the maximum delay variation. Higher depths increase the amount of detuning. Usually the rate and depth settings should be varied inversely, i.e. if you increase the rate decrease the depth however some unique sounds can be obtained using high rates and depths.
- MIX - Sets the ratio of wet and dry. Duplicated from MIX page. A setting of 50% produces the most prominent effect. Try setting the mix to 100% for vibrato effects.
- TEMPO - Locks the rate to the global tempo. For example, if the global tempo is 120 bpm and the tempo is set to a quarter note (1/4) then the LFO rate will be 2 Hz (120 bpm / 60 seconds = 2). To ignore the global tempo set the tempo control to NONE.
Advanced Parameters
- BASS - Adjusts the bass response of the wet signal. The bass can be boost or cut up to 12 dB.
- TREBLE - Adjusts the treble response of the wet signal. The treble can be boost or cut up to 12 dB.
- BASS FREQ - Adjusts the corner frequency of the bass control.
- TREBLE FREQ - Adjusts the corner frequency of the treble control.
- DELAY TIME - Adjusts the minimum delay time of the delay line. This can provide subtle changes in the character of the effect.
- LFO PHASE - Adjusts the phase difference between the left and right lfo waveforms. When set to 180 degrees, the right delay time will be a maximum when the left is a minimum and vice-versa. For maximum stereo spread set this to 180 degrees. For a mono chorus simply set this to zero.
- LFO TYPE - Selects between sine or triangle waveforms for the LFO. Sine is the most commonly used waveform.
- LFO2 RATE - Sets the rate of a 2nd LFO. The second LFO amplitude modulates the primary LFO on every other voice. This allows for a lusher chorus effect.
- LFO2 DEPTH - Sets the depth of a 2nd LFO. The second LFO amplitude modulates the primary LFO on every other voice. This allows for a lusher chorus effect.
- AUTO DEPTH - When this is set to LOW or HIGH the depth is automatically scaled for the rate. Lower rates therefore increase the actual depth and vice-versa. The HIGH setting allows greater maximum depth. This greatly simplifies adjusting the rate and depth and gives the most musical results. For wild sounds you may wish to set this to OFF which decouples the controls allowing for full depth swing even at fast rates.
- PHASE REVERSE - When this is set to ON the phase of the right channel is reversed on the effected signal. This increases the stereo imaging.
- WIDTH - skews the delay between left and right for a lusher chorus effect. When set to 100% the right delay time will be 1/2 the left value. At 0% they will be equal.
Quad Chorus
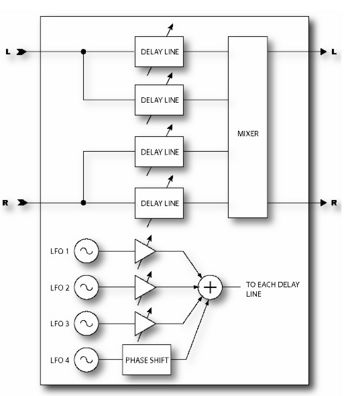
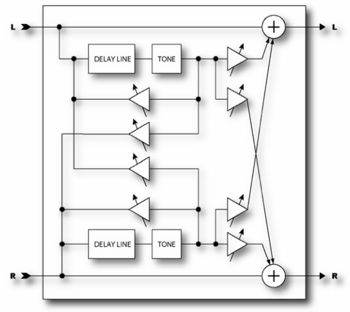
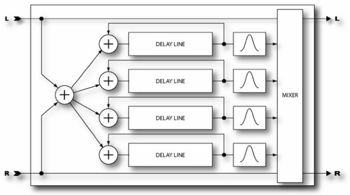
The Axe-Fx Ultra Quad Chorus is the ultimate chorus effect. Four independent chorus units are modulated by four separate LFO’s. The result is an incredibly lush and liquid chorus sound. It takes a little while to program but the effort is well worth the investment. The first three LFO’s are then combined in various amounts via the LFO Morph parameter for each chorus unit. The fourth LFO modulates all the chorus units. In the illustration above the effect is shown in the default stereo configuration. The four LFO’s are depicted as used for each chorus delay line.
Parameters
Master Parameters
- TIME - The time delay of each chorus unit is set to a percentage of its programmed value by this parameter. This can be used to adjust all the delay times simultaneoulsy or further modulate the choruses.
- RATE - Sets the master rate of the LFO’s.
- DEPTH - The depth of modulation to each chorus is set to a multiple of its programmed value by this parameter.
- FDBK - The amount of the output of each chorus fed back to its input is controlled by this parameter. Set to 0% for classic chorus sounds. Increase for flanging effects
- INPUT MODE - When set to STEREO, two of the chorus units are fed from the left input and the other from the right input. This can be used to preserve or increase the stereo separation.
Chorus Unit Parameters
Each chorus unit has an identical set of parameters.
- TIME - Sets the minimum time delay of the chorus unit.
- LEVEL - Sets the output level of the chorus unit.
- PAN - Sets the panning of the chorus unit in the stereo field.
- DEPTH - Sets the depth of the modulation applied to the chorus unit.
- LFO MORPH - This parameter controls the contribution of the first three LFO’s to the modulation signal. A value of 0% would select only LFO1 as the modulation source. A value of 25% would have equal parts of LFO1 and LFO2. A value of 100% would use only LFO3. The net effect is that a combination of two LFO’s is used to modulate the chorus (in additon to the global modulation of LFO4).
Advanced Parameters
The master parameters are duplicates of the first page.
- WIDE MODE - When this in set to ON, the modulation to every other delay line is inverted thereby widening the stereo effect.
- MAIN DEPTH - This parameter controls the depth of LFO4 which modulates all the chorus units. The amount of global modulation can be controlled by this parameter.
- MAIN PHASE - Sets the phase difference of the main LFO (LFO4) between chorus units. This allows the pitch of each chorus unit to change differently than if they were all modulated in-phase.
- LFO1 MASTER - If this is set to ON, the rate of LFO’s 2 and 3 are locked to LFO1 and the LFO1 RATE MULT parameter controls the first three LFO rates.
- LFOn TYPE - Selects the type of LFO for each LFO.
- LFOn RATE MULT - Sets the rate of the LFO as a multiple of the master rate.
Flanger
A flanger is similar to a chorus but uses a shorter delay time and feeds back some of the effect signal back to the input. It was originally intended to duplicate the sound of two tape decks that were synchronized together and then pressing on the flange of one of the tape reels (hence the term flanging). This caused the tape decks to become slightly out of sync and created the classic wooshing sound. A great example of this is in the Doobie Brother's song "Listen to the Music" during the bridge.
Parameters
Basic Parameters
- TIME - Adjusts the nominal delay time of the delay line. This changes the character of the effect. Low values give a jet-like sound whereas high values are metallic. Adjust to taste.
- RATE - Controls the frequency of the Low Frequency Oscillator. Use low settings with higher depths for slow moving sounds. Increase the rate for vibrato effects. Set fully CCW to sync to the Global LFO1 oscillator.
- DEPTH - Sets the maximum delay variation. Higher depths increase the amount of detuning. Usually the rate and depth settings should be varied inversely, i.e. if you increase the rate decrease the depth however some unique sounds can be obtained using high rates and depths.
- FEEDBK - Sets the amount of wet signal fed back to the input. Increasing the feedback can give the Flanger a metallic quality as it produces sharp resonances in the frequency response. Note that excessive values can result in marginal stability and may even cause oscillation. Decrease the feedback if this occurs.
- MANUAL - Manually controls the delay time. You can use this along with a foot controller or other controller to control the flange effect. For full manual control set the depth to zero.
- MIX - Sets the ratio of wet and dry. Duplicated from MIX page. A setting of 50% produces the most prominent effect.
- TEMPO - Locks the rate to the global tempo. For example, if the global tempo is 120 bpm and the tempo is set to a quarter note (1/4) then the LFO rate will be 2 Hz (120 bpm / 60 seconds = 2). To ignore the global tempo set the tempo control to NONE.
Advanced Parameters
- DRY DELAY - Adjusts the delay time of the dry signal. This, in conjunction with the TIME parameter can be used to achieve “Through-Zero Flanging” (TZF). By experimenting with combinations of TIME and DRY DELAY you can achieve wild TZF effects.
- PHASE REVERSE - Controls the phase of the wet signal. Either of both channels can be inverted. Use along with DRY DELAY to increase depth of TZF.
- BASS - Adjusts the bass response of the wet signal. The bass can be boost or cut up to 12 dB.
- TREBLE - Adjusts the treble response of the wet signal. The treble can be boost or cut up to 12 dB.
- BASS FREQ - Adjusts the corner frequency of the bass control.
- TREBLE FREQ - Adjusts the corner frequency of the treble control.
- LFO PHASE - Adjusts the phase difference between the left and right lfo waveforms. When set to 180 degrees, the right delay time will be a maximum when the left is a minimum and vice-versa. For maximum stereo spread set this to 180 degrees.
- LFO TYPE - Selects the waveform for the LFO. Sine is the most commonly used waveform. You can achieve strange rising/falling effects using the sawtooth types.
- LFO HICUT - Adjusts the filtering of the LFO waveform. For certain waveform types along with extreme depth or rate settings, clicking may occur at the waveform discontinuities. For example a square wave can cause audible artifacts as the LFO rapidly changes from one extreme to the other. Decreasing the LFO FILTER frequency will mitigate this.
- AUTO DEPTH - When this is set to LOW or HIGH the depth is automatically scaled for the rate. Lower rates therefore increase the actual depth and vice-versa. The HIGH setting allows greater maximum depth. This greatly simplifies adjusting the rate and depth and gives the most musical results. For wild sounds you may wish to set this to OFF which decouples the controls allowing for full depth swing even at fast rates.
RodTAylor
Phaser
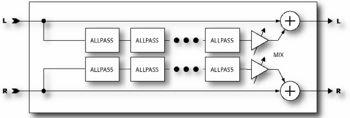
A phaser works by cascading a series of "allpass filters" and then mixing the processed signal with the input. The allpass filters cause phase shift and at certain frequencies the amount of phase shift will be exactly out of phase with the input so the mixed signal will have notches at those frequencies. The Axe-Fx Phaser is extremely powerful allowing from 4 to 12 stages along with a feedback control for producing even more dramatic effects. Also, the Axe-Fx phase is full stereo allowing for spatial effects as well.
The Phaser also contains a special “Vibe Mode” that recreates the classic vibe effect with astonishing accuracy. Set the ORDER control to fully clockwise to activate this mode.
NOTE: The MIX control should be set at 50% for the maximum effect.
Parameters
Basic Parameters
- ORDER - Sets the number of stages in increments of two. For classic phaser sounds set the order to four and use low feedback. For more pronounced effects increase the order. Turning this control fully clockwise puts the Phaser into “Vibe Mode” where the frequency spacings are fixed. In this mode the FREQ SPAN control has no effect.
- RATE - Controls the frequency of the Low Frequency Oscillator. Set fully CCW to sync to the Global LFO1 oscillator.
- DEPTH - Controls the sweep depth of the LFO.
- RES - Resonance control. Controls how much of the wet signal is fed back to the input. Increasing the resonance increases how sharp the notches are. Excessive values of feedback can cause instability. If this occurs decrease the feedback.
- FREQ - Sets the start frequency of the first stage filter. This in combination with the depth control controls the range over which the notches sweep.
- TEMPO - Locks the rate to the global tempo. For example, if the global tempo is 120 bpm and the tempo is set to a quarter note (1/4) then the LFO rate will be 2 Hz (120 bpm / 60 seconds = 2). To ignore the global tempo set the tempo control to NONE.
Advanced Parameters
- LFO TYPE - Selects the waveform for the LFO. The ramp types can provide falling or rising effects. Experiment with Exponential or Logarithmic types for pulsating effects.
- FREQ SPAN - Sets the span of the allpass filters. Higher values separate the resulting notches by greater amounts.
- LFO PHASE - Sets the phase difference from left to right for the LFO. When set to 180 degrees, the right notch will be a maximum when the left is a minimum and vice-versa.
Rotary Cabinet
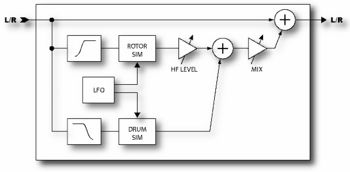
A Hammond B3 without a Leslie cabinet is like a BLT sandwich without the lettuce and tomato. Guitar players soon came to discover the wonderful tones of the Leslie cabinet and it's brethren. The classic Leslie cabinet is comprised of a spinning drum with a slot in it and a rotating horn called a rotor. A low frequency speaker is aimed into the spinning drum while high frequencies are sent to the horn. The result is unmistakable, from schmaltzy hockey-game to Steppenwolf, the Leslie cabinet became ubiquitous. Spinning drum alone versions have been produced by other manufacturers with Stevie Ray Vaughn's "Cold Shot" being one example of that sound.
The Axe-Fx Rotary Cabinet simulator reproduces all these classic sounds and offers more control. Also, it doesn't weigh 300 lbs and require four guys to move up a flight of stairs. Isn't technology great?
Parameters
- RATE - Controls the rate at which the "drum and rotor" spin. Connect this to a controller for real-time control.
- LDEPTH - Sets the modulation depth of the "drum". Higher settings provide a more pronounced throb.
- HDEPTH - Sets the modulation depth of the "rotor". To simulate a rotating drum only cabinet reduce this.
- HLEVEL - Sets the output level of the "rotor". Use this to balance the level between the drum and rotor.
- TEMPO - Locks the rate to the global tempo. For example, if the global tempo is 120 bpm and the tempo is set to a quarter note (1/4) then the LFO rate will be 2 Hz (120 bpm / 60 seconds = 2). To ignore the global tempo set the tempo control to NONE.
Wah-Wah
Ah, the legendary wah effect. No effect has ever been as used (or abused). From Jimi Hendrix's "Voodoo Chile" to, well, Stevie Ray Vaughn's "Voodoo Chile" the wah continues to hold a unique place in the annals of rock history. The Axe-Fx Wah is the embodiment of this legacy but with modern reliability and control. Also, the unique control input processing of the Axe-Fx eliminates the "zipper effect" common to many remotely controlled wahs.
A wah is actually a very straightforward device. The signal is passed through a high-Q filter whose frequency is controllable. The Wah may be placed before distortion for a subtler, classic sound or after distortion for a more prominent and aggressive sound.
Parameters
- TYPE - Selects between a lowpass, bandpass or peaking filter. A bandpass filter gives a more dramatic sound whereas the other filters are more subtle.
- FMIN - Sets the frequency of the filter when the frequency control is at its lowest value. This can be adjusted to match the range of your instrument or preference.
- FMAX - Sets the frequency of the filter when the frequency control is at its highest value.
- RES - Sets the resonance, or ‘Q’ of the filter. Higher values give a sharper response. The actual Q value is two times RES.
- TRACK - Sets the ‘Q’ tracking of the filter. As the frequency is increased the resonance will be decreased by an amount proportional to this value. If this is zero the resonance of the filter will be constant at all frequencies. Classic wah pedals usually have a resonance that decreases with frequency due to design limitations. This control can be used to mimic those pedals.
- FREQ - Sets the frequency of the filter relative to the minimum and maximum frequencies. Normally you would attach this to a controller. Attach it to an external controller (such as pedal) for classic wah or attach it to an LFO or Envelope for autowah or dynamic wah.
Formant Filter
The wah was originally intended to mimic the sound of the human voice but obviously falls a little short. A formant filter is an extension of the wah principle but operates on the concept of formants. Formants are resonances in instruments, cabinets, and, in this case, the human vocal tract that give sounds their character. The human vocal tract generates a handful of formants that produce the vowel sounds we recognize. For example the vowel sound "eee" can be reproduced with a bank of narrow bandpass filters with various frequencies and amplitudes. The Axe-Fx Formant Filter allows "talk-box" effects without the fuss and muss of the real thing.
The Format Filter morphs between three vowel sounds: start, mid and end. The CTRL knob then controls the morphing between these sounds. For example, we can program the Formant Filter to go "ooo - eee - aaahh" as a pedal is moved. The start vowel is generated with the CTRL knob counter-clockwise, the end vowel is generated with the knob fully clockwise and the mid vowel is generated with the knob at 12:00. The sound gradually changes from one vowel to the next between positions. The Formant Filter usually sounds best when placed after distortion although there are no hard and fast rules.
Parameters
- START - Sets the start vowel sound.
- MID - Sets the mid vowel sound.
- END - Sets the end vowel sound.
- RES - Sets the resonance of the filters. Higher resonance can yield a more dramatic effect.
- CTRL - Controls the morphing between vowel sounds. Normally you would connect this to a controller (i.e. EXTERN1).
Vocoder
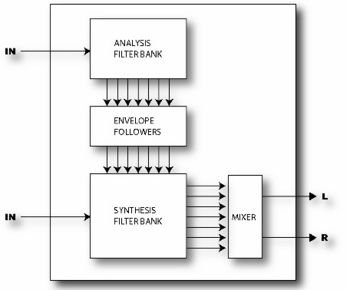
The Axe-Fx UltraTM has a digital recreation of the classic analog Vocoder. The Vocoder, created by Homer Dudley, was originally designed as means of compressing human speech for transmission over narrow-band carrier channels. Impressive amounts of compression can be achieved while still rendering speech intelligible. Although it never really gained acceptance for that application, it later found usefullness as a means of encrypting speech for wartime communications. In the 1970’s Robert Moog and Wendy Carlos pioneered the use of the Vocoder for musical applications.
The Axe-Fx Vocoder pays faithful homage to those early analog vocoders. Using a true constant-Q approach the Axe-Fx Vocoder can be used to make your guitar “talk” or make your voice sound like a robot or other strange and interesting effects.
When using the Vocoder with your guitar or other instrument as the carrier (synthesis bank), resist the urge to sing along. Speaking in a monotone voice yields the best results.
Parameters
- INSEL - Selects the input to use for the synthesis (carrier) channel. This is the input to use for your guitar or other instrument. The other input is then the analysis channel and is typically used for vocal input. If you are using a microphone it will probably need a preamp as it is look for a line level signal.
- BANDS - Selects the number of bands to use in the analysis and synthesis filter banks.
- FMIN - Sets the frequency of the lowest filter band.
- FMAX - Sets the frequency of the highest filter band.
- RES - Sets the Q, or bandwidth of the filters. Higher values yield narrower filters.
- SHIFT - Shifts the frequency of the synthesis bands relative to the analysis bands. This allows you to change the character of the vocoding and produce “anonymous mob informant” or “chipmunk” effects.
- HPMIX - Sets the amount of highpass filtered signal to mix in with the synthesis output. This can be used to increase the intelligibility of the vocoding.
- ATT - Sets attack filter time for the envelope followers.
- REL - Sets release filter time for the envelope followers.
- FREEZE - Turning this to ON, freezes the output of the envelope followers. This can be used to hold the vocal formant.
- MLVL - Sets the master level for all the synthesis filter outputs.
- MPAN - Sets master panning for all the synthesis filter outputs.
Individual control of the filter output levels and panning is provided on dedicated menu pages. You can use these controls to fine tune the filter bank response and control the panning of the filter outputs.
Pan/Tremolo
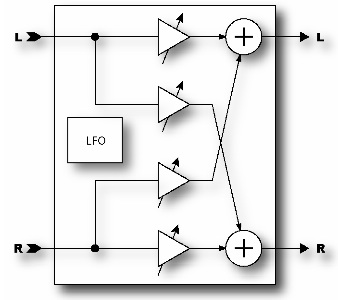
The Axe-Fx Pan/Tremolo provides, as the name would imply, panning and tremolo effects. A panner moves the sound left/right in the stereo field while a tremolo varies the volume. Tremolo can be used to get that classic "surf" sound especially when used with some spring reverb.
Parameters
- EFF TYPE - Chooses between the tremolo and panner.
- RATE - Sets the frequency of the LFO. Turning the control fully CCW locks the rate to the global LFO1 generator.
- DEPTH - Sets the modulation depth for the tremolo.
- WIDTH - Sets the modulation depth for the panner. When Width is set to more than 100%, the Panner will pan beyond a normal stereo image
- TEMPO - Locks the rate to the global tempo. For example, if the global tempo is 120 bpm and the tempo is set to a quarter note (1/4) then the LFO rate will be 2 Hz (120 bpm / 60 seconds = 2). To ignore the global tempo set the tempo control to NONE.
- LFO TYPE - Selects the waveform for the LFO. Try experimenting with the Log or Exp waveforms.
- DUTY - This controls the symmetry of the LFO waveform. It has no effect if the waveform is a sine wave. For a triangle wave this controls the shape of the waveform. At 50% the waveform is perfectly symmetrical. For a square wave this controls the ratio of time that the waveform is "on" as opposed to "off". This control has no effect for sine, log, exp or random waveforms
- LFO PHASE - Adjusts the phase difference between the left and right lfo waveforms.
- PAN CENTER - In panner mode adjusts the apparent center of the stereo image.
Delay
The real strength of digital processing was first exhibited with the original digital delay processors. Before that, delay processing was done using analog delay devices or tape-based techniques. These methods suffered from relatively narrow frequency response, noise, and in the mechanical versions, reliability concerns. Digital delays address all of these shortcomings while also providing longer delay times.
The Axe-FX contains two different types of delay blocks. The first type, a regular "Delay", described here, covers basic digital delay territory and then adds some interesting enhancements and innovations. (The second, a "Multi-Delay" will be covered later.) The Delay has five different modes: Mono, Stereo, Ping-Pong, Dual and Reverse. In Mono mode the inputs are summed and a single delay line is used. This allows for simple delay sounds. The Stereo mode allows independent left and right delay time control. The Ping-Pong mode provides a quick and easy way to have echoes alternate between the left and right outputs. The Dual mode allows full control over each of two independent delay lines. The Reverse mode is a special mono reverse looper capable of strange and exotic reverse playback effects.
The Delay also contains a lowcut and highcut filter to allow frequency response tailoring of the repeats. By turning down the highcut frequency you can simulate the sound of a tape delay with it's reduced high frequency character. Setting the lowcut frequency to increasing values produces a thinner delay sound for special effects.
The Delay also contains two delay time modulators that can be used to modulate the delay time in subtle or dramatic ways. These can be used to add a chorus-like depth to the echoes or to simulate the instability of vintage tape delay. One can be used, for example, to simulate the slow fluctuation of a worn belt (wow) and the other simulating a worn capstan (flutter). More imaginative approaches are also possible.
The first and third pages of the Delay menu are the same for all types. The second page of the edit menu changes based on the type of delay selected.
Parameters
Common Parameters
- TYPE - Selects between the various delay types available.
- INGAIN - Sets the input level into the delay lines. The primary purpose of this is to allow you to attach a controller (i.e. pedal) to control the delay level without disturbing the mix. Set the mix at the desired maximum echo level and then use the INLVL control (via a pedal) to control the echo level. This is different than controlling the echo level with the MIX control since the echoes will continue to sound after the control is set to zero whereas using the MIX control the echoes will be immediately cut off. If you are not attaching a controller then you would normally set this to 100% (default).
- LOCUT - Sets the cutoff frequency of the lowcut filter. Higher values remove more low frequency content from the delayed signal.
- HICUT - Sets the cutoff frequency of the highcut filter. Lower values remove more high frequency content from the delayed signal.
- DRIVE - Sets the drive level into the tube simulator. This can be used to add some distortion to the echo like an old tube-based tape delay. This control has no effect when using the Reverse delay type.
Modulation Parameters
The MOD page contains the various dynamic parameters that can be adjusted.
- LFO1/2 TYPE - Sets the type of LFO for the delay time modulators.
- LFO1/2 TARGET - Sets which channel(s) each delay time modulator affects. Each modulator can be independently assigned to either left, right, both or no channels.
- LFO1/2 RATE - Sets the rate of the time modulators. The delay time can be modulated so as to simulate a worn capstan or belt or to add a chorus effect to the echoes.
- LFO1/2 DEPTH - Sets the depth of the time modulators. Use in conjunction with the rate controls.
- DEPTH RANGE - The modulators use “auto depth”, faster rates automatically decrease the depth and vice-versa. The DEPTH RANGE control allows selecting the amount of maximum depth.
- DUCKER - Turns the delay ducking on or off. Ducking reduces the volume of the delayed signal in response to your playing. The volume of the echoes then increases when you stop playing.
- ATTENUATION - Sets the attenuation depth of the ducker. A setting of 20 dB, for example, will decrease the echoes by 20 dB when the input level is above the threshold.
- THRESHOLD - Sets the trigger threshold of the ducker. If the input signal exceeds this value the delayed signal will be attenuated by an amount equal to that set with the ATTENUATION control.
- RELEASE RATE - Sets the rate at which the ducker releases the attenuation when the input signal falls below the threshold.
- DIFFUSION- Sets the amount of echo diffusion. This causes the echoes to get “fuzzy” and can be used to smooth the echoes
- DIFF TIME- Sets the delay time for the diffuser.
- PHASE REV - When set to ON, inverts the phase of the right channel. This can be used to widen the stereo effect.
Mono Delay
- TIME - Sets the time of the delay lines.
- FEEDBK - Sets the amount of delay feedback. This controls how many repeats are heard.
- ECHO PAN - Controls the placement of the echoes in the stereo image. Note that this is different than the PAN control on the MIX page which controls the panning of the mixed sound. This control only effects the wet signal.
- TEMPO - Locks the time to the global tempo. For example, if the global tempo is 120 bpm and the tempo is set to a quarter note (1/4) then the time will be 500 ms (one echo per beat). To ignore the global tempo set the tempo control to NONE.
Stereo Delay
- TIME - Sets the time of the delay lines.
- RATIO - Sets the ratio of the delay time of the right channel relative to the left channel. A ratio of 1.0 sets both channels equal. Decreasing this value decreases the delay time of the right channel.
- SPREAD - Controls the stereo spread of the echoes. Increasing this value increases the separation between the left and right delay signals.
- FEEDBACK L - Sets the amount of delay feedback for the left channel.
- FEEDBACK R - Sets the amount of delay feedback for the right channel.
- TEMPO - Locks the left delay time to the global tempo. For example, if the global tempo is 120 bpm and the tempo is set to a quarter note (1/4) then the time will be 500 ms (one echo per beat). To ignore the global tempo set the tempo control to NONE.
Ping-Pong Delay
- TIME - Sets the time of the delay lines.
- FEEDBK - Sets the amount of delay feedback. This controls how many repeats are heard.
- SPREAD - Controls the stereo spread of the echoes. Increasing this value increases the separation between the left and right delay signals.
- TEMPO - Locks the delay time to the global tempo. For example, if the global tempo is 120 bpm and the tempo is set to a quarter note (1/4) then the time will be 500 ms (one echo per beat). To ignore the global tempo set the tempo control to NONE.
Dual Delay
- TIME L - Sets the time of the left delay line.
- TIME R - Sets the time of the right delay line.
- TEMPO L/R - Locks the delay time to the global tempo. For example, if the global tempo is 120 bpm and the tempo is set to a quarter note (1/4) then the time will be 500 ms (one echo per beat). To ignore the global tempo set the tempo control to NONE.
- FEEDBK L->L/R->R - Sets the amount of delay feedback for the delay line. This controls how many repeats are heard.
- FEEDBK L->R/R->L - Sets the amount of cross feedback for the delay lines. This controls how much of the left delay line is fed back to the right and vice-versa.
- LEVEL L/R - Sets the volume level of the delayed signals.
- PAN L/R - Controls the panning of the delayed signals.
Reverse Delay
- TIME - Sets the time of the delay lines.
- FEEDBK - Sets the amount of delay feedback. This controls how many repeats are heard. Use caution as instability can occur with the reverse type with certain parameter settings.
- ECHO PAN - Controls the placement of the echoes in the stereo image. Note that this is different than the PAN control on the MIX page which controls the panning of the mixed sound. This control only effects the wet signal.
- RUN - When this is set to ON the reverse playback is active. You can start and stop playback using this or by attaching a controller to it.
- TRIG RESTART - When this is set to ON the reverse playback restarts when triggered via the RUN control. If set to OFF, the playback continues from the current position.
- TEMPO - Locks the time to the global tempo. For example, if the global tempo is 120 bpm and the tempo is set to a quarter note (1/4) then the time will be 500 ms (one echo per beat). To ignore the global tempo set the tempo control to NONE.
- XFADE TIME - Sets the crossfade time between reverse audio snippets. When the playback position approaches the delay time a new snippet begins playback at time zero. The crossfade time controls how long it takes for the old snippet to fade out and the new one to fade in. You can achieve interesting and rhythmic variations by setting a long crossfade time. For classic reverse delay sounds set this at or near its minimum value.
Looper
The Looper is a sixteen second phrase sampler. The Looper controls are different than the other effects in that they are “pushbutton” controls rather than knobs. Selecting the control and pressing ENTER toggles the state of the control. The Looper controls have dedicated MIDI CC assignments as well so you can control the Looper using a MIDI footpedal or other MIDI device. Access to the CC assignments is done in the I/O menu.
- RECORD - When record is activated the Looper records the audio input. Pressing record again stops recording and immediately begins playback.
- PLAY - Toggles the playback state. If recording, pressing play immediately stops recording and starts playback..
- ONCE - This control plays the phrase one time only and then stops. If the phrase is already playing the phrase continues playing until the end and stops. If the playback is stopped, pressing this plays the phrase one time. Pressing this again while the phrase is playing resets playback to the beginning allowing for “stutter” effects.
- STACK - Pressing this adds the audio input to the existing phrase. Pressing it again stops the addition. The existing audio is faded every time through the loop.
- REV - Pressing this reverses the direction of the loop playback.
Multi-Delay
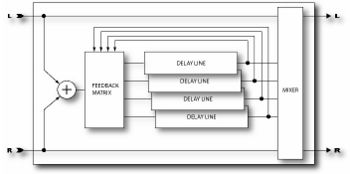
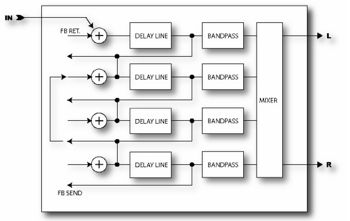
The Multi-Delay is a rhythmic delay block with eight sub-algorithms: Quadtap delay, Plex Delay, Plex Detune, Plex Shift, Band Delay, Quad-Series, Ten-Tap and Rhythm Tap. Delay times can be controlled by tempo allowing for rhythmic patterns to be easily created. All delay lines can be modulated by up to four LFO’s.
Parameters
Standard Parameters
- MASTER TIME - Scales all the delay times. Attach a controller to this for real-time control of the delay times.
- MASTER LEVEL - Scales all the output levels. Attach a controller to this for real-time control of the echo levels.
- MASTER PAN - Scales all the pan amounts essentially acting as a spread control. The amount can go negative allowing for the echoes to switch sides. Attach a controller to this for real-time control of the pans.
- MASTER FEEDBACK - Scales all the feedback amounts. You can attach a controller to this.
- MASTER FREQ - Scales all the frequency values. Attach a controller to this to vary all the frequency values in real-time. This can be used to achieve a wah-like effect on the echoes.
- MASTER Q - Scales all the Q values. Attach a controller to this to vary all the Q values in real-time.
- MASTER DETUNE - Scales all the detune values. Attach a controller to this to scale all the detune values in real-time. By varying the detune values this way, resonances are broken up and the delay becomes smoother.
- MASTER PITCH - Scales all the shift values. Attach a controller to this to vary all the pitch shifts in real-time.
- DECAY TIME - Sets the coefficients of the feedback matrix for the Plex types thereby controlling the amount of time for the echoes to fade. Use caution with the Detune and Shift types as high decay times can result in instability.
- DIFFUSION - Sets the amount of cross-coupling between delay lines.
- TIME - Sets the delay time of the tap.
- TEMPO - Locks the delay time to the global tempo. For example, if the global tempo is 120 bpm and the tempo is set to a quarter note (1/4) then the time will be 500 ms (one echo per beat). To ignore the global tempo set the tempo control to NONE.
- LEVEL - Sets the volume level of the tap.
- FEEDBACK - Sets the amount of delay feedback. This controls how many repeats are heard. The total of all feedbacks must add up to 100% or less.
- PAN - Controls the placement of the echoes in the stereo image. Note that this is different than the PAN control on the MIX page which controls the panning of the mixed sound. This control only effects the wet signal.
- DETUNE - Sets the amount of pitch detune for the delay line for the Plex Detune and Plex Shift types.
- SPLICE LEN - Sets the splice time for the detuners. Longer times are smoother but less precise.
- DIRECTION - Sets direction of the pitch shifter. Reverse can be used for atmospheric textures.
- CROSSFADE - Sets the amount of overlap in the audio snippets. A low setting will make the echoes
more discrete whereas a high setting will tend to smear the echoes.
- SHIFT - Sets the amount of pitch shift for the delay line for the Plex Shift type.
- FREQ - Sets the center frequency of the delay line output filter.
- Q - Sets the ‘Q’ of the delay line output filter. Higher values result in narrower bandwidth. The Axe-Fx uses a constant power algorithm so higher Q’s increase the gain of the filter. As such, use caution as overloads could result with some program material.
- LFO RATE - Controls the frequency of the Low Frequency Oscillator (LFO). Use low settings with higher depths for slow moving sounds. Increase the rate for vibrato effects. Set fully CCW to sync the LFO to the Global LFO1 oscillator.
- LFO TEMPO - Locks the rate to the global tempo. For example, if the global tempo is 120 bpm and the tempo is set to a quarter note (1/4) then the LFO rate will be 2 Hz (120 bpm / 60 seconds = 2). To ignore the global tempo set the tempo control to NONE.
- LFO DEPTH - Sets the maximum delay variation. Higher depths increase the amount of detuning. Usually the rate and depth settings should be varied inversely, i.e. if you increase the rate decrease the depth however some unique sounds can be obtained using high rates and depths.
- FDBK SEND - Sets the feedback send tap for the Quad-Series type.
- FDBK RET - Sets the feedback return tap for the Quad-Series type.
- Important Note - firmware version 5 and beyond significantly changed the Plex-Shift algorithm to get pre-5.X patches to sound as intended do the following:
1. Set crossfade between 50-100%.
2. Set times to half original value.
Ten Tap Delay
The Ten Tap Delay is a special kind of delay that allows you to precisely control the repeats. It is implemented essentially as 10 delays in series. You can control the exact number of repeats, up to 10, along with the decay, level and panning.
- MONO/STEREO - Sets the mode of the Ten-Tap Delay. In mono mode twice as much delay per tap is possible.
- DELAY TIME - Sets the delay time per tap.
- DELAY TEMPO - Sets the delay tempo per tap. This overrides the delay time paramter.
- NUMBER OF TAPS - Sets the exact number of repeats.
- DECAY - Sets how rapidly the repeats decay. A value of zero will have no decay and all repeats will be at the same volume.
- SHUFFLE - Sets the amount of time offset for the odd taps to give a shuffle feel to the repeats.
- SPREAD - In stereo mode sets the spread of the repeats. At maximum the left channel is panned full left and the right channel full right.
- RATIO - Sets the ratio of the left delay time to the right in stereo mode.
- PAN SHAPE - Controls the shape of the panning as a function of tap number. The repeats can slowly move from one side to the other (inreasing / decreasing) stay constant, or move back and forth (sine).
- PAN ALPHA - Controls how quickly the repeats move as a function of tap number and pan shape. Higher values produce a more pronounced effect. To alternate left-right set the PAN SHAPE to SINE and the PAN ALPHA to maximum.
- LOW CUT - Sets the cutoff point of the highpass filter. Higher values reduce the amount of low frequencies per repeat.
- HIGH CUT - Sets the cutoff point of the lowpass filter. Higher values reduce the amount of high frequencies per repeat.
- TAPn LEVEL - Sets the relative level of the repeat.
Rhythm Tap Delay
The Rhythm Tap Delay uses basically the same algorithm as the Ten Tap Delay but allows you to enter the exact rhythm of the repeats. You can enter the rhythm either manually or by tapping the rhythm in with the ENTER button. The parameters for the Rhythm Tap Delay include most of the Ten Tap Delay parameters listed above plus the following:
- FEEDBACK - Sets the feedback level from the last repeat to the input of the delay line. You can use this in conjunction with the decay to control the overall decay behavior. If you set decay to zero and feedback to a moderate value, the pattern will repeat getting quieter each time through.
- QUANTIZE - Quantizes the tap times to the entered note value. This can be used to aid in tapping in a rhythm. The tap times will be rounded to the nearest multiple of the note duration. You can change this value even after you’ve tapped in your rhythm.
- LEARN - Sets this to <TAP ENTER> to enter the rhythm pattern learn mode. You can then tap the desired rhythm in with the ENTER button. When finished set to <DONE>. If the ENTER button is not pressed after several seconds the unit will automatically terminate the learn mode.
Diffusor
The Diffusor is comprised of four two-second diffusers in series. A diffuser smears transients and can be used as a type of reverb for creating interesting ambience effects.
- MASTER TIME - Scales all the delay times. Attach a controller to this for real-time control of the
delay times.
- MASTER FEEDBACK - Scales all the feedback amounts. You can attach a controller to this.
- TIME n - Sets the delay time each diffuser.
- TEMPO n - Locks the time to the global tempo. For example, if the global tempo is 120 bpm and
the tempo is set to a quarter note (1/4) then the time will be 500 ms (one echo per beat). To ignore the global tempo set the tempo control to NONE.
- FEEDBACK n - Sets the feedback level for each diffuser. For maximum diffusion set to 100%.
MegaTap Delay
The Axe-Fx UltraTM MegaTap Delay is a 2.5 second, 40-tap delay line with paramteric control of time, amplitude, and panning. This effect can be used to create interesting delay patterns or as a “density increaser” for use before reverberant effects.
Parameters
- INPUT GAIN - Sets the input level to the effect. Attach this to an expression pedal or controller to produce swell effects.
- MASTER LEVEL - Controls the overall level of all the delay taps.
- COARSE TIME - Sets the coarse delay time of the last tap.
- FINE TIME - Sets the fine delay time of the last tap.
- NUMBER OF TAPS - Sets the number of taps (repeats) off the delay line.
- TIME SHAPE - Sets the spacing of the delays as a function of tap number. This along with the TIME ALPHA paramter can be used to control the tap spacing.
- TIME ALPHA - Sets the spacing of the delays as a function of tap number. This controls the rate at which the spacing changes.
- AMPLITUDE SHAPE - Sets the amplitude shape of the taps as a function of tap number.
- AMPLITUDE ALPHA - Sets the amplitude of the taps as a function of tap number. This parameter controls the rate at which the amplitudes change with tap number.
- PAN SHAPE - Sets the pan shape of the taps as a function of tap number.
- PAN ALPHA - Sets the panning of the taps as a function of tap number. This parameter controls the rate at which the pans change with tap number.
- TIME RANDOMIZE - Controls how much the tap spacing is randomized.
Reverb
Aside from distortion no effect is probably more important to the electric guitar than reverb. From almost the instant that amplifiers were created, guitarists yearned to be able to duplicate the sound of their amps in a hall or large room. Early reverb simulators incorporated springs or large metal plates. Most fine recording studios had their own large rooms dedicated to providing reverb. A speaker and microphone were placed in the room and the reverberated sound was recorded.
Digital processing excels at simulating reverberation and the Axe-Fx has one of the finest reverbs you've likely heard. A proprietary bandpass comb-filter algorithm provides extremely dense and smooth reverbs with no graininess or metallic qualities. The Axe-Fx provides five basic reverb types: Spring, Room, Hall, Chamber and Plate.
The Spring reverb type simulates the sound of the old spring reverbs used in popular guitar amplifiers (except for the crashing sound when someone trips over it). It is characterized by a smooth tail with a slightly "boingy" quality. For surf and rockabilly dial up the Spring reverb, plug in your Strat or Tele and lay down some Dick Dale.
The Room reverb type simulates an actual room. It is the type to use when you want the most natural, realistic reverb. Also great on vocals and percussion.
The Hall reverb type is similar to the Room reverb but simulates a concert hall. It is a little less smooth and has some response peaks lending it a unique character. Use this when you want your sound to stand out a little.
The Chamber reverb type simulates the sound of large, boxy chamber. It is useful when you want a bright, resonant reverb sound.
The Plate type simulates the sound of a vintage reverb plate. These are large metal plates suspended in a frame. An acoustic signal is launched into the plate and pickups record the sound that is produced as it bounces around inside the metal. Plate reverbs are characterized by their smooth yet bright sound and were popular in the 70's and 80's especially for vocals. The Axe-Fx Plate simulation captures the "shiny" sound of a plate reverb but without all the complicated setup.
For those more technically inclined, the designer of the axe-fx states: "The reverb in the Axe-Fx is a kind of hybrid physical/synthetic model. It's based on an amalgam of various techniques including FDN, BABO (ball-in-a-box), scattering waveguides and ray-tracing. Hence some of the classic parameters don't apply on a 1-to-1 basis. I spent two years developing the algorithm."
The Axe-Fx Reverb edit menu has three pages. The basic page has the most commonly used of the parameters below. The mix page is the standard mixer. The advanced page allows for more in-depth editing and contains all the adjustable parameters (except for the mixer parameters).
Parameters
- TYPE - Selects the reverb type. The are five basic types with three variations for each type, small, medium, and large. Each type sets the parameters below to a preset value. You can override the parameter values afterward but if you then change the type the values will be reset to the default values for that type.
- TIME - Sets the reverb decay time. This is the amount of time for the reverb to vanish beyond the point of perception. This is known as the t60 time, referring to the amount of time required for the reverb to decay to 0.001 of its initial value (-60 dB).
- SIZE - Sets the size of the spring, room, hall etc. This controls the length of time it takes for an echo to bounce between the walls. Increasing this increases the echo time and also increases the delay before the reverb starts. Small values smooth out the reverb, very small values can be used to obtain a metallic sound. Large values can make the reverb more grainy as the time between the individual repeats increases. Also, as the size is increased the reverb will become somewhat darker as the high frequencies are absorbed more.
This control is important in that it actually sets the size of the room, hall, etc. that is simulated by the algorithm. If you want the reverb to sound like a huge concert hall then best results will be obtained by increasing this value. Of course there are no rules and you can set the size small and the time high to obtain some interesting effects. The separation of the early reflections is also controlled by this parameter as well as the reverb tail. The Size parameter is actually proportional to the length of one "wall". With size set to max the simulated room (in room mode) is roughly the size of a football field! - INLVL - Sets input level to the reverb. Primarily for use with a controller to control the reverb and allow the reverb to continue to sound. Set to 100% normally. Attach a controller to vary the reverb level without disturbing the mix.
- LOCUT - Decreases the low-frequency content of the wet signal
- HICUT - Decreases the high-frequency content of the wet signal
- COLOR - Sets the color of the reverb. Higher values simulate less high-frequency wall absorption and result in a brighter reverb. This is equivalent to the "Damping" parameter in other reverb algorithms.
- DIFFUSION - Controls the density of the reverb tail. Higher values give a smoother sound. Lower values allow the individual repeats to be more easily discerned. It controls how "rough" the "walls" are. A low diffusion value means the walls are mirror-like and the individual echoes will be more audible. Higher values means reflections are scattered more. Ideally the parameter would have a tanh() type response as the control is more sensitive at the extremes but it's a linear function so be aware of this. On older firmware, this control defaults to 0% for spring models, which may sound strange (instead set it to 100%).
- PRE DELAY - Adds extra delay before the reverb starts. The SIZE control automatically imparts a certain amount of delay before the reverb starts. Use this control to add more delay if desired. For example, if the SIZE is low the reverb will start almost immediately. You can use this control to add some delay before the reverb starts but keep the small sounding size.
- EARLY DELAY - This controls the relationship between the early reflections and the reverb tail. This allows a +/- 50% change in the early reflections initial delay. The size control automatically sets the time between the early reflections and the tail. You can use this control to vary that time.
- EARLY LEVEL - Adjusts the relative volume level of the early reflections. This control has no effect for the Spring reverb type.
- REVERB LEVEL - Adjusts the relative volume level of the reverb tail.
- MOD DEPTH - This parameter controls the depth of modulation of the reverb tail. For a more musical sound experiment with this and the MOD RATE control. The reverb contains an LFO that modulates the delay lines that comprise the reverb. This modulation helps fill out the soundstage and makes the reverb sound fuller. The modulation is best used on pitched instruments. For percussive instruments (i.e. drums) it may sound better with the modulation off. Set the depth to zero to defeat the modulation. To hear the effect of the modulation turn the mix to max and adjust the depth and rate, then set the mix to the desired amount.
NOTE: The modulation depth defaults to zero. To use the modulation you must enter the advanced parameter page and set the depth and rate as desired. - MOD RATE - This parameter controls the rate of modulation of the reverb tail.
Tips
Room Simulation
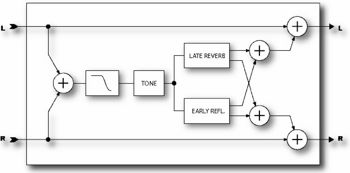
Using the Reverb effect block to simulate early reflections of a room (or amp booth or similar) adds a very realistic touch if you are recording direct.
Here are some more detailed explanations on early reflections and reverb:
- http://audacity.sourceforge.net/manual-1.2/effects_reverb.html
- http://audacity.sourceforge.net/manual-1.2/tutorial_effects_1.html
- http://www.gearslutz.com/board/rap-hip-hop-engineering-production/363107-reverb-tips-techniques.html
Improved early reflections
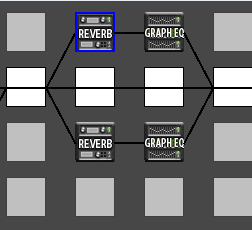
Lately I've been experimenting in using two reverb blocks in parallel to the dry signal each with GEQ/PEQs to shape the resulting sound. I suppose this simulates cabinet reflections (poor man's approach) given the size of the reverbs; regardless of what it simulates it gives that feeling that sometimes it's missing when when mic'ing a real cab. I tend to keep the size very small to retain that in your face tonality and not a live room type of vibe.
With the following settings:
- Mix: 100% (since it's parallel)
- Level: -18dB to -10dB (depending how dramatic you want to get)
- Type: Small room in one block, small Hall in the other block
- Time: 0.10 sec
- Size: 1.4-2.0 (something really small) = 2.2 feet to 6 feet essentially keeping the room is really "cabinet size". I try to keep these very close if not the same on both blocks. 1.0 is way to small and results in complete metallic ringing.
- Color: 0-2 (I like to damp the high frequencies, the lower the more damp)
- Lo-cut: 150Hz-400Hz (Since the size is so small, the reverb will get very boomy at the end, so I cut it)
- Hi-cut: 10000-15000Hz (adjust to taste, this is rather subtle)
- Diffusion: 100% (This doesn't matter as will only do early reflections). Input diffusion and time are the same they don't matter here as we are turning off the "reverb" level and leaving only early reflections.
- Pre-delay: 0ms -0.4ms (I usually keep it at 0ms, but changing to 0.4ms/0.8ms has a lot of impact on the sound due to phasing which may or may not sound better). You may do 0.4 ms on one block and 0 on another or keep them the same.
- Density: 12 (Lost of density to avoid metallic ringing)
- Early delay: (No real value here, experiment, this affects the phasing of the early reflections so go through the range to find the most pleasing value). I set this to a different value for each of the reverb blocks.
- Early level: 0dB (we just care about early reflections for this simulation. Same on both blocks.
- Reverb level: -40dB (the minimum you can set it at). Same on both blocks
- Mod: 0% (this don't matter on early reflections).
For the GEQ's that are inline with the Reverb blocks, I tend to bring up the highs, as the reverb will be fairly dark (even with color set to 10). This is of course completely up to taste.
I usually set the bypass mode to Mute out, so that I can compare taking the reverbs in/out of the chain and compare the tonality (I assign reverb 1 and 2 bypass to the same cc).
Old Previous Notes about room reverb
On the Axe-Fx you can use these initial settings to simulate a small space like an "amp booth" for example:
- Mix: 50% (Adjust to taste)
- Level: 0-8dB (adjust to balance non bypassed vs. bypassed state)
- Type: Small room
- Time: 0.10-.26sec
- Size: 1.4-20 (any more will sound like too big of a room) - 2.0 = 1m wall, 4.0 = 2m wall
- Color: 1-5 (adjust to taste again, this is just a starting point).
- Lo-cut: 100Hz-200Hz (Used to reduce reverb low freq boom)
- Hi-cut: 80000-13000Hz (if your settings give too much harshness you can tame it with this)
- Diffusion: 100%
- Pre-delay: 0ms-0.4ms (This will really change the phasing if you are using Mix < 100%)
- Density: 9-12 (I find a lot of density really improves the early reflections)
- Early delay: 13.8%
- Early level: -8dB (keep the early and reverb level fairly close, but again experiment)
- Reverb level: -9dB
- Mod: 0%
In general here are some guidelines for modifying the parameters (but they are not rules, experiment!!). Also see Reverb for an official explanation of what the controls do.
- Size. This will set up all the pre-delay, early delay time etc. This is the most crucial parameter that you should experiment with to get the sound you want, then you can "fine tune" the other controls once you establish the base sound.
- Time. Keep this farly, try to avoid any metallic ringing.
- Color. This is a bit more subtle, but keep it low for a more darker room. Adjust to taste depending on how reflective you want the walls of the virtual space.
- Lo-cut. Use this to reduce boominess.
- High-cut. Adjust to taste, depending on how bright you want the space to be.
- Diffusion: Keep it fairly high if not 100%. As per the name, this will diffuse the early reflections so they are not as direct.
- Pre-delay: The pre-delay is set by the size parameter. Change this value if your mix is not 100% as this will affect phasing.
- Early Delay: This is to change the default time set by size (i.e. 0% is the default). Adjust it to match the sound you are looking for. This also affects phasing. If it's too echoey, decrease this (to the negative side). This effectively reduces the room size.
- Early Level, Reverb Level: May want to keep early level close to the reverb level.
11
Amp Simulator
Without distortion the electric guitar probably wouldn't have had nearly the impact it has had on popular music. The Axe-Fx contains multiple distortions based on emulations of various amplifiers. As mentioned earlier the Axe-Fx is not a modeler however these emulations provide sonic characteristics very similar to the amplifier they are emulating.
One of the primary differences between the Axe-Fx and a modeling amplifier is the control philosophy. Modeling amps replicate the operation of the tone, volume, drive, etc. controls even replicating the annoying interaction among these controls. The Axe-Fx philosophy is to provide the control as a more useful tool rather than a strict replica of the original. In this regard the tone controls on the Axe-Fx are true cut/boost equalizing controls and do not interact. Because of this the controls are more powerful and are set differently than on a typical amplifier. "Diming" all the tone controls may sound great on an old tube amp but usually gives less than optimum results with the Axe-Fx.
The Axe-Fx distortion is based on a proprietary dual-stage non-linearity generator. There are two basic stages: preamplifier and power amplifier. The preamplifier stage emulates the distortion generated by classic tube preamplifiers. The power amplifier stage emulates the type of distortion generated by a tube power amplifier using our proprietary Dynamic Response TechnologyTM.
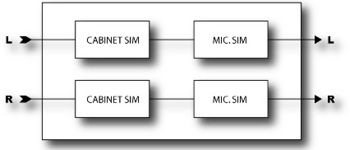
Full control over all parameters is naturally afforded allowing precise tailoring of this all-important block to your particular sonic tastes. Read the following carefully as the distortion block in the Axe-Fx is very sophisticated and a complete understanding will allow you to get the most from it. Also it is important to understand the role of the Cabinet Simulator in the overall sound. The cabinet contributes to the sound of a preset at least as much the amplifier type. If you’re not getting the exact sound you’re looking for try a different cabinet simulation. Of course there are no “rules” so there’s nothing preventing you from using a 10” blues cabinet with a high-gain amp simulation. Experimentation can lead to some unique and useful sounds.
Parameters
- GLOBL - If set to OFF the amp block works as normal. If set to GLOBAL1 through GLOBAL10, the amp will load the parameters from a "global amp parameter list". This parameter allows you to have 10 amps, each with different customizable settings, available to use in any preset.
- TYPE - Selects the amplifier simulation. The simulations are based on classic and modern amps as well as some hybrids and completely original types that we concocted. Check this page in the Wiki.
- BRIGHT - Many amplifiers contain a “treble peaker” on the volume or drive control (see DRIVE below). Some amplifiers have a “bright switch” that can be used to engage or disengage the circuit. On many amps this switch is built in to the volume control as a “pull on” switch. On others the circuit is hard-wired.
The Axe-Fx amp types default to a particular state for the bright switch. If the amp had a hard-wired treble peaker the default state is on. If the amp had no circuit at all the default state is off. You many override this state by selecting the TREB control and pressing ENTER. This will toggle the state of the switch. The text “BRIGHT” will appear under the control when the bright circuit is active.
If the original amp did not have a treble peaker circuit, the bright switch uses circuit values most suited to an amp of that type. On some amps the effect may be subtle, on others, quite pronounced. - DRIVE - Sets the preamp drive. Higher settings equal more preamp distortion. On some amplifier types the drive control has a treble peaker (like the original). When the drive is turned down the low frequencies are attenuated more than the high. As the drive is turned up the low frequencies are increased more.
Many amplifiers have this feature and it can be heard as the drive is varied. You can use this to achieve the exact sound you’re looking for when a drive block feeds the amp. Adjust the drive control of the amp to achieve the desired amount of input treble peaking and then adjust the drive and the output level of the drive block to achieve the desired amount of distortion.
The Drive control has 40 dB of range. At a setting of ‘0’ the gain is 40 dB below the maximum gain. - BOOST - adds an additional 12db of gain for added preamp distortion. You many toggle this state by selecting the TYPE control and pressing ENTER. This will toggle the state of the switch. The text “BOOST” will appear under the control when the boost circuit is active.
- BASS, MID, TREB - Tone controls. The active tone controls in the Axe-Fx have up to twice the range of a typical amplifier. When a tone control is set to the 12:00 position (0.0 dB) it is equivalent to the simulated amplifiers control at 12:00. However, the boost cut range of the control is greater, +/- 12 dB, whereas a typical amplifier may have only +/- 6 dB or less. This allows you to get sounds, like heavily scooped mids or boosted treble, that normally wouldn't be possible. Also, the active tone controls do not interact like a typical amplifier. So when you turn the treble control the midrange and bass are not affected. This makes dialing in a certain tone easier and quicker than with a typical tone stack. This does not affect the voicing of the simulation in that the frequency response of the original circuit is always achieved however the exact setting of the controls will be somewhat different. In general the Axe-Fx tone controls are more sensitive than a typical amp and require less extreme settings to achieve the same sound. For example, if you set the treble to full on a British hi-gain amp, the corresponding setting on the Axe-Fx is about 5.0 dB. The advantage of this philosophy is ease of use plus more flexibility and wider range of tones. Adjust the tone controls slowly and listen carefully. A 1.0 dB adjustment can make a marked difference in the tone. For those who prefer the classic passive tone controls that are found on most tube amps, the Axe-Fx has the option of using this style of tone control as well. Not just a crude shelving filter approximation, the Axe-Fx passive tone stack simulation exactly replicates the frequency and phase response of the classic passive tone stack. When using the passive tone controls the display will read out in traditional 0-10 style as opposed to decibel readings. Some of the amps simulated do not have the full complement of tone controls. In those cases setting the control to 12:00 replicates the original. For example, some early amps did not have Mid controls. To capture the original faithfully simply set the control to ‘0’. Adjust the control as desired to achieve new and different tones. Be careful in setting the tone controls as extreme settings along with high gain can cause pickup squealing or excessive noise. This is especially true with the active controls.
- PRES - Power amp presence control. This control boosts (or cuts) the upper frequencies from the power amp simulator by varying the negative feedback frequency response. Increasing this can help your sound “cut” through a heavy mix. This control actually has a greater range than a standard presence control. Values greater than zero behave like a typical tube amp, values less than zero actually reduce the high-frequency response even further.
If the Damping is set to zero this control is converted to a high-shelf equalizer at the output of the power amp. This allows you to control the high-frequency response of the power amp for types that don’t have any negative feedback. - HI CUT - This control sets the cutoff frequency of a lowpass filter at the very end of the preamp simulation. It defaults to a preset value for each amp type but can be overridden if desired. Experiment with this to fine tune your tone. For example, some of the higher gain types are characterized by fairly heavy filtering after the preamp stage but with this control you can reduce the amount of filtering and achieve a brighter tone. Conversely you gain reduce this value to achieve a darker or less brittle tone.
If using the Axe-Fx along with a separate tube power amp you may wish to experiment with this control to achieve the desired tone as the power amp may have it’s own high-frequency filtering. - DEPTH - This controls the effective output impedance of the power amp simulation. Higher values increase the impedance which increases the interaction of the virtual speaker with the power amp. Higher values give a fuller, looser sound, while low values can be used to achieve a more focused sound.
- DEEP - Power amp deep control. This control boosts the low frequencies from the power amp simulation by varying the negative feedback frequency response. Defaults to an appropriate value when the amp type is selected but may be overridden by the user.
- DAMP - This controls the amount of negative feedback, or damping, in the power amp simulation. Higher values give a tighter and brighter sound but can sound harsh at very high master volume levels. Lower values give a loose and gritty sound and feel. Each amp type defaults to a its own value but you may override the default value with this control. For example, a Top Boost amp has no negative feedback and as a result a unique tonal character. You can override the default damping and dial in some negative feedback to give the power amp a more “American” sound but still retain the preamp voicing.
- SAG - This controls how dynamic the power amp simulation behaves. Higher settings simulate higher power supply impedance and thus more droop in the tube plate voltages which leads to a more compressed feel.
This control interacts with the Master Volume control in that at low Master Volume settings this control will have little effect as the power amp is not being pushed. As the power amp is pushed and draws more virtual current from its virtual power supply the Sag control will have more effect.
NOTE: Turning this control fully CCW defeats the power amp simulation. If you are using the Axe-Fx into an external tube power amp and cabinet you may want to set this control to zero to defeat the power amp simulation.
- MSTR VOL - This, the Master Volume, is a very important control. It determines the drive to the power amp simulator. A higher setting increases the distortion contributed by the power amp simulator. As the Master is turned up the entire character of the amp will change, just like the real thing. The tone controls will have less influence on the sound, and the sound will “bloom” more and be more touch sensitive.
By carefully balancing Drive and Master Volume you can achieve the tone you desire. Experiment with the two to achieve your ultimate tone. Sometimes the tone you desire may be mostly preamp based and as such turn the Drive up and the Master down. Other times the tone may be mostly from the power amp so crank the Master up and back off the Drive. Amps with negative feedback (damping greater than zero) tend to have a crunchier power amp distortion and this can even get raspy if driven too hard. This is due to the negative feedback attempting to linearize the power amp. The resulting transfer function is harsher at clipping than an amp with little or no feedback. You can experiment with the damping control and master volume to achieve the desired power amp distortion timbre.
If the Master Volume is set very high best results are usually achieved by reducing the drive control. Try setting the Master around 9 or so and then slowly bringing the drive up until the desired tone is achieved. At high Master settings less drive is usually required, especially for high-gain types.
Amp types that are designed for preamp distortion typically sound better with lower values of this control and too high of a value can make the tone muddy or excessively noisy. This includes the USA Lead types, SOLO 100 and others. Lower gain amps such as Plexi, Brownface, and others can benefit from higher settings as this can reduce the harshness of the amp.
If the power amp simulation is off (Sag at zero) this control then becomes a simple level control. This control has 40 dB of range. A setting of ‘5’ is therefore 20 dB less than maximum. - LOWCUT FREQ - This control allows you to reduce the amount of low frequency content at the input to the amp simulator. This parameter defaults to a value for each type but can be overridden if desired. A higher value will "tighten" up the amp, since what a user calls "flub" is low frequency distortion.
- Bright Cap - This control sets the value of the “bright cap” across the virtual drive control. Increasing this will make the preamp brighter and vice-versa. The Bright Switch must be engaged for the effect to be audible.
- TONESTACK TYPE- This control allows you to select the type of tone stack used in the simulation. The tone stack will default to either ACTIVE or PASSIVE depending upon the DEFAULT TONESTK parameter in the GLOBAL menu. When set to ACTIVE, the tone stack is a semi-parametric EQ with +/- 12 dB of range for each control. When set to PASSIVE, the tone stack is an exact digital recreation of the classic tone stack used in the amplifier being simulated. You can also choose from a wide selection of other tone stacks if desired. Fifteen classic passive tone stacks are available to choose from. So you can dial up a Plexi model and change the tone stack to a Blackface or Top Boost, etc yielding hybrid amp sounds.
- WARMTH-This controls the power tube and transformer interaction. Set to zero to deactivate. Increasing this value increases the apparent warmth and depth of the tone, especially as the power amp is driven harder. This parameter defaults to a non-zero value whenever a new amp type is chosen.
- THUMP- This models the output transformer interaction with the speaker impedance. The amount of thump is adjustable from 0 – 10. Value is set to a default value when amp type is selected. When using a tube power amp you may want to set this to zero as the tube power amp will produce it’s own thump. To facilitate this the global power amp bypass has an additional mode that deactivates the thump modeling.
- TONE FREQ - This control allows you to alter the center frequency of the tone controls. You can use this to change the character of the preamp. This parameter defaults to a value for each type but can be overridden if desired.
- XFRMR MATCH - This controls the effective output impedance of the power amp simulation. Higher values increase the impedance which increases the interaction of the virtual speaker with the power amp. Higher values give a fuller, looser sound, while low values can be used to achieve a more focused sound.
- XFORMER LF - This control allows you to alter the lower cutoff frequency of the “output transformer”. Increase this value to simulate an old, under-designed transformer as was common in some vintage amps. This parameter defaults to a value for each type but can be overridden if desired.
- XFORMER HF - This control allows you to alter the upper cutoff frequency of the “output transformer”. Decrease this value to simulate narrow bandwidth transformers as were common in some vintage amps. This parameter defaults to a value for each type but can be overridden if desired.
- TONE LOCATION - This control allows you to alter the location of the tone stack. “PRE” places the tone stack at the input to the amp, “POST” places the stack between the preamp and power amp. "END" places the tonestack after the power amp simulation. This parameter defaults to a value for each type but can be overridden if desired.
- PWR TUBE BIAS - This parameter can be used to fine-tune the virtual power tubes’ bias points. A value of zero corresponds to full Class B operation. A value of one corresponds to full Class A operation. Values in between are therefore Class AB. For traditional Class AB power amps (i.e. Marshall, Fender, etc.) a value of 0.35 is considered the “optimum” bias point. For traditional Class A amps, (which aren’t really true Class A, i.e. Vox, Matchless, etc.) a setting of 0.75 corresponds to the typical bias value these amps are run at. Lower values of bias increase the amount of crossover distortion, add “hair” to the sound and make the power amp more “explosive” since the transfer function slope increases with input level. Higher values of bias yield less distortion, “rounder” sound, more linear response and a more compressed feel. At high Master Volume settings the effect of bias may be subtle. As the Master Volume is turned down the audible effect is more pronounced. Increasing the Damping increases the linearity of the power amp and also serves to reduce the audible effect of the bias control.
- PRESENCE FREQ - This control allows you to alter the center frequency of the presence control. This parameter defaults to a value for each type but can be overridden if desired.
- B+ CAPACITANCE - This control allows you to alter the amount of filtering capacitance on the power amp virtual power supply. Higher values will make the response stiffer and “faster”. Lower values will give a looser feel. Use along with the SAG control to fine-tune the response.
- SPKR RES FREQ - This control allows adjustment of the virtual speaker impedance's resonance frequency. It defaults to the value of the cabinet that would typically be paired with the TYPE, but can be adjusted to retune the response. This control has the most effect when the Depth controls is fairly high (as depth controls the amp output impedance).
- STABILIZER - Under certain extreme settings of DEPTH and DAMP the simulation may go unstable. This would happen in a real amplifier as well. The STABILIZER switch alters the “grid capacitor” values to ensure stability. (Alternatively you can reduce the XFORMER LF value. This will usually remove any instability, although occasionally it won't. In those cases you can use the STABILIZER.)
- LEVEL, PAN, BYP MODE - These are the standard output mixer controls.
Cabinet Simulator
The Axe-Fx contains 38 built-in cabinet simulations. These simulations recreate the tonal characteristics of a variety of different speaker and cabinet configurations. More than just simple filters, the cabinet simulator actually captures the subtle frequency response variations inherent in a real guitar speaker.
Cabinet block can be run in three modes:
- MONO HIRES: Mono 1024 sample convolution
- MONO LORES: Mono 512 sample convolution
- STEREO: Stereo 512 sample convolution
Mono Lores can be used to decrease CPU requirements as processing load will be cut roughly in half.
The STEREO modes is true stereo allowing different speaker/mic combinations for each channel. This allows setting up a dual amp configuration easily. Simply run AMP1 with its pan control fully left and AMP2 with its pan control fully right. Sum their outputs into a cabinet block and set the left cabinet and mic types for AMP1 and the right cabinet and mic types for AMP2.
In addition the are 10 User defined cabinets. Impulse Responses captured by the user may be loaded into the Axe-Fx non-volatile memory. A Window’s utility to convert wave files into the appropriate sysex file will be needed.
Parameters
- TYPE - Selects the cabinet simulation. See the list on this page.
- MIC L/R - Selects the microphone simulation type. There are ten different types based on classic microphones that are popular for micing guitar cabinets.
- None - No mic processing.
- 57 DYN - Based on the Shure SM-57.
- 58 DYN - Based on the Shure SM-58.
- 421 DYN - Based on the Sennheiser MD421.
- 87A COND - Based on the Shure Beta 87A.
- U87 COND - Based on the Neumann U87.
- E609 DYN - Based on the Sennheiser E609.
- RE16 DYN - Based on the Electro-Voice RE16.
- R121 COND - Based on the Royer R-121.
- D112 DYN - Based on the AKG D112.
- U67COND - Based on the Neumann U67.
- LINK - When ON, the right channel speaker and mic type change when the left channel type is changed allowing for quick evaluation of the various types. You can still override the right channel types if desired.
- LEVEL L/R - Sets the output level for the left and right speaker/mic.
- PAN L/R - Sets the output panning of the speaker/mic. Each speaker/mic combo can be panned in the stereo field. By default they are panned 25% from full left/right. Adjust this control to obtain the desired amount of separation.
- DRIVE L/R - This can be used to simulate speaker break-up.
- AIR - A low-pass filtered direct signal mixed with the processed signal. Sometimes adding some Air can help remove the boxiness. According to Cliff: "You typically need to set the Air Freq above 3 kHz before the effect is noticeable. I like it around 3500 or so. It adds a little sizzle to high-gain tones and removes that boxy sound."
Drive
The drive block replicates the effect of classic “stomp boxes”. They range from sublime to intense. Use caution when putting a drive before a high-gain amp as excessive noise and squealing may occur. Drives work best before low and medium gain amps.
Parameters
- TYPE - Selects the type of drive effect. The fuzz types are based on a hard-clipping distortion and give a raspy sound. The overdrive (OD) types are based on a cold-cathode tube model and give a warm, mellow overdrive tone. The boost types don’t distort much unless the drive is set quite high and are primarily tone-shaping and overdrive devices. The distortion types (dist) are based on a variety of tube and solid-state models and give classic distortion tones. The following types are available:
- Rat Dist - Based on a high-gain, raspy fuzz good for searing lead work.
- Pi Fuzz - A more mellow but fuzzy distortion sound
- Tube Drive - A fairly neutral distortion sound with just a bit of low-frequency roll-off.
- Super OD - Another Japanese distortion, this model is similar to the T808 model but with more highs and a slightly different tone control circuit.
- Treb Boost - A bright, trebly sound good for overdriving medium gain amps. Particularly effective on darker amps like Class A. This type has a LOT of treble boost and can easily cause pickup squeal when used with a high-gain amp type.
- Mid Boost - A custom mid-boost overdrive.
- T808 OD - A screaming distortion sound good for overdriving low gain amps. Based on the legendary Japanese pedal used by many famous artists.
- Fat Rat - A thick, medium gain distortion sound with a low-midrange emphasis.
- T808 Mod - Based on a “modified” Tube Dist type. This type captures the most popular mods done to the famed Japanese distortion pedal. Sounds great as a clean boost in front of a low gain amp with the drive turned down and the level turned up.
- Octv Dist - An octave distortion effect. This produces an octave above the note you are playing. For best results use your neck pickup and constrain your playing to the 12th fret and above.
- Plus Dist - Controls can be set to produce low-volume, controllable distortion or increased to achieve a warm, tube overdrive sound. Set to maximum, its pronounced fuzztone combines with long sustain.
- Hard Fuzz - Hard-clipping 60’s-style fuzz.
- FET Boost - Clean boost, great for a more musical level shift than a raw volume increase.
- Tape Dist - Simulates distorion as would be encountered when overdriving a studio reel-to-reel tape recorder.
- Full OD - Modeled after the modern day classic light OD. Great for a clean boost.
- Blues OD - Simulates the British pedal. A light OD w/ a break up reminiscent of early non-master volume pedals.
- Shred Dist - Simulates the British pedal w/ tons of gain and a huge mid-scoop. The original has a "contour" control which allows you to vary the width of the scoop. The model models the scoop with the contour control set halfway.
- M-ZoneDist - Simulates the BOSS Metalzone.
- Bender Fuzz - Model of the Sola Sound Tone Bender, first designed by electronics engineer Gary Stewart Hurst in 1965 (based on the Gibson-built Maestro Fuzz-Tone.)
- BB Pre - Model of the Xotic Pedals BB Preamp, a soft Distortion and Sustain pedal that produces a fat singing lead tone.)
- DRIVE - Sets the input drive level.
The Drive control has a range of 40 dB irrespective of the model it emulates. Many actual drive pedals have less range than this so there isn’t necessarily a one-to-one correspondence to the knob position on the model and the knob position on the emulated pedal. 5 - 10 for the Drive effect is equal to 0 - 10 on the emulated pedal. For example, an SD-1 has 30 dB of range so fully CCW on an SD-1 is equivalent to 2.5 on the model. A TS-9 (or 808 or 10) has only 20 dB of drive range, so you would need to set the Drive knob to 5.00 to replicate fully CCW on that pedal. With the Drive set to maximum it will always be the same as the Drive set to maximum on the emulated pedal. Same with the Level.
If you want to use a Drive pedal as a boost, set the Level near maximum and the Drive to minimum. Bring the Drive up until you achieve the desired amount of boost.
- TONE - Controls the tone of the effect.
- SLEW - This models the slew rate limiting produced by early op-amps. Increasing the SLEW LIMIT parameter limits the large signal frequency response of the virtual op-amp. Adjust to taste. Set to zero to deactivate.
- LEVEL - Sets the output level of the block
- BYP MODE - Selects the bypass mode of the block.
Pitch Shifter
The Axe-Fx Pitch Shifter has six basic modes of operation: Detune, Fixed Harmony, Intelligent Harmony, Whammy, Octave Divider, and Crystals. The Ultra adds Advanced Whammy, Arpeggiator, Custom Shifter and Auto Pitch. The mode is selected on the TYPE page. The Pitch Shifter can use one of two different algorithms when in the Fixed Harmony or Whammy modes. The algorithm is selected using the PITCH TRACK control. When set to ON, the Pitch Shifter will track the pitch of the incoming note and adjust various internal parameters accordingly. Setting PITCH TRACK to OFF ignores the pitch data and uses fixed parameter values. With pitch tracking off the sound can waver or flutter depending upon the note(s) played. With pitch tracking on the sound is typically smoother but complex chords may cause pitch instabilities.
The Ultra pitchshifter also allows you to select the source of the pitch data that the shifter will use when making pitch calculations. The global detector is unaffected by routings and is usually the best choice for single note usage. The integrated detector uses the signal input to the pitch block including any feedback within the block. This can enhance pitch stability when using feedback, whether internally, using the FEEDBACK parameters, or using the feedback blocks. When using the global detector and pitch feedback the pitched notes may sound a bit off if you stop playing since there will be no signal to determine pitch from. By using the internal detector the the pitch block is always obtaining pitch information even when you stop playing. The integrated detector may not work as well, however, if the data input to the block is distorted in amplitude or time (i.e. reverb, chorus, etc.).
The PITCH SOURCE parameter has three settings:
GLOBAL - In this mode the pitch information comes from the global pitch detector connected directly to the main inputs. This detector is optimized for speed and accuracy when playing single notes.
LOCAL MONO - In this mode the pitch information comes from the integrated pitch detector
connected to the input of the pitch block. In this mode the detector is optimized for speed and
accuracy when playing single notes. By using the input of the block as the data source this detector
can continue to track pitch if you are using feedback into the block and stop playing.
LOCAL POLY - In this mode the pitch information comes from the integrated pitch detector
connected to the input of the pitch block. In this mode the detector is optimized for polyphonic
sources, i.e. chords. The pitch tracking is necessarily slower but is more stable when playing
multiple notes. Due to the inexact definition of pitch for chords, the pitch detector may have
difficulty finding pitch on complex chord types. Simple chords, diads and triads, work best.
Detune
The Detune mode creates two voices that are slightly detuned from the input. The amount of detuning is adjustable between -50 and +50 cents. This mode is useful for creating double-tracked sounds or chorus-like effects.
Parameters
- V1,2 - Sets the detune amount for each voice. Attaching an LFO to these can be used to create chorus effects.
- LVL1,2 - Sets the volume level of the voice.
- PAN1,2 - Sets the panning of the voice.
Fixed harmony
The Fixed Harmony mode creates two voices that are fixed intervals from the input.
Parameters
- VOICE1,2 DETUNE - Sets the detune amount of the voice in cents. The range of +/- 50 cents. You can attach a controller to the detunes by pressing enter.
- VOICE1,2 SHIFT - Sets the shift amount of the voice in half-steps. The range of shift is +/- 12 half-steps.
- VOICE1,2 LEVEL - Sets the volume level of the voice.
- VOICE1,2 PAN - Sets the panning of the voice.
- VOICE1,2 DELAY - Sets the delay time of the as a function of the tempo.
- VOICE1,2 DLYTEMPO - Locks the delay time to the global tempo. For example, if the global tempo is 120 bpm and the tempo is set to a quarter note (1/4) then the time will be 500 ms (one echo per beat). To ignore the global tempo set the tempo control to NONE.
- VOICE1,2 FEEDBACK - Sets the feedback of the voice to the input. By delaying and feeding a voice back strange pitch effects can be created as the note is translated pitch again and again.
- PITCH TRACK - Setting this to ON instructs the pitch shifter to track the pitch of the input. For single note work this provides improved results. For chordal work this should be set to OFF as the pitch tracker obviously cannot determine the pitch of simultaneous tones.
- TRACK ADJUST - This control allows fine-tuning the pitch shifter “splice length”. For large shifts this control can help improve the quality of the shifted note.
Intelligent harmony
The Intelligent Harmony mode creates two voices that track the note you’re playing and remain within the key.
Parameters
- KEY - Sets the key that the harmony will be in.
- SCALE - Sets the type of scale (or scale mode) that the harmony will use. Examples are Ionian (major), Aeolian (minor), Whole Tone, etc. Set to CUSTOM to use custom scale tones (see below).
- TRACK MODE - Sets mode in which the harmony will track the input. SMOOTH allows the harmony note to follow bends and vibrato in the input. STEPPED locks the harmony to the nearest chromatic tone.
- TRACKING - Controls the tracking of the pitch shifter. Adjust for best sound. Higher values tend to sound better for higher shifts and vice-versa.
- GLIDE TIME - Sets the rate at which the harmony moves from the existing pitch to a new pitch.
- VOICE1,2 HARMONY - Sets the scale degree the voice will sound.
- VOICE1,2 DELAY - Sets the delay time of the voice in milliseconds.
- VOICE1,2 DLYTEMPO - Locks the delay time to the global tempo. For example, if the global tempo is 120 bpm and the tempo is set to a quarter note (1/4) then the time will be 500 ms (one echo per beat). To ignore the global tempo set the tempo control to NONE.
- CUSTOM NOTES - Sets the number of notes when using a custom scale. Custom scales can have between four and eight notes.
- TONIC - Sets the reference note for entering the custom scale. This is not a stored parameter and only serves to aid in defining the custom scale. Setting this to “C” allows defining your custom scale with C as the tonic. The actual key that the harmony will be in is set using the KEY parameter.
- NOTEn - These are the notes of your custom scale relative to the tonic set by TONIC. Set these to define the scale degrees.
Classic whammy
The Whammy mode allows control of the pitch shift via a control knob (normally you would connect this knob to a controller such as an expression pedal). There are two sub-modes: Whammy-Up and Whammy-Down. The difference between the sub-modes is the direction of the pitch shift. In Whammy-Up mode the pitch increases as the control is increased. In Whammy-Down mode the pitch decreases as the control in increased.
Parameters
- MODE - Selects the Whammy mode. Various amounts of shift are possible up to two octaves up and down.
- CONTROL - Adjusts the output pitch. Attach to a controller for dynamic control of the pitch.
- PITCH TRACK - Setting this to ON instructs the pitch shifter to track the pitch of the input. For single note work this provides improved results. For chordal work this should be set to off as the pitch tracker obviously cannot determine the pitch of simultaneous tones.
- TRACK ADJ - This control allows fine-tuning the pitch shifter “splice length”. For large shifts this control can help improve the quality of the shifted note.
Octave divider
The Octave Divider creates two new notes one and two octaves below the input. This effect simulates the classic effect and works by actually turning the input into a square wave and then dividing the signal by two using flip-flops. Like the classic effect, this effect only works on single notes and works best on notes above the fifth fret. Experiment with pickup selection and effect placement to achieve the best results.
Parameters
- LVL1,2 - Sets the volume level of the octaves.
- PAN1,2 - Sets the panning of the octaves.
- MIX - Sets the mix between the effect and input.
Crystals
The Crystals pitch shifter is similar to the Fixed Harmony but optimized for special effects. The effect works by chopping the audio up into little chunks and playing the chunks back (or "splicing" the chunks) at a different speed, thus allowing for interesting delay effects. The splice times in this effect are significantly longer than the times available in Fixed Harmony. It also features a reverse switch and extensive tempo options.
Parameters
- MASTER PITCH - Multiplies the pitch shift by this amount. For example, if the shift is set to 12 semitones and the Master Pitch is 50%, the shift amount will be six semitiones.
- MASTER FEEDBACK - Scales all the feedback amounts. You can attach a controller to this.
- VOICE1,2 DETUNE - Sets the detune amount of the voice in cents. The range of +/- 50 cents. You can attach a controller to the detunes by pressing enter.
- VOICE1,2 SHIFT - Sets the shift amount of the voice in half-steps. The range of shift is +/- 12 half-steps.
- VOICE1,2 LEVEL - Sets the volume level of the voice.
- VOICE1,2 PAN - Sets the panning of the voice.
- VOICE1,2 DELAY - Sets the delay time of the voice in milliseconds.
- VOICE1,2 DLYTEMPO - Locks the delay time to the global tempo. For example, if the global tempo is 120 bpm and the tempo is set to a quarter note (1/4) then the time will be 500 ms (one echo per beat). To ignore the global tempo set the tempo control to NONE.
- VOICE1,2 SPLICE - Sets the splice time of the voice (or "size" of the spliced chunks) in milliseconds.
- VOICE1,2 SPLTEMPO - Locks the splice time to the global tempo. For example, if the global tempo is 120 bpm and the tempo is set to a quarter note (1/4) then the time will be 500 ms (one echo per beat). To ignore the global tempo set the tempo control to NONE.
- VOICE1,2 FEEDBACK - Sets the feedback of the voice to the input. By delaying and feeding a voice back strange pitch effects can be created as the note is translated pitch again and again.
- DIRECTION - Sets the “direction” of the splice playback. Try setting to REVERSE for spacey effects.
- FEEDBACK TYPE - Selects the type of feedback. DUAL sends the individual voices back to their respective delay lines. BOTH mixes the voices and sends them back to both delay lines. PING-PONG sends each voice to the opposite delay line.
- HICUT FREQ - Sets the high-frequency rolloff of the pitched signal using a 12 dB / octave filter. This can be used to adjust the timbre of the voices.
- CROSSFADE - Sets the amount of overlap in the audio snippets. A low setting will make the echoes more discrete whereas a high setting will tend to smear the echoes.
- Important Note - The Crystals Algorithm was significantly change in frimware version 5 and beyond. To get pre 5.x patches to sound as intended do the following:
1. Set Master Feedback to 100%
2. Set splice times to half original value.
3. Set crossfade between 50-100%
Advanced whammy
The Advanced Whammy mode is identical to the Classic Whammy mode except that the start and stop shift amounts are controllable in semitone increments. This allows you to set the heel down to any amount of shift and the toe down to any amount of shift rather than being constrained to pre- programmed intervals.
Parameters
The parameters for the Advanced Whammy are the same as the Classic with the following differences:
- START - Sets the start pitch shift amount in semitones. This is the amount of pitch shift when the CTRL knob is in the minimum position.
- STOP - Sets the stop pitch shift amount in semitones. This is the amount of pitch shift when the CTRL knob is in the maximum position.
- FILTER - This can be used to adjust the timbre of the voices.
Arpeggiator
The Arpeggiator is a 16-stage sequencer that controls the pitch shift. Complex arpeggio patterns can be created just by playing a single note.
Parameters
- SCALE - Sets the type of scale (or scale mode) that the harmony will use. Examples are Ionian (major), Aeolian (minor), Whole Tone, etc. Set to CUSTOM to use custom scale tones (see Intelligent Harmony above for details).
- KEY - Sets the key that the harmony will be in.
- STAGES - Sets the number of stages in the pitch sequencer.
- REPEATS - Sets the number of times the sequence will repeat once triggered. Set to INFINITE to loop forever.
- RUN - When set to ON, the sequence starts. When set to OFF the sequence stops and resets to the beginning. Attach the envelope follower controller to this to retrigger the sequence on each new note.
- TEMPO - Sets the tempo at which the sequencer steps.
- GLIDE TIME - Sets the rate at which the harmony moves from the existing pitch to a new pitch.
- MASTER LEVEL - Controls the overall level of all the sequence stages
- AMPLITUDE SHAPE - Controls the shape of the output level as a function of the sequencer stage.
- AMPLITUDE ALPHA - Controls the rate of change of the output level as a function of the sequencer stage.
- MASTER PAN - Controls the overall level of all the sequence stages
- PAN SHAPE - Controls the shape of the output panning as a function of the sequencer stage.
- PAN ALPHA - Controls the rate of change of the panning as a function of the sequencer stage.
- STAGE n SHIFT - Sets the amount of pitch shift for the selected stage of the sequence.
Custom Shifter
The Custom Shifter is identical to the Intelligent Harmony except that it uses the custom shift tables stored in the global memory.
Parameters
All parameters are the same as the Intelligent Harmony mode with the following exceptions:
- VOICE n SCALE - Selects the custom Global Scale to use. See the Global section for more details on Global Scales.
Auto Pitch
The Auto Pitch mode corrects the pitch of the input. This can be used to correct vocal performances or as a special effect.
Parameters
All parameters for the Auto Pitch mode are described under the Intelligent Harmony mode.
Synth
The Axe-Fx UltraTM contains two dual-voice monophonic synthesizers. These are classic oscillator-based synthesizers and can be used to do synth leads with your guitar or other instrument input. Alternatively, they can be controlled manually.
Parameters
Each synth has two voices with the following parameters:
- TYPE - Selects the type of waveform. Sine and triangle are the smoothest while the square and ramp types are more “buzzy”. Available types are: sine, square, triangle, sawtooth up, sawtooth down, random, pink noise and white noise.
- TRACK - Selects the type of input tracking. OFF allows the frequency and level to be set manually via the FREQ and LEVEL controls. ENV ONLY selects the level to be controlled by the envelope of the input with the frequency set manually. PITCH+ENV selects the frequency and level to be controlled by the pitch and envelope of the input.
- FREQ - If input tracking is set to OFF or ENV ONLY this paramter sets the oscillator frequency.
- SHIFT - Shifts the frequency of the oscillator up or down in semitone steps. The oscillator can be shifted +/- 24 semitones.
- TUNE - Detunes the oscillator slightly. The oscillator can be detuned +/- 50 cents.
- DUTY - When using the TRIANGLE or SQUARE waveforms this parameter controls the duty cycle of the waveform.
- LEVEL - Controls the output level of the oscillator.
- PAN - Controls the panning of the oscillator.
- FILTER - Sets the cutoff frequency of a low-pass filter after the oscillator.
- Q - Sets the Q of the post-oscillator filter.
- ATTACK - Sets the attack time of the envelope follower on the input.
Tip
If the synth sounds too sterile, add an amp and/or a cab afterwards, or try to run it through a drive block (e.g. Tape drive).
Ring Modulator
The Ring Modulator is a double-sideband modulator that can be used to create harmonically unrelated tones from the input. The Axe-Fx Ring Modulator differs from the classic effect in that the frequency can be controlled by the pitch of the input.
Parameters
- FREQ - Sets the frequency of the oscillator.
- FMULT - Sets the frequency multiplier for the oscillator. The actual oscillator frequency is the the FREQ value times the FMULT value.
- TRACK - When this is set to ON, the frequency of the oscillator tracks the input pitch. The actual frequency is then the pitch times the FMULT value.
- LOCUT - Sets the cutoff frequency of a lowpass filter on the output.
Stereo Enhancer
The Stereo Enhancer is used to increase the apparent stereo separation between the left and right outputs. When used judiciously it can make a stereo track appear “fuller” and “wider”.
Parameters
- WIDTH - Sets the phase difference between the left and right channels. Adjust until the desired effect is achieved. Certain frequencies may cancel each other at various settings, experiment with this to achieve the desired enhancement and frequency response.
- INVERT - Allows inversion of the left or right channel if desired. Use in conjunction with the width control to adjust frequency and apparent widening.
- PAN - Sometimes the effect will cause a shift in the apparent localization of the instrument. The pan control may be used to compensate for this.
Effects Loop/Aux.Out
The Axe-Fx has a fully routable effects loop which allows you to use outboard processors anywhere in the signal chain. The effects loop can also be used as an auxiliary output for live stage monitoring through an amplifier and cabinet or as a general purpose output.
To use the effects loop as an auxiliary output the output of the block is simply not connected. Alternatively you can place the effects loop directly in the signal chain but not connect anything to the INPUT2 / EFF. RETURN jack. The Axe-Fx senses if the effects return is not used and then just uses the loop as an output.
To use the effects loop as an on-stage monitor with a guitar amp (or head and cabinet) place the loop BEFORE any cabinet simulation blocks. For example, if you want to send a fully processed, stereo feed to the P.A. system and monitor your sound on-stage you would set up a chain like the following:
AMP - CHORUS - DELAY - REVERB - EFFECTS LOOP - CABINET
Note that the effects loop is before the cabinet. The main output would then be fully processed including the cabinet simulation. If you were to send this signal to an amp/cabinet combination it would probably be excessively muddy.
If your on-stage monitoring equipment is full-range then you can place the effects loop after the cabinet or simply use the un-balanced OUTPUT1 jacks for monitoring and connect the balanced jacks to the P.A.
Mixer
The Mixer is a simple linear mixer that mixes the four rows feeding the block according to the gains for each row. The Mixer allows you to fine-tune levels, or cross-fade between effects. This is especially useful for cross-fading amps or delays.
Each gain control corresponds to a row in the routing matrix. To adjust, for example, the gain for the effect in row two preceding this block, simply adjust GAIN2.
The BALANCE controls allow you to select the balance of left and right from each stereo row summed into the outputs. For example, you can use set up a routing where two amp blocks feed a single cabinet block with one amp panned hard left, the other panned hard right. You can now fade between the two amp blocks using the PAN control. Attach the BALANCE control to a modifier for real-time control.
The controls are linear (as opposed to logarithmic like most other gain controls). This makes setting up cross-fades much easier.
Volume/Pan
The Volume / Pan block is a simple level and pan control block. It allows you to insert level and pan controls at any point in the routing matrix. It is a great way to control the level into or out of effects using an expression pedal.
Volume - controls the amount of volume cut
Balance - Pan signal left or right
Taper - allows for different volume curves
Feedback Send/Return
The Feedback Send and Return blocks allow you to feedback sound from one point in the routing to any other point.
The Send block has no parameters, while the Return block has a basic mixer. Adjust the MIX control to set the ratio of direct and feedback signals.
Best results are achieved when feeding back a pure delayed signal. If any direct signal is fed back the resulting loop will usually be unstable and/or sound strange due to phase cancellation.
Warning: Use caution with the Feedback blocks as you can easily program an unstable loop and cause internal clipping of the signal and/or very high sound levels which can damage your hearing. Always start with the MIX control on zero and slowly bring it up. If you start to hear squealing or other signs of instability return the MIX control to zero and analyze your routing for possible causes of instability.
