This is the wiki for products made by Fractal Audio Systems. Maintained by members of the community.
FX8
The FX8 is discontinued. The contents of this page are frozen and will not be updated.
Contents
- 1 References
- 2 About the FX8
- 3 FX8-Edit
- 4 Firmware
- 5 I/O
- 6 Pedal ports
- 7 Relays
- 8 Presets slots
- 9 Effects list
- 10 Buttons, knobs, switches
- 11 Tips, tricks and troubleshooting


References
About the FX8
Status
The FX8 was discontinued in 2019.
Final firmware version: 5.04.
Introduction
The FX8 provides effects for the gigging musician who uses his own amp(s) and cabinet(s), including specific "no tone suck" support for 4CM (Four Cable Method). It provides dedicated relays for amp channel switching and other amp functions. It does not provide amp and cab modeling.
- "This product is aimed at the person who doesn't want to use modeling. It is specifically designed for use with an amp. The I/O architecture was designed to integrate with tube amps." [1]
- "Just effects. Specifically designed for 4CM with dedicated pre- and post- paths. Up to 8 simultaneous effects. Any number assignable pre/post. Any combination of series or parallel routing. Two expression pedal inputs, four relay outputs. USB for remote editing with free FX8-Edit software. Silent Switch technology from the MFC Mark III. True Bypass. Etc., etc. Don't drop it on your foot." [2]
- "Amp channel switching? Yes."
- "Anything new that's not in the Axe-Fx II? True bypass and relay outputs. Longer Looper time. Other than that it's most of the fx from the Axe-Fx II in a floor package." [3] And: It doesn't have the vocoder or quad chorus. It has two instances of many effects (the ones where you'd want more than one). [4]
- "Note that each relay jack is TRS so there are two relays per jack so you get four relay outputs." [5]
- "You don't have to use TRS. With a mono cable obviously you'll only get one relay output." [6]
- "Internal, universal power supply." [7]
- "Will it respond to Program Change and CC commands? Yes, and it supports SCENES too."
- "The FX-8 is not a substitute for the MFC. It cannot function as a dedicated MIDI controller for the Axe-Fx. It will send basic MIDI commands but it is not intended to be a MIDI controller." [8]
- "It can't do the two-way comms that the Axe-Fx II uses. It can operate as a BASIC midi controller but it's not nearly as capable as an MFC. If all you need is PC, CC and expression then, yes, it can do that." [9]
- "I believe that the number one feature of this product is "No Tone Suck". The noise floor is amazingly low, you can't tell when the unit is engaged versus bypassed. The analog signal path design is pristine. We used these new Analog Devices premium op-amps which cost about 10x what other manufacturers typically use and the results are worth it." [10]
- "No fan." [11]
- "You can select whether True Bypass bypasses both the pre (before amp) and post (amp's loop) paths or just the pre path. Honestly though the noise floor is so low that you'd be hard pressed to tell whether it was true bypass or DSP bypass. The signal still goes through a buffer but bypasses the converters. I guess technically it should be called "Buffered True Bypass". The buffer has an extremely low self-noise." [12]
- "The FX8 has 128 different presets (patch); each preset has 8 scenes:
- Preset - up to 8 unique effects, configured in any desired Pre/Post configuration (4/4, 2/6, etc.)
- Scene - each scene saves the following effect states: On/Off, X/Y (when available).
- Spillover can be configured for both Preset transitions and Scene transitions.
- Each footswitch controls the On/Off and X/Y state of the corresponding effect. More transitions can be controlled through the use of Presets and Scenes.
- The Looper settings are stored with each Preset, but the audio is not.
- The FX8 groups the effects in the Pre (before the amp) Loop and Post (Effects Loop) Loop. There is a Pre/Post setting that is saved with each preset. Simply changing your Pre/Post setting to 8/0 will put all of your effects in the Pre loop." [13]
- "There are two Scene controllers that can be attached to modifiers. You can use one of the scene controllers to change the value of your Reverb hold from off to on, and back." [14]
- "There are 12 external controllers." [15]
- "Like the Axe-FX, there is a CPU meter, and you do have to be aware of your utilization." [16]
- "Bypassing the front end does work like other products and will reduce the added noise since it bypasses the converters and associated electronics. However the FX-8 is so quiet that any added noise is virtually imperceptible. The self-noise of the FX-8 is less than the self-noise of a typical electric guitar so the guitar itself becomes the dominant noise source. This was a challenging design point and I spent a lot of time figuring out how to make an A/D system that could meet that requirement. So, while you can bypass the front end (if you want to be a purist), it's not really necessary as the unit is so quiet anyways." [17]
- "Where effects are common to both units, you can export them from the Axe-FX, and import them into the FX8." [18]
- "Scene changes can set relay states and send MIDI without using effect blocks." [19]
- "You have 8 scenes per preset. Scenes do not necessarily change any effect unless you want. Additionally, you can use the relay block with X/Y settings allowing for two separate "On" states for the given relay. X/Y can be changed on any block using scenes or "stomp box" mode. If your amp requires a single relay output to transition to all three "On" states (Tip to Sleeve, Ring to Sleeve, and Both) then you will need to use scenes. Otherwise, either option will work for you, and it will be a matter of preference." [20]
- "No Amp or Cabinet simulation. Just effects (up to 8 at a time)." [21]
- "There are two methods for triggering the relay outputs: (2) Tie them to scene changes (2) Use a relay block in the grid - ties the block to a particular footswitch. Because they both rely on software to drive the relay(s), some CPU utilization is required (albeit a very small amount). However, if you do not wish to use scenes to drive the relay(s), then you have to tie the change to a foot switch. This consumes real estate in the grid as it also consumes a footswitch to drive the relay." [22]
- "There are 8 scenes per preset, corresponding to the 8 effect footswitches. When in STICKY SCENES are turned on, stepping on the SCENE/PRESET footswitch puts you in SCENE mode. Once in SCENE mode, each of the numbered footswitches will change to the active scene. Once you wish to return to STOMPBOX mode, step on the SCENE/PRESET footswitch again." [23]
- "USB is for configuration and MIDI only." [24]
- "The FX8 uses the standard USB MIDI drivers. No additional drivers are required." [25]
- "No driver is required. FX8 is fully class compliant." [26]
- "The Pedal inputs are not configured to handle two switches." [27]
- "The FX-8 was specifically designed to be a "Pro" unit. No BS, no whacky effects. What you get is straightforward, extremely high-quality effects and circuit design. The money is in the circuitry. It's very difficult to design something that is sonically transparent. To do so requires expensive parts. The I/O in/out of the converters is all balanced design which most consumer products don't use. This almost doubles the number of components needed (and hence the cost) but results in lower noise and distortion. The converters themselves are Cirrus Logic's "flagship" converters (= $$$$$). Our philosophy with the FX-8 and upcoming AX8 is no-frills, just absolute best sound quality in a convenient floor unit." [28]
- "Are the outputs buffered for long cable runs? Yes." [29]
- "The AX8 is not "way more powerful" than the FX-8. The AX8 has one additional DSP that is DEDICATED to amp modeling. If you don't use the amp modeling the AX8 has the same power as the FX-8. The AX8 will not work as well as the FX-8 in 4CM. It is not designed for that. It will do 4CM, as will most digital processors but the FX-8 is the only processor of which I'm aware that is truly optimized for 4CM. That optimization requires a lot of expensive circuitry. The op-amps used are very expensive and there's dozens of them just to support the 4CM stuff. Add to that relays for true bypass, metal film capacitors, etc., etc., and you end up with an expensive design. The FX-8 and AX8 are built on the same code base. There is a single folder that is used to build the common elements for both products. Enhancements to one automatically enhance the other. All this work we've been doing for the AX8 will improve the FX-8. The AX8 will be much more popular than the FX-8. That should be obvious. Most people want the amp modeling. If you don't care about the amp modeling then the FX-8 is the better product and the whole reason for having two different products."
- "The AX8 and FX-8 use the same converters (CS4272-CZZ) and op-amps. The circuit design in the FX-8 is necessarily much more complex to support true-bypass switching (without pops and clicks) and to optimize the outputs for use in 4CM." [30]
- "The FX8 was not designed for use with Global Blocks, and there are no plans to add them." [31]
- "The XL+ does not offer True Bypass, nor does it offer additional relay outputs for amp channel switching. So, we are back to the statement that the FX8 has additional circuitry optimized for 4CM. The True Bypass can be applied to the Pre stage, Post stage, or Both. Giving more flexibility when using 4CM." [32]
- "The FX8 is designed to run Humbuster cables on all of the outputs. If you are running mono, you will only need to run two Humbusters: one to the front input on your amp from Output Pre on the FX8, and one to the FX loop return from Output Post on the FX8." [33]
Specifications and manufacturing
- Dimensions: 16.35" x 3.96" x 10" (415.29mm x 100.6mm x 254mm)
- Weight: 11.5 lbs (5.2 kg)
- Switches: Fractal Audio's proprietary Solid State Switches, no mechanical contacts
- Screen: 160 x 80
- USB: 2.0 Type B
- Sample rate: 48kHz (fixed)
- Input impedance: 1 Megohm (depending on Input Impedance setting)
- Power supply: built-in switchable AC
"As soon as you put a power supply inside a product you are required by law to have a safety ground from the chassis to the third wire of the power cable. This can cause a ground loop. The GSP 1101 uses an internal supply and would be subject to ground loops depending upon the application. In the old days products only used 2-wire power cables and if a conductor shorted to the chassis it wouldn't necessarily blow a fuse and you could get electrocuted. Connecting the chassis to ground ensures that the circuit breaker will trip in the event that one of the power conductors shorts to the chassis. A wall-wart isolates the power supply outside the chassis inside a plastic housing which means that there is no requirement for the chassis to be connected to earth ground. The downsides of wall-warts are well known though. In certain applications (i.e. Hi-Fi) you can use a double-insulated power supply with no chassis safety ground but that is not permitted for "professional installations". With products that use internal power supplies if you encounter a ground loop you then need to either use isolation transformers or "cheater plugs" (which are dangerous). The FX-8 eliminates the need for these by using a simple, inexpensive cable. Some products have dedicated ground lift switches but you are required to have at least one switch grounded and if you don't you are inviting disaster (blown output drivers, etc.)." [34]
Originally, the FX8 was made in the USA. Manufacturing was shifted to China.
"The AX-8 and FX-8 are 100% made in China." [35]
"As soon as you put a power supply inside a product you are required by law to have a safety ground from the chassis to the third wire of the power cable. This can cause a ground loop. The GSP 1101 uses an internal supply and would be subject to ground loops depending upon the application. In the old days products only used 2-wire power cables and if a conductor shorted to the chassis it wouldn't necessarily blow a fuse and you could get electrocuted. Connecting the chassis to ground ensures that the circuit breaker will trip in the event that one of the power conductors shorts to the chassis. A wall-wart isolates the power supply outside the chassis inside a plastic housing which means that there is no requirement for the chassis to be connected to earth ground. The downsides of wall-warts are well known though. In certain applications (i.e. Hi-Fi) you can use a double-insulated power supply with no chassis safety ground but that is not permitted for "professional installations". With products that use internal power supplies if you encounter a ground loop you then need to either use isolation transformers or "cheater plugs" (which are dangerous). The FX8 eliminates the need for these by using a simple, inexpensive cable. Some products have dedicated ground lift switches but you are required to have at least one switch grounded and if you don't you are inviting disaster (blown output drivers, etc.)." [36]
Differences between original FX8 and Mark II
"In comparison to the original FX8, the Mark II has a black bezel and end caps plus an improved silkscreen design -- the #1 footswitch is now in the lower left, and "F" labels are used for the three programable switches. In addition, a new option allows the pad on the instrument input to be set at a maximum of 18dB (vs, 12dB previously) making the unit more suitable with ultra-high output guitars and basses. Finally, outputs have an even lower noise floor! All FX8 presets are fully cross-compatible between the original and Mark II models. Footswitch assignments stay in their original physical positions instead of following the numbers. FX8-Edit automatically detects which model is connected and adjusts itself accordingly." [37]
"The two units, FX8 and FX8 Mark II require different firmware. Two key differences explain why: (1) The extra input pad needs to be settable on one unit and not the other. (2) The footswitches are numbered differently based on customer feedback. Therefore, it is extremely important that the decision about which firmware to install not be ambiguous. Customers not familiar with the product history should have an easy time of it. Sure, we could have called it the FX8-B (or anything else) but the terminology "Mark II" is one we've used before for similar changes, so this is a consistent naming increment, and we wanted it to stand out on." [38]
"The Mark II has lower noise output buffers. The reduction in noise is around 3-4 dB IIRC. Whether or not that is audible with your particular amp is not known." [39]
Presets can be transferred between both models, using the editor. Preset switch locations will automatically be renumbered.
Comparing the FX8 to the AX8 and Axe-Fx
"The only product more transparent than the FX-8 is the Axe-Fx III." [40]
"The analog signal path in the Axe-Fx III is the same as the FX8." [41]
"Anything new that's not in the Axe-Fx II? True bypass and relay outputs. Longer Looper time. Other than that it's most of the fx from the Axe-Fx II in a floor package." [42]
"It doesn't have the vocoder or quad chorus. It has two instances of many effects (the ones where you'd want more than one)." [43]
"It can't do the two-way comms that the Axe-Fx II uses. It can operate as a BASIC midi controller but it's not nearly as capable as an MFC. If all you need is PC, CC and expression then, yes, it can do that." [44]
"The AX8 is not "way more powerful" than the FX-8. The AX8 has one additional DSP that is DEDICATED to amp modeling. If you don't use the amp modeling the AX8 has the same power as the FX-8. The AX8 will not work as well as the FX-8 in 4CM. It is not designed for that. It will do 4CM, as will most digital processors but the FX-8 is the only processor of which I'm aware that is truly optimized for 4CM. That optimization requires a lot of expensive circuitry. The op-amps used are very expensive and there's dozens of them just to support the 4CM stuff. Add to that relays for true bypass, metal film capacitors, etc., etc., and you end up with an expensive design. The FX-8 and AX8 are built on the same code base. There is a single folder that is used to build the common elements for both products. Enhancements to one automatically enhance the other. All this work we've been doing for the AX8 will improve the FX-8. The AX8 will be much more popular than the FX-8. That should be obvious. Most people want the amp modeling. If you don't care about the amp modeling then the FX-8 is the better product and the whole reason for having two different products."
"The AX8 and FX-8 use the same converters (CS4272-CZZ) and op-amps. The circuit design in the FX-8 is necessarily much more complex to support true-bypass switching (without pops and clicks) and to optimize the outputs for use in 4CM." [45]
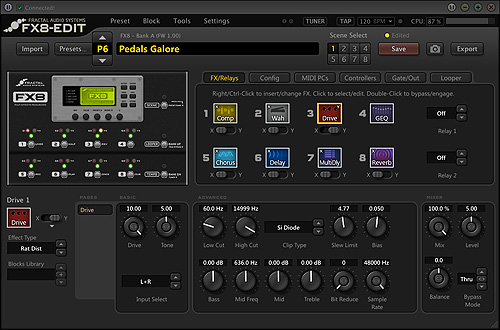
FX8-Edit
Read this: Editors
Firmware
I/O
- IN [PRE] (INSTR) – 1/4", mono, instrument level, unbalanced, 1 Megaohm (depending on Input Impedance setting), max 16dBu, instrument level
- OUT [PRE] – 1/4", L/R, (L/Mono), unbalanced, Humbuster, 600 ohm, max 20dBu
- IN [POST] – 1/4", L/R, line level input (+4dBu), 1 Megaohm, balanced, max 20dBu
- OUT [POST] – 1/4", L/R, unbalanced, HumBuster, 600 ohm, max 20dBu
Read this:
Pedal ports
The pedal ports let you connect expression pedals and/or external switches.
An expression pedal should have a linear resistance taper, max resistance of 10 kOhm to 100 kOhm, and requires a TRS-to-TRS cable. The pedal must be calibrated before use in the I/O menu.
An external switch can be a momentary or latching one, and uses a TS-to-TS cable.
Use the I/O > PEDAL menu to let the hardware know what type of external switch you're connecting:
- if a latching (aka "toggle") switch is connected, set TYPE to “LATCHING”
- if a momentary switch (such as a sustain pedal) is connected, you have two options:
- set TYPE to “MOMENTARY” and the device will recognize alternate stomps as ON and OFF, creating a “virtual” latching footswitch
- set TYPE to “CONTINUOUS” if you want the switch to turn on when you press, and off when you release it
"The Pedal inputs are not configured to handle two switches". [46]
"The FX8 pedal assignments are always global." [47]
"Pedals are always running. If nothing is plugged in there is a pull-up resistor that pulls the pedal value to 100%." [48]
Relays
The FX8 is able to switch amp channels and other amp functions: Relays.
Presets slots
Number of preset slots:
- 128
About the factory presets:
- Read this: Factory presets
Effects list
Click on the image below:

Buttons, knobs, switches
Operating requires the use of buttons (PAGE, ENTER, etc.), footswitches and the following knobs:
- NAV — navigates between the 8 footswitches, changes the value of the first on-screen knob and scrolls up and down through a vertical menu. In the Global EQ and GEQ blocks, it shifts bands
- VALUE' — steps through the effects/functions list for the current switch, changes the value of the second on-screen knob and changes the highlighted parameter
- PRESET/A — steps through PRESETS/BANKS, changes the value of the third on-screen knob and changes the parameter labeled A
- SCENE/B — selects a SCENE, changes the value of the fourth on-screen knob (if any) and changes the parameter labeled B
- C — changes the value of the fifth on-screen knob (if any) and changes the parameter labeled C
There's no 4x12 grid like in the Axe-Fx and AX8.
Switches
The main screen on the FX8 is the Footswitch Page (FS), which displays 8 switchable blocks, assigned to effects. You can also assign other functions, aka "footswitch blocks". You assign an effect or function by selecting a footswitch, turning the VALUE knob and pressing ENTER. Select from:
- None
- Effects (present on the Config page)
- Looper Mode
- Bank Up / Bank Down
- Scene 1-8
- Scene 1/2 toggle
- Preset 1-8
- Relay 1 and 2
- MIDI 1 and 2
IMPORTANT: before you can assign an effect to a footswitch, you need to add the effect on the CFG page first. Use VALUE to select the effect and press ENTER. To access the CFG page from the FS page, press Page. To leave the CFG Page, press EXIT (depending on the EXIT setting in the Global menu).
On the CFG page you can specify whether an effect slot operates in SERIES or PARALLEL (depending on the preset configuration) and the effect's X/Y state (if available).
Footswitch assignments do not affect effect blocks or their order.
You can turn a footswitch into a "global" footswitch, forcing its assigned function to be the same across all presets. Footswitches are designated as either "Global" or "Per-Preset" using the Global Footswitch (“GBL FS”) page in the GLOBAL Menu.
You can assign multiple footswitches to the same effect block. This enables you to, for example, assign a latching AND a momentary switch to the same effect.
F-switches

In Global > F-switch you can assign functions to the 3 switches at the right. Each switch supports a Press action and a Press-and-Hold action. Select from:
- None
- Single / Sticky Preset/Bank (only available on F1)
- Sticky Preset +/-
- Single Scene or Sticky Scene
- Scene 1/2 Toggle
- Preset Up / Preset Down
- Bank Up / Down
- Tempo Tap
- Tuner
- Single / Sticky X/Y
- Looper Mode
- True Bypass
- Exit (exits Large Preset Display)
Using the editor simplifies the assignment of footswitches.


Shortcuts
CFG page:
- EXIT — recalls the FS screen
- 2x EDIT — switches between X/Y
- 2x ENTER — bypasses or engages the effect
- ENTER — swaps an effect
- To remove an effect: select NONE after turning VALUE.
Within a block's EDIT menu:
- 2x ENTER — resets the effect
Global GEQ:
- ENTER — flattens the selected slider
- 2x ENTER — flattens all bands and gain
Sequencer:
- ENTER — randomizes the values
Switch presets
- Press a switch assigned to Single Preset, use the BANK up or DOWN switches to scroll to the desired Bank and press switch 1-8. After selecting a preset, the unit will return to its operational mode. To make the unit stay in Preset Mode, set the switch to Sticky Preset.
- Send a MIDI Program Change to the unit.
- Assign switches to Preset Up and Preset Down.
- Turn "Preset/A".
The FX8 does not provide a "global preset" feature. Here's a workaround:
- Set one of the 1-8 switches to "Global latching" (Global menu).
- Assign that switch to the preferred preset in the bank (FS page).
- Now press that switch at any time to immediately recall the preferred preset.
- To make it work across multiple banks, copy and paste the preferred preset to the same position in those banks.
The parameter "Display Large Preset" in the Global menu enables or disables the display of preset titles in a large font size, and the number of seconds (or "always") that you want it displayed.
The Bank Limit parameter in the Global menu simplifies preset and bank selection during a live performance. It limits the available banks you can access through the footswitches with an UPPER and LOWER limit. Bank Limit is available in the Global menu.
There are three parameters:
- NO — banks are NOT limited, Lower and Upper limit settings are IGNORED
- WRAP — banks ARE limited and will wrap around from the highest back to the lowest (or vice versa)
- NO WRAP — banks ARE limited and will NOT wrap
Read this: Presets.
Switch scenes
There are several ways to switch between scenes:
- Press the F-switch assigned to Scenes, and press switch 1-8. After selecting a scene, the unit will return to its operational mode. To make the unit stay in Scene Select Mode, set it to Sticky Scene.
- Send MIDI Control Change 34 (Scene Select) to the unit, with value 0 for scene 1, value 1 for scene 2, etc.
- Turn "Scene/B".
In the Global menu you can specify the default scene for all presets. This includes the possibility to specify: Current scene. This means that when switching presets, the device will stick to the current scene number. You can also set the preferred scene per preset.
Read this: Scenes.
Switch behavior
Press & Hold interval
You can specify in the Global menu how long you need to press and hold a switch to engage its “hold switch” functionality.
You can also disable press-and-hold, see below.
Single versus Sticky
Single — lets you press a switch to select a scene and then returns the switches to their regular function
Sticky — lets you press a switch to select a scene, and then keeps the switches assigned to scenes
Up-stroke versus down-stroke
By default the unit engages or bypasses an effect or function when "releasing" a switch. This is necessary for the "press-and-hold" functionality.
You can make the switch activate immediately when pushed:
- disable PRESS/HOLD FOR XY in the Global menu
- or: assign Single X/Y or Sticky X/Y to a F-switch at the right side
With press-and-hold disabled, operating the unit feels faster. But you can no longer hold a switch to switch an effect between X/Y.
Also, when you set the “HOLD” function of any F-switch to “NONE”, its TAP function switch will execute on the switch down-stroke instead of the up-stroke.
Latching or momentary
A latching switch switches on or off, when you press it, and switches to the other state when pressing it again.
Momentary switches do not “latch” when you step on them. They engage while your foot is down on the switch, and stop when you lift it up. Any of the numbered footswitches may be designated as MOMENTARY. This can be done either GLOBALLY (Global menu) or PER-PRESET (Config page).
If a momentary footswitch is used to BYPASS/ENGAGE effects, the effect state will be reversed by the action of the switch. A block that is saved as ENABLED will be momentarily bypassed. A block that is saved as BYPASSED will by momentarily enabled. The same is true for a momentary footswitch assigned to SCENE 1/2 Toggle: depending on whether Scene 1 or Scene 2 is selected, the switch will momentarily toggle to the other.
The settings on the CONFIG > FS MODE page have no effect for a footswitch if it is set to one of the GLOBAL options on the GBL FS page.
The FX8 lets you assign multiple footswitches to the same effect block. This enables you to, for example, assign a latching and a momentary switch to the same effect.
Looper Mode
Looper Mode turns the switches into Looper controls. The FX8 has the switches labeled.
Bypass the AD/DA converters
The FX8 allows you to physically bypass (disable) the analog-to-digital and digital-to-analog converters between IN and OUT. Aka "True Bypass". This disables ALL processing. It will for example mute Looper playback, all effects will by disabled, it'll stop delay repeats, it'll ignore level settings etc.
Even though the FX8 does not suck tone and is completely transparent, some users value the ability to completely bypass the A/D and D/A converters. Also, True Bypass enables you to compare gain settings, compare stuff etc.
In each preset you can specify on the Config page if True Bypass applies to the PRE stage, the POST stage, or ALL.
"On the CFG tab of the main screen, there is parameter called "BYPASS". It's values are PRE, POST, and ALL. By setting this to PRE, any time TRUE BYPASS is engaged, it will only bypass the effects block in the PRE stage".
"TRUE BYPASS does not mute the audio, it engages circuitry that bypasses the Digital converters. The audio is routed from Input Pre to Output Pre". [49]
To engage True Bypass, press (or hold) the switch assigned to True Bypass.
"Automatic True Bypass" is a option (Global menu) that will automatically engage True Bypass when all effects are bypassed. This works per signal chain (PRE and POST), without affecting the other signal chain.
"The XL+ does not offer True Bypass, nor does it offer additional relay outputs for amp channel switching. The FX8 has additional circuitry optimized for 4CM. The True Bypass can be applied to the Pre stage, Post stage, or Both. Giving more flexibility when using 4CM." [50]"
Tips, tricks and troubleshooting
Amp and speaker simulation on the FX8
Read this: FX8 and speaker simulation.
Improving readability of preset list
Improve the readability of the preset titles in the Single/Sticky Preset screen, by adding spaces to each consecutive preset name:
- preset 2 starts with one space
- preset 3 with two spaces
- preset 4 with 3 spaces
Then start over again.
Make sure to not add too many spaces, because this will push titles off the screen when recalling that preset.
Mounting the FX8 on a pedalboard
You can remove the rubber feet of the AX8 to mount it on a pedalboard with Velcro.
WARNING: do not use the same screws again. Use substitute screws. You need M3.5 x 6mm flat head screws. [51]