This is the wiki for products made by Fractal Audio Systems. Maintained by members of the community.
AX8
The AX8 (amp modeler and multi-effects pedalboard) is discontinued. The contents of this page are frozen and will not be updated.
Contents


References
Pictures of AX8 rigs
AX8 owners proudly show their rigs
About the AX8
Discontinued
April 2019: the AX8 is discontinued.
The final firmware version 10.01 incorporates some of the “Ares” modeling from the Axe-Fx III.
Introduction
The AX8 is an all-in-one floor version of the Axe-Fx II, designed for the gigging musician. It provides amp modeling and UltraRes speaker cab sims, plus hundreds of effects and the familiar 4x12 grid, with the same quality as the Axe-Fx II. It has multiple outputs offering Humbuster technology, SPDIF output and an effects loop. It differs from the Axe-Fx II in that it offers only one instance per preset of amp, cab and some effects blocks (e.g. Reverb, Flanger, etc.). Also, certain esoteric effects found on the Axe-Fx II are not included in the AX8 (Vocoder, Megatap, Multiband Compressor etc.).
"It is not an Axe-Fx. It won't be able to do two amps or two cabs. It won't have things like the Vocoder and other esoteric blocks. It's a stripped down floor version at an aggressive price. It will have G3 modeling and user IR slots. It has two dual-core DSPs, one for amp modeling the other for effects. These DSPs are slower than the ones in the Axe-Fx so it won't be able to do two instance of amps. There will be block compatibility between the Axe-Fx and the AX8 meaning you can copy blocks from your Axe-Fx presets into the AX8. It has USB, XLR outs for FOH, 1/4" outputs for local monitoring and an FX loop. Four expression pedal inputs. AC powered, no wall-wart." [1]
"When I designed the AX8 I designed a product based on my 25 years playing as a pro and what I used 99% of the time during a gig. Even with the Axe-Fx II 99% of the time I dial up an amp, a cab and a few effects. What I care about most is a great tone. The Axe-Fx amp modeling algorithms are the best in the world. I wanted to design something portable and affordable enough to get those algorithms into the hands of a lot more players." [2]
"The DSPs used in the Axe-Fx are far too costly and require exotic cooling that is not suitable for a floor application. The AX8 covers the needs of 99% of performing guitar players." [3]
"The AX8 is not "way more powerful" than the FX8. The AX8 has one additional DSP that is DEDICATED to amp modeling. If you don't use the amp modeling the AX8 has the same power as the FX8. The AX8 will not work as well as the FX8 in 4CM. It is not designed for that. It will do 4CM, as will most digital processors but the FX8 is the only processor of which I'm aware that is truly optimized for 4CM. That optimization requires a lot of expensive circuitry. The op-amps used are very expensive and there's dozens of them just to support the 4CM stuff. Add to that relays for true bypass, metal film capacitors, etc., etc., and you end up with an expensive design. The FX8 and AX8 are built on the same code base. There is a single folder that is used to build the common elements for both products. Enhancements to one automatically enhance the other. All this work we've been doing for the AX8 will improve the FX8. The AX8 will be much more popular than the FX8. That should be obvious. Most people want the amp modeling. If you don't care about the amp modeling then the FX8 is the better product and the whole reason for having two different products." [4]
Specifications and manufacturing
- Dimensions: 16.1” x 4.0” x 10.3” (410mm x 101mm x 262mm)
- Weight: 11.8 lbs (5.4 kg)
- Processors: two dual-core 450 MHz ADSP-21469s, two microcontrollers (one is dedicated to amp modeling, the other to effects and housekeeping). Cab processing runs in an accelerator
- Screen: 160 x 80
- Sample rate: 48kHz (fixed)
- Input impedance: 1 Megohm (fixed)
- Headphones output: none
- Power supply: built-in switchable AC power
- LED-Ring amp controls: Drive, Bass, Mid, Treble, Presence, Depth, Master, Level
"The AX8 was built to a price point with quality of sound the primary consideration. It's primary use is as a live performance product. A color LCD and USB audio were not deemed pertinent for the intended application. Had those been included the price would be much higher than $1399." [5]
"The AX8 isn't exactly featherweight either though. It has a heavy steel chassis and aluminum end-caps. It's pretty heavy but very durable." [6]
Originally, the AX8 was made in the USA. Manufacturing was shifted to China.
"The AX-8 and FX-8 are 100% made in China." [7]
"Final test, programming and QC will still be done in the US. We test and inspect every unit. We do not do random sampling. Every single unit is put through a full functional test and inspection. A second QC operation is then performed prior to shipping. Costs more but results in less returns due to defects." [8]
"Our warehouse, shipping center, and engineering lab are in Plaistow NH. The real heart of the AX8—the firmware and all the software, are made in America. The design and mechanical are done here too. The unit is assembled in China using components sourced globally sourced components. In the context of such questions I always point out how the computers we're chatting through are made—who knows where—but in a global economy, what matters in the context of your such a question is that Fractal Audio Systems is an American company, with high quality overseas partners who handle certain physical aspects of getting the product made." [9]
Processing
(Does the cab/mic/ir use the fx dsp or share the amp dsp?)
"Neither really. They are done in an a separate accelerator so they have minimal CPU loading. An accelerator is a DSP unit dedicated to performing a defined task. In this case it performs convolution. The difference is that a "DSP" as we commonly call them is really just a microcomputer optimized for Digital Signal Processing. The term DSP most correctly refers to any device that does signal processing using numerical computations. That device can be an FPGA, ASIC or fixed hardware unit. In the AX8 it is a convolution processor." [10]
"The AX8 has two ADSP-21469s and two microcontrollers. It will only do one amp model at a time. Our amp modeling algorithms use up the entirety of one DSP. The second DSP is running at over 90% utilization. That's how detailed our algorithms are." [11]
"The TigerSHARC architecture is vastly superior to the SHARC, and it's a shame it has been discontinued. In our tests a TigerSHARC performs about 50% faster clock-for-clock. Then factor in the higher clock speed and it's about twice as fast. See here for independent benchmarks: http://www.bdti.com/MyBDTI/bdtimark/chip_float_scores.pdf. The newest SHARCs are the same as the 213xx except they have the FIR accelerator. As one can see a TigerSHARC (Axe-Fx's use the ADSP-TS201S) is about twice as fast. (...) The TigerSHARC has a more modern core and much better architecture (larger register file, wider buses, better DAG units, etc). It can do six floating point operations per clock. In practice this is two multiplies, two adds and two store/fetch instructions. This means a 4096 point IR only requires 2048 clock cycles. Secondly the TigerSHARC has a much wider bus than a SHARC. The TigerSHARC has a 512 bit bus whereas a SHARC has a 128 bit bus. The TS can move data around much faster and pipeline stalls due to bus contention are far less frequent. It can load or store eight words in a single clock cycle whereas a SHARC is hard pressed to do two. The TS also has a LOT more on-chip memory. A TS has 24 Mbits of on-chip memory compared to 5 Mbits for the best SHARC. This means more code/data in fast memory and less stalls waiting for data access. Also the TS has a superior cache unit which caches both instructions and data, as opposed to instructions only on a SHARC. There are numerous other improvements as well including better DMA engine, better interrupt handling, vastly superior 40-bit floating point support (which we use for amp modeling), etc. Having written hundreds of thousands of lines of code for both (including coding the SHARC's FIR accelerator) my experience is that the TS is a much better chip but it is much more expensive. We moved to SHARCs for our floor processors for a variety of reasons but performance was definitely not one of them. The FIR accelerator is nice and all but it only applies to cab modeling which is a small percentage of a typical preset. On an Axe-Fx II a stereo Hi-Res cab block only uses 11% of the DSP. On an AX-8 it's still a couple percent as the accelerator doesn't handle everything needed in the block. So the net savings is less than 10%. The rest of the effects then run about twice as fast which means almost twice as many effects per preset on an Axe-Fx compared to an AX-8. While "all about the code" has some merit, in reality it's "all about a lot of things" including the architecture and clock speed. Algorithm complexity is also very important and it becomes diminishing returns (i.e. it takes twice as much CPU to improve the sound quality 10%). If it were just about the code everyone would still be using the original 33 MHz SHARCs. The TigerSHARC enjoyed a long run as the best DSP on the market but, alas, all good things must come to an end. The good news is that Atomic, Fractal and Line6 are all using the same DSP family in their respective floor products so it's highly unlikely Analog Devices will discontinue them and there are now more choices for the consumer." [12]
"The latency is the same as the Axe-Fx II." [13]
"Latency is fixed and does not change with CPU usage. It's less than 2 ms." [14]
(How many effects can you run at a time?)
"Depends on the effects but typically 8-10 in addition to amp and cab. The amp and cab block use very little of the main DSP. The amp runs in a dedicated DSP and the cab processing runs in an accelerator. Therefore most of the main DSP is available for effects." [15]
"You can have more than 8 effects in a preset. For example, you could have 12 effects in a preset. You then assign which of those effects you want to be able to switch on and off via the footswitches." [16]
"Our modeling is very detailed and whenever the amp model changes the "virtual circuit" needs to be reconfigured. We can switch quickly but often this causes clicks and pops due to the reconfiguration. So the amp block needs to run silently for a bit so things will settle. Then we unmute the block. This mute period is what you are hearing. Most other products just use a fixed algorithm and change the input/output EQ and gain. With this type of algorithm you can switch quickly without clicks and pops but, of course, you don't get the realism and detail." [17]
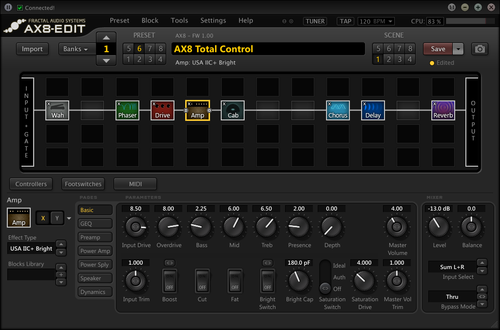
AX8-Edit
Read this: Editors
Firmware
I/O
- IN 1 (INSTRUMENT) – 1/4", mono, unbalanced, 1 Megaohm (fixed), max. 16dBu, instrument level
- OUT 1 (MAIN) – XLR, L/R, balanced, 600 ohm, max.20dBu
- OUT 1 (MAIN) – 1/4", L/R, unbalanced, Humbuster, 600 ohm, max. 20dBu
- IN 2 (FX RTN) – 1/4", L/R, balanced, 1 Megaohm, max. 20dBu
- OUT 2 (FX SEND) – 1/4", L/R, unbalanced, Humbuster, 600 ohm, max. 20dBu
- SPDIF digital out, 24-bit, 48kHz (fixed)
Read this:
Pedal ports
The pedal ports let you connect expression pedals and/or external switches.
An expression pedal should have a linear resistance taper, max resistance of 10 kOhm to 100 kOhm, and requires a TRS-to-TRS cable. The pedal must be calibrated before use in Setup : I/O : Pedal.
An external switch can be a momentary or latching one, and uses a TS-to-TS cable.
Use the I/O > PEDAL menu to let the hardware know what type of external switch you're connecting:
- if a latching (aka "toggle") switch is connected, set TYPE to “LATCHING”
- if a momentary switch (such as a sustain pedal) is connected, you have two options:
- set TYPE to “MOMENTARY” and the device will recognize alternate stomps as ON and OFF, creating a “virtual” latching footswitch
- set TYPE to “CONTINUOUS” if you want the switch to turn on when you press, and turn off when you release it
Presets
Number of presets:
- 512
About the factory presets:
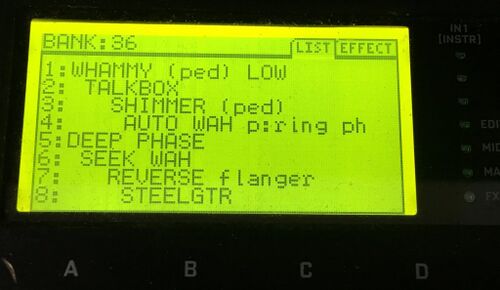
Effects list
Click on the image below:

System reset
Buttons, knobs, switches
Operating the AX8 requires the use of buttons (PAGE, ENTER, EXIT etc.), footswitches and the following knobs:
A — changes values
B — changes presets on the FS page and changes parameter values
C — changes scenes on the Footswitch page and Layout page, and changes parameter values
D — operates as a vertical navigation control in menus and on the grid, and changes parameter values
E — operates as a block-by-block navigation control on the grid, and changes parameter values. In the Global EQ, GEQ blocks and Graphic EQ in the Amp block, it shifts bands
ENTER/EXIT — perform double-duty as horizontal navigation controls when SHIFT is pressed. Use these to access the modifier menu of a parameter. Note that SHIFT only works for a single movement/action, unless it's locked (press and hold)
SHIFT — used for secondary functions: to access the global menus, to switch to the previous menu page, to bypass an effect, as an editing shortcut
The AX8 provides 8 physical amp controls: Drive, Bass, Mid, Treble, Presence, Depth, Master, Level.
Switches
The main screen on the AX8 is the Footswitch Page (FS), which displays 8 switchable blocks, assigned to effects. You can also assign other functions, aka "footswitch blocks". You assign an effect or function by selecting a footswitch, turning the VALUE knob and pressing ENTER. Select from:
- None
- Effects (present on the Layout page)
- Looper Mode
- Bank Up / Bank Down
- Scene 1-8
- Scene 1/2 toggle
- Preset 1-8
- Amp X/Y
- Control Switch
IMPORTANT: before you can assign an effect to a footswitch, you need to add the effect to the grid on the Layout page first. Use VALUE to select the effect and press ENTER. To access the Layout grid from the FS page, press Page. To leave the grid, press SHIFT + PAGE or EXIT (depending on the EXIT setting in the Global menu).
Footswitch assignments do not affect effect blocks or their order.
You can turn a footswitch into a "global" footswitch, forcing its assigned function to be the same across all presets. Footswitches are designated as either "Global" or "Per-Preset" using the Global Footswitch (“GBL FS”) page in the Global Menu.
You can assign multiple footswitches to the same effect block. This enables you to, for example, assign a latching AND a momentary switch to the same effect.
"The switches are multi-function. They operate as preset, scene, looper or bypass switches. There are four expression pedal inputs. There is a stereo effects loop. The dedicated knobs control only those parameters for which they are indicated. There are five soft knobs under the display that are used for adjusting other parameters." [18]
"Footswitches are freely assignable. There is a footswitch assign menu." [19]
"The AX8 uses assignable switches. So rather than a dedicated Looper control mode, you can choose which Looper controls you want on the assignment page. Most people don't use all the Looper controls so this system is more flexible." [20]
"The eight main footswitches are assignable per preset. A screen shows you at glance what each switch controls. The function switches are configurable globally." [21]
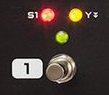
F-switches

In Global > F-switch you can assign functions to the 3 switches at the right. Each switch supports a Press action and a Press-and-Hold action. Select from:
- None
- Single / Sticky Preset/Bank (only available for F1)
- Sticky Preset +/-
- Single / Sticky Scene
- Scene 1/2 Toggle
- Preset Up / Preset Down
- Bank Up / Down
- Tempo Tap
- Tuner
- Single / Sticky X/Y
- Looper Mode
- Exit (exits Large Preset Display)
Using the editor simplifies the assignment of footswitches.
Shortcuts
FOOTSWITCH page:
- ENTER — swaps footswitches
- EXIT — removes a footswitch
LAYOUT page:
- SHIFT > 2x EDIT — switches the selected block between X/Y. The current state of the selected block is shown at the bottom of the Layout page
- EXIT — recalls the FS screen (depending on the setting in the Global menu)
Within a block's EDIT menu:
- 2x EDIT — toggles X/Y
- SHIFT > 2x EDIT — resets the effect
- ENTER — flattens the selected slider
- SHIFT > 2x EDIT — resets all sliders
AMP GEQ page:
- ENTER — flattens all bands
Sequencer:
- ENTER — randomizes
Switch presets
- Press a switch assigned to Single Preset, use the BANK up or DOWN switches to scroll to the desired Bank and press switch 1-8. After selecting a preset, the unit will return to its operational mode. To make the unit stay in Preset Mode, set the switch to Sticky Preset
- Send a MIDI Program Change to the unit
- Assign switches to Preset Up and Preset Down
- Turn "B" while on the FS page
The AX8 does not provide a "global preset" feature. Workaround:
- Set one of the 1-8 switches to GLOBAL LATCHING (Global menu)
- Assign that switch to the preferred preset in the bank (FS page)
- Now press that switch at any time to immediately recall the preferred preset
- Copy and paste the preferred preset to the same position in every bank.
The parameter DISPLAY LARGE PRESET in the Global menu enables or disables the display of preset titles in a large font size, and the number of seconds (or "always") that you want it displayed.
Note: If you have DISPLAY LARGE PRESET set to ALWAYS, it isn't possible to enter the SETUP menu from the main footswitches page ("FS"). To work around this, simply press EDIT first to enter any block's edit menu, then proceed to SETUP from there.
The BANK LIMIT parameter in the Global menu simplifies preset and bank selection during a live performance. It limits the available banks you can access with the footswitches by setting an UPPER and LOWER limit. Bank Limit is available in the Global menu.
There are three parameters:
- NO — banks are NOT limited, Lower and Upper limit settings are IGNORED
- WRAP — banks ARE limited and will wrap around from the highest back to the lowest (or vice versa)
- NO WRAP — banks ARE limited and will NOT wrap around
Switch scenes
- Press the F-switch assigned to Scenes, and press switch 1-8. After selecting a scene, the unit will return to its operational mode. To make the unit stay in Scene Select Mode, set it to Sticky Scene
- Send MIDI Control Change 34 (Scene Select) to the unit, with value 0 for scene 1, value 1 for scene 2, etc.
- Turn "C" knob while on the FS or LAYOUT page
In the Global menu you can specify the default scene for all presets. This includes the possibility to specify: Current scene. This means that when switching presets, the device will stick to the current scene number. You can also set the preferred scene per preset.
Switch behavior
Press & Hold interval
You can specify in the Global menu how long you need to press and hold a switch to engage its “hold switch” functionality.
You can also disable press-and-hold, see below.
Single versus Sticky
Single — lets you press a switch to select a scene and then returns the switches to their regular function.
Sticky — lets you press a switch to select a scene, and then keeps the switches assigned to scenes.
Up-stroke versus down-stroke
By default the unit engages or bypasses an effect or function when "releasing" a switch. This is necessary for the "press-and-hold" functionality.
You can make the switch activate immediately when pushed:
- disable PRESS/HOLD FOR XY in the Global menu
- or: assign Single X/Y or Sticky X/Y to a F-switch at the right side
With press-and-hold disabled, operating the unit feels faster. But you can no longer hold a switch to switch an effect between X/Y.
Also, when you set the “HOLD” function of any F-switch to “NONE”, its TAP function switch will execute on the switch down-stroke instead of the up-stroke.
Latching or momentary
A latching switch switches on or off, when you press it, and switches to the other state when pressing it again.
Momentary switches do not “latch” when you step on them. They engage while your foot is down on the switch, and stop when you lift it up. Any of the numbered footswitches may be designated as MOMENTARY. This can be done either GLOBALLY (Global menu) or PER-PRESET (Config page).
If a momentary footswitch is used to BYPASS/ENGAGE effects, the effect state will be reversed by the action of the switch. A block that is saved as ENABLED will be momentarily bypassed. A block that is saved as BYPASSED will by momentarily enabled. The same is true for a momentary footswitch assigned to SCENE 1/2 Toggle: depending on whether Scene 1 or Scene 2 is selected, the switch will momentarily toggle to the other.
The settings on the CONFIG > FS MODE page have no effect for a footswitch if it is set to one of the GLOBAL options on the GBL FS page.
The AX8 lets you assign multiple footswitches to the same effect block. This enables you to, for example, assign a latching and a momentary switch to the same effect.
Control Switches
Read this: Modifiers and controllers
Tips and tricks
Improving readability of the preset list
Improve the readability of the preset titles in the Single/Sticky Preset screen, by adding spaces to each consecutive preset name:
- preset 2 starts with one space
- preset 3 with two spaces
- preset 4 with 3 spaces
Then start over again.
Make sure to not add too many spaces, because this will push titles off the screen when recalling that preset.
Mounting on a pedalboard
You can remove the rubber feet of the AX8 to mount it on a pedalboard with Velcro.
WARNING: do not use the same screws again. Use substitute screws. You need M3.5 x 6mm flat head screws. [22]
Sources for substitute screws in Europe
If it isn't possible to enter SETUP from the foot switches page
If you have DISPLAY LARGE PRESET set to ALWAYS, it isn't possible to enter the SETUP menu from the main footswitches page ("FS"). To work around this, simply press EDIT first to enter any block's edit menu, then proceed to SETUP from there.