Difference between revisions of "Template:MFC And AxeEdit Working Together"
m |
(→BASICS) |
||
| (18 intermediate revisions by 4 users not shown) | |||
| Line 1: | Line 1: | ||
| − | = Getting the MFC-101 and AxeEdit working together = | + | === Getting the MFC-101 and AxeEdit working together === |
| − | There was a | + | There was a (lengthy) [http://forum.fractalaudio.com/threads/29450-MIDI-Merge MIDI Merge thread] on this subject on the FAS forum, so thought it should be added to the wiki for preservation sake, as I'm sure here are MANY folks who would like to get this working. This page explains what to do to get AxeEdit and the MFC-101 working with the Axe at the SAME TIME. |
| + | {| style="background-color:#ededed;" cellpadding="5" cellspacing="0" border="1" align="top" | ||
| + | |'''NOTE:''' There '''are limitations''' with the method below. While you '''can''' use both AxeEdit and the MFC-101 with the Axe, they '''do not communicate with each other directly'''. They act as separate midi controllers attached to the AxeFx. In other words, switching to another preset using the MFC does not cause AxeEdit to display that new preset. Conversely, switching to a new preset in AxeEdit does not change the active patch on the MFC. And, changing state (ON/OFF) of an effect block in AxeEdit does not change the LED color of that IA on the MFC either. | ||
| + | |||
| + | ''Additional research is required on sync'ing the devices'' | ||
| + | |} | ||
| − | ==BASICS== | + | ====BASICS==== |
{| style="background-color:#cccccc;" cellpadding="5" cellspacing="0" border="1" align="top" | {| style="background-color:#cccccc;" cellpadding="5" cellspacing="0" border="1" align="top" | ||
|''NOTE: '' ''''This article assumes use of the equipment listed below. Different choices for your midi merger will likely require a different approach.'''' | |''NOTE: '' ''''This article assumes use of the equipment listed below. Different choices for your midi merger will likely require a different approach.'''' | ||
|} | |} | ||
| − | |||
*To get started will need the following equipment: | *To get started will need the following equipment: | ||
| − | **midi merge box [eg: [ | + | **midi merge box [eg: [http://www.midisolutions.com/prodmrg.htm Midi Solutions Midi Merge]] |
**midi interface to PC [eg: [http://http://www.m-audio.com/products/en_us/MIDISPORT2x2AnniversaryEdition.html M-Audio Anniv 2x2]] | **midi interface to PC [eg: [http://http://www.m-audio.com/products/en_us/MIDISPORT2x2AnniversaryEdition.html M-Audio Anniv 2x2]] | ||
**3 or 4 5-pin midi cables [eg: any standard 5-pin midi cable] | **3 or 4 5-pin midi cables [eg: any standard 5-pin midi cable] | ||
| − | **7-pin to 5-pin midi cable | + | **7-pin to 5-pin midi cable |
| + | {| style="background-color:#ffffcc;" cellpadding="5" cellspacing="0" border="1" align="top" | ||
| + | | NOTE: Best-Tronics now offers cables designed for Fractal Audio products. [http://best-tronics.com/mm5/merchant.mvc?Screen=CTGY&Store_Code=BMI&Category_Code=Fractal_Audio Go here for more information] | ||
| + | |} | ||
| − | ==THE BIG Picture== | + | ====THE BIG Picture==== |
| − | The following TWO pictures show different ways to achieve the same objective. BOTH use the "modified" midi-merger box - which is explained below. The first approach uses | + | The following TWO pictures show different ways to achieve the same objective. BOTH use the "modified" midi-merger box - which is explained below. The first approach uses uses a 7-pin to 5-pin cable that supplies power to the MFC and the second uses a standard 5-pin midi cable powering the MFC directly from its own adapter. |
| + | WARNING! MODIFYING OR EVEN OPENING A MIDI SOLUTIONS MERGER WILL VOID ITS WARRANTY! | ||
| − | ===The First Method=== | + | =====The First Method===== |
| − | The first picture is how mine is setup using standard 5-pin midi cables. | + | The first (and original) approach - Matman's method - uses a 7-pin to 5-pin midi cable modified to connect the power to the MFC-101. |
| + | [[File:Midi-merge-box-2-1-.gif]] | ||
| + | # ''Credit to Matman for above pic'' | ||
| + | |||
| + | |||
| + | =====The Second Method===== | ||
| + | The second picture is how mine (s0c9) is setup using standard 5-pin midi cables - as I did not have a 7-pin to 5-pin cable. | ||
[[File:Midi-merge.jpg]] | [[File:Midi-merge.jpg]] | ||
| − | === | + | =====Modified MIDI-MERGE Box===== |
| − | + | ||
| − | + | ''[UPDATE: - (per play4quarters) midisolutions.com can do the custom mod show below, for you. The charged is an addition $20.00 for the mod. If interested contact John Fast - john@midisolutions.com . You can refer to it as the DIN1/3 pass through mod.]'' | |
| − | + | ||
| − | + | The modification shown below is necessary to allow the MFC and Axe to communicate with each other. Without this mod, the Tuner, Tap Tempo and Patch names will not be displayed on the MFC. The Axe's midi IN port is actually bi-directional, you will need to connect midi ports 1&3 on either the IN1 in IN2 sockets (your choice) to the 1&3 pins on the OUT port of the merge box to make them talk to each other correctly. | |
| − | |||
"The merger-box has four screws under the "MIDI Solution" Sticker - so don't break your box to get through to the PCB, just pull of the sticker and unscrew the top. Then lift the PCB out of the box - it's not glued or screwed - and solder cables from the IN port (I chose IN2 because phantom power comes from my MOTU) of your choice to the OUT port (Pin 1&3) on the downside of the PCB. Pin 1&3 are the outside pins of the socket.They aren't connected to anything." | "The merger-box has four screws under the "MIDI Solution" Sticker - so don't break your box to get through to the PCB, just pull of the sticker and unscrew the top. Then lift the PCB out of the box - it's not glued or screwed - and solder cables from the IN port (I chose IN2 because phantom power comes from my MOTU) of your choice to the OUT port (Pin 1&3) on the downside of the PCB. Pin 1&3 are the outside pins of the socket.They aren't connected to anything." | ||
| Line 41: | Line 54: | ||
This process should work for most "like" products, assuming you chose not to use the Midi Solutions merge box. | This process should work for most "like" products, assuming you chose not to use the Midi Solutions merge box. | ||
| + | =====Alternative Solution for Mac/Emu Users===== | ||
| + | The following solution was provided by Paolo68 for Mac users with and Emu interface. | ||
| + | |||
| + | Per joe1871 - "Anybody else out there looking to get the MFC working with the Axe and your PC get Paolo's doc, and a MIDI Solutions Merger and MIDI Solutions Thru (I got the Quadra Merger and Quadra Thru. Folllow the doc, then launch the Axe PX app. Go in and select the channels you used on your MIDI IF and you have USB working on the PC. No more swapping cables! (Granted I only swapped cables for a couple of days, but it was a PITA that I am glad to be free of)." | ||
| + | |||
| + | [[File:MFC_101_midi_Merge.jpg]] | ||
Latest revision as of 16:37, 21 July 2011
Contents
Getting the MFC-101 and AxeEdit working together
There was a (lengthy) MIDI Merge thread on this subject on the FAS forum, so thought it should be added to the wiki for preservation sake, as I'm sure here are MANY folks who would like to get this working. This page explains what to do to get AxeEdit and the MFC-101 working with the Axe at the SAME TIME.
| NOTE: There are limitations with the method below. While you can use both AxeEdit and the MFC-101 with the Axe, they do not communicate with each other directly. They act as separate midi controllers attached to the AxeFx. In other words, switching to another preset using the MFC does not cause AxeEdit to display that new preset. Conversely, switching to a new preset in AxeEdit does not change the active patch on the MFC. And, changing state (ON/OFF) of an effect block in AxeEdit does not change the LED color of that IA on the MFC either.
Additional research is required on sync'ing the devices |
BASICS
| NOTE: 'This article assumes use of the equipment listed below. Different choices for your midi merger will likely require a different approach.' |
- To get started will need the following equipment:
- midi merge box [eg: Midi Solutions Midi Merge]
- midi interface to PC [eg: M-Audio Anniv 2x2]
- 3 or 4 5-pin midi cables [eg: any standard 5-pin midi cable]
- 7-pin to 5-pin midi cable
| NOTE: Best-Tronics now offers cables designed for Fractal Audio products. Go here for more information |
THE BIG Picture
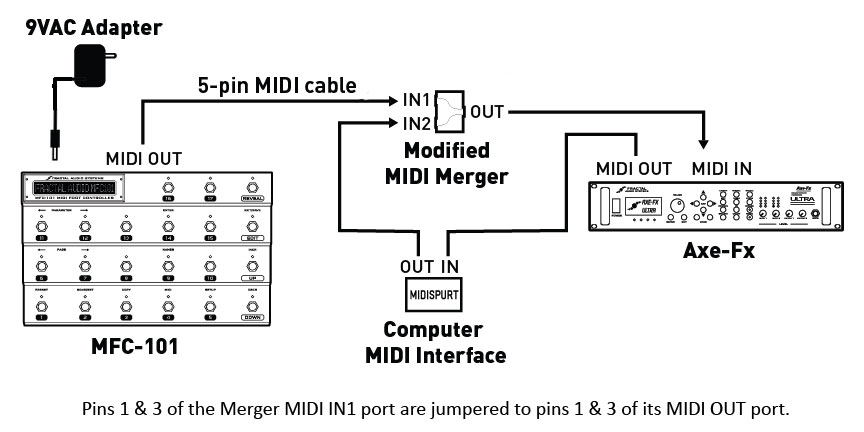
The following TWO pictures show different ways to achieve the same objective. BOTH use the "modified" midi-merger box - which is explained below. The first approach uses uses a 7-pin to 5-pin cable that supplies power to the MFC and the second uses a standard 5-pin midi cable powering the MFC directly from its own adapter.
WARNING! MODIFYING OR EVEN OPENING A MIDI SOLUTIONS MERGER WILL VOID ITS WARRANTY!
The First Method
The first (and original) approach - Matman's method - uses a 7-pin to 5-pin midi cable modified to connect the power to the MFC-101.
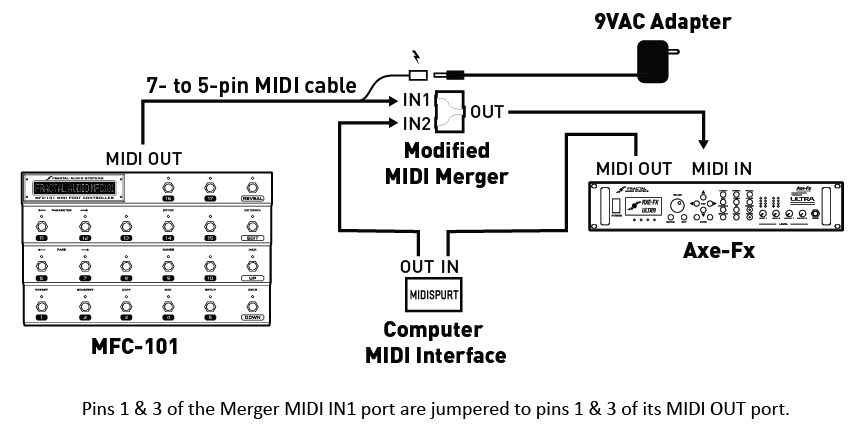
- Credit to Matman for above pic
The Second Method
The second picture is how mine (s0c9) is setup using standard 5-pin midi cables - as I did not have a 7-pin to 5-pin cable.
Modified MIDI-MERGE Box
[UPDATE: - (per play4quarters) midisolutions.com can do the custom mod show below, for you. The charged is an addition $20.00 for the mod. If interested contact John Fast - john@midisolutions.com . You can refer to it as the DIN1/3 pass through mod.]
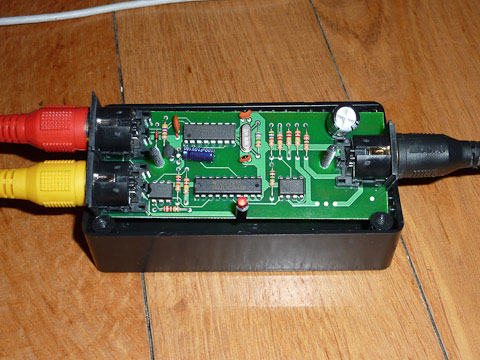
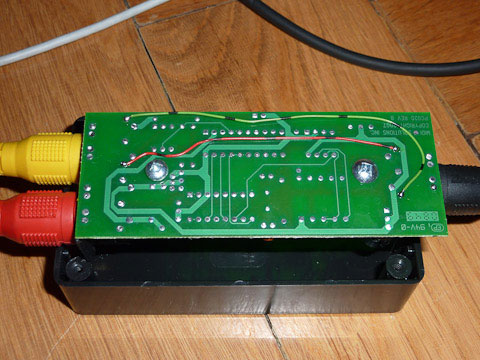
The modification shown below is necessary to allow the MFC and Axe to communicate with each other. Without this mod, the Tuner, Tap Tempo and Patch names will not be displayed on the MFC. The Axe's midi IN port is actually bi-directional, you will need to connect midi ports 1&3 on either the IN1 in IN2 sockets (your choice) to the 1&3 pins on the OUT port of the merge box to make them talk to each other correctly.
"The merger-box has four screws under the "MIDI Solution" Sticker - so don't break your box to get through to the PCB, just pull of the sticker and unscrew the top. Then lift the PCB out of the box - it's not glued or screwed - and solder cables from the IN port (I chose IN2 because phantom power comes from my MOTU) of your choice to the OUT port (Pin 1&3) on the downside of the PCB. Pin 1&3 are the outside pins of the socket.They aren't connected to anything."
- Credit to Michael for the pics below and description inside quotes above
This process should work for most "like" products, assuming you chose not to use the Midi Solutions merge box.
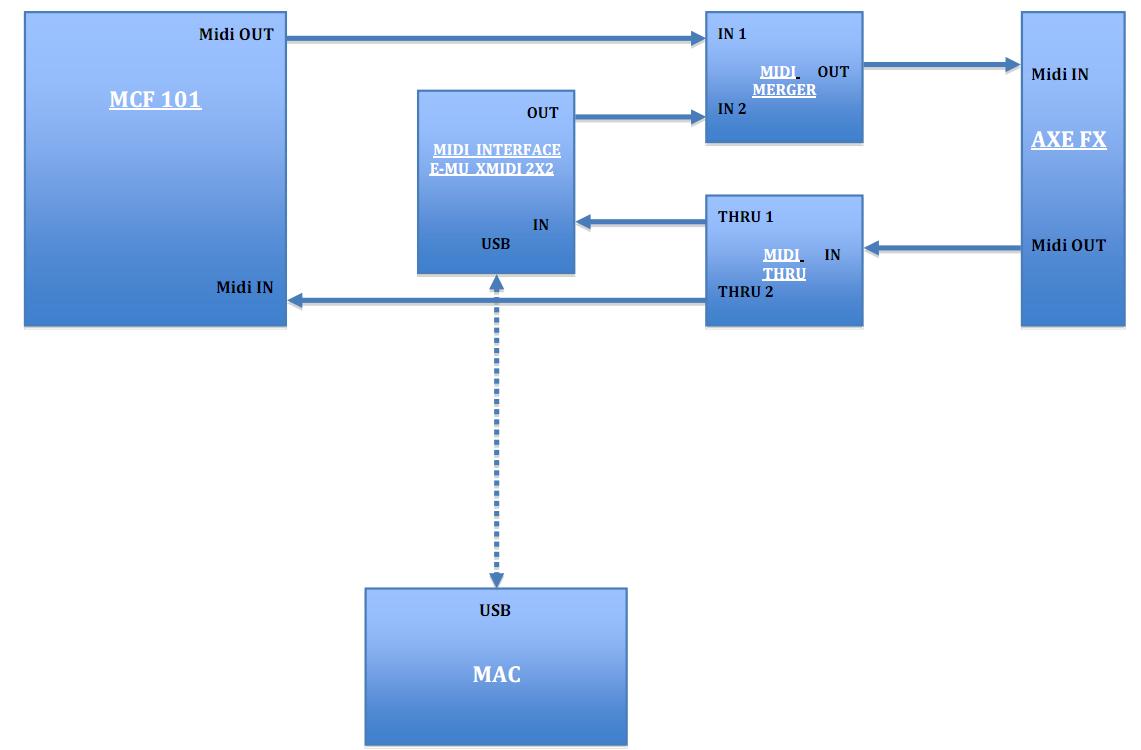
Alternative Solution for Mac/Emu Users
The following solution was provided by Paolo68 for Mac users with and Emu interface.
Per joe1871 - "Anybody else out there looking to get the MFC working with the Axe and your PC get Paolo's doc, and a MIDI Solutions Merger and MIDI Solutions Thru (I got the Quadra Merger and Quadra Thru. Folllow the doc, then launch the Axe PX app. Go in and select the channels you used on your MIDI IF and you have USB working on the PC. No more swapping cables! (Granted I only swapped cables for a couple of days, but it was a PITA that I am glad to be free of)."
