Always consult the official Owners Manuals first
RJM Mastermind MIDI foot controller
Contents
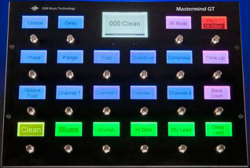
RJM Mastermind GT: what is it?
- The MMGT is a powerful MIDI controller with a dedicated display for each switch.
- More information
RJM Mastermind GT: Mission Engineering expression pedal for RJM
- Mission Engineering makes an expression pedal specifically for the MMGT. Its LED is always sync'd and powered by the MMGT. One TRS cable connects to an expression pedal input on the MMGT. Another TRS cable connects the switch on the pedal to an external switch input on the MMGT.
RJM Mastermind GT: MIDI cable and power
- To provide phantom power to the MMGT, you need the separate RJM phantom power box. The box connects to the MMGT with a 7-pin MIDI cable, and to the Axe-Fx with a 5-pin MIDI cable. Do not connect the MMGT's power supply to the phantom power input at the rear of the Axe-Fx, connnect it to the phantom power box.
- In the MMGT's Setup menu, set MIDI to birdirectional.
RJM Mastermind GT: firmware updates, saving and loading
- The MMGT's USB drive makes it easy to update the firmware, and to save and load settings.
RJM Mastermind GT: setup with the Axe-Fx II
- The MMGT is very flexible. Here's a walkthrough to program it, as an example. Many other possibilities exist. Use the software editor!
- Add the Axe-Fx as a device in "System Functions > Edit Devices". Make sure to select the right model!
- Verify the "MIDI Channel" (default: 1).
- If you use DIsplay Offset on the Axe-Fx, set it "Preset Offset" to 1 on the MMGT.
Executed "Set Default Buttons". Highly recommended because this assigns the preset buttons on the GT to the Axe-Fx Program Changes numbers, and scene buttons too, saving loads of programming.
I did not execute "Set Default Pedals" because I wanted to configure the pedal myself.
Executed "Get Preset Names". The Axe-Fx will scroll through the presets in the specified range and sync the names. Takes a couple of minutes with the hundreds of presets on the Axe-Fx II XL. Note that current MM/GT firmware now supports syncing names when switching presets.
Notes: - If "Get Preset Names" doesn't work and you have a XL, make sure you added the "Axe-Fx II XL" and not the "Axe-Fx II". - If "Preset-to-Scene mapping" is enabled on the Axe-Fx (I/O > MIDI > Mapping Mode = Custom), the process will fail! - If the process stall/freezes somewhere during the process, check the Axe-Fx for a corrupt preset. - When changing just a single preset title on the Axe-Fx, there's no need to import all 640 preset names again to sync the names on the GT. Just adjust the Starting and End points in "Get Preset Names".
The device parameters below show the following values: - Send CCs on preset change: OFF. - Send PCs: On. - Send redundant PCs: OFF. - Ignore incoming PC: ON. - Ignore incoming CC: OFF. - Sync names: ON.
All good. No need to change this, unless:
- If you want be able to "reset" the current preset by pressing a preset button a 2nd time, to undo changed IA states, turn on "Send redundant PCs". I use this setting. Make sure that IgnoreRedundantPC on the Axe-Fx is turned ON, to prevent audio gaps. Note that the IA buttons on the GT are not updated after "resetting" a preset this way. - If you switch presets on the Axe-Fx and want to have the GT to change accordingly, turn off "Ignore incoming PC". - If you're using buttons to control external controllers on the Axe-Fx, turn on "Send CCs on preset change" to keep them sync'd. I use this setting.
In "System > MIDI" I verified that bidirectional MIDI communication is enabled.
Not using MIDI Clock (not required to sync tempo with the Axe-Fx).
In "Display Settings" I selected "Bold On" for larger text.
I sometimes use an additional dual footswitch. In "System > External Switches" I assigned the external switch to: - Delay 1 X/Y (Global: on, IA Link: on) - Scene Increment (Global: on, UpdOnPrst: on, Momentary: on).
In "System > Expression Pedals" I made sure that pedals 3 and 4 are disabled (CCs set to None). I calibrated Pedal 1 and assigned it to External 1 on the Axe-Fx (which is CC16 on my system). I'm using it mainly as a wah (auto-engaged), and for other functionality per preset. Not using the 2nd CC (the GT lets you assign a 2nd CC to a pedal). Not using Switch Position/Actions either.
I don't have a 2nd expression pedal. But the RJM lets you change pedal functionality within a preset by configuring a 2nd pedal and using "Pedal Grouping". Configuration of pedal 2 is the same as pedal 1, but assigned to the CC of External 2. I have a dedicated button to switch the pedal between the two pedal configurations.
Other parameters: - Max Pages: 2 (default). Suffices for me. - Preset 2nd: Preset. Not using the "Global Preset" feature. And "Previous Preset" is assigned to a dedicated button. - Pedal Group: changed to "[1 2] 3 4". This enables switching pedal functionality within the same preset. - First Prst is 0: OFF. - Hold mSec: changed to 500 (see below). - Auto Page: ON (default). - InstantBank: OFF (default). - PagePreview: OFF (default).
Next: programming the buttons. I did this on the hardware first to get familiar with the unit. Later on I repeated this in the editor which of course is much easier.
The easy way is to have the GT set the default buttons and just swap them. But I wanted to learn how everything works, so I did it myself. I also wanted to implement some "special" features.
The GT makes it very easy to assign buttons to Axe-Fx functionality by keeping a database of MIDI CCs and names. It's also easy to look up the CC and enter it manually.
Programming the buttons did take some time to get used to. In particular, switching between NORMAL and HOLD modes was slightly confusing at first (on hardware). Just takes some time to get used to, and the editor is handier. The HOLD functionality is brilliant, BTW. The GT displays a second row in the button display and can indicate its status independent of the first row on the button, awesome.
Scenes: The default scene buttons work fine. Switch to IA Mode to see them in the same position as the preset buttons. The current scene is highlighted. They are assigned to a group so engaging one will automatically turn off the other. No need to change the default Group settings in "Setup > Edit Groups" ("SndOffMsg"=ON and "Allow Off"=OFF). Note: recent firmware has greatly improved support for scenes. The GT now recognizes scenes. No need for special configuration options, except IA Link needs to be on.
Notes: - Preset-to-scene mapping on the Axe-Fx doesn't work well together with the GT. Indication of scenes and of effects states becomes a mess.
Bank Up/Down: I made Banking Up/Down a little faster, by setting "First Repeat" to: 600 (Setup > Next Page)
Preset Menu: I added a "Preset Menu" button above the Banking buttons. Great feature!
Preset Numbering: A great alternative to Bank Up and Down. Just enter digits to quickly recall a specific preset.
Global Preset, Solo preset, Previous Preset: As mentioned earlier, I'm not using the GT's native Global Preset feature. I do have a "global preset" stand-by, so I can quickly recall my main tone from any position. Programmed as an IA, recalling a preset. All On/Off button parameters are off except for UpdOnPrst. I also have a hold button on the first page which enables me to recall the previous preset, very handy!
Hold: I like the button HOLD function. It's particularly effective, IMHO, to switch Axe-Fx effects between X and Y. Or to switch an effect between two speeds through an external controller on the Axe-Fx. Set the button to HOLD, and assign the button in HOLD mode to the specific X/Y CC (using the database). Set all other button ON/OFF fields to OFF for normal effects. I shortened the HOLD time in "Setup" to 500 ms (Setup > Next Page).
Tempo: I programmed a Tempo button on page 2. Set "Tempo" to ON, assign the button to the Tempo CC (#14). Other OFF/ON button parameters are OFF.
External controllers, IA Link Some effects need adjustable rates. Tremolo etc. I use the button's HOLD function to switch between slow and fast rates. This requires assigning an external controller to the effect's "Rate" parameter on the Axe-Fx, and specifying Min and Max values. On the GT I assigned the HOLD function to the external controller's CC. Note that buttons assigned to external controllers on the Axe-Fx require "CCOnPRST" in System to be ON, and "SndOnPrst" and "UpdOnPrst" must also be ON for those buttons to function correctly and stay sync'd to the Axe-Fx.
Tuner: To program a Tuner button: set the IA to "Tuner" ("Button Action > IA > System > Tuner"), and then assign the Tuner CC from the database. All ON/OFF fields are OFF except UpdOnPrst = ON. The hires tuner display on the GT works very well.
Page and IA Store: I'm only using IA Mode to switch the preset buttons, to scene buttons. So I renamed the IA Mode button: Scenes.
Presets There was no need to change anything on the Presets page in Setup. I want presets to display the default page (not "local" pages) and it was set that way. The preset buttons are fine by default. UpdOnPrst is turned on and they're grouped.
Groups A group links a number of buttons together, so that only one of them can be engaged. I'm using this for the two AMP buttons: I often have two AMP blocks in my Axe-Fx presets, pressing one of the AMP buttons automatically bypassed the other. Also using grouping with the Scene buttons.
IA Cycle Currently not using this but it can come in handy for sure. For example, it lets you use a single button to step between 4 effect settings, or switch multiple effects in 4 steps, etc. You can use it to enable a Delay (step 1) and switch it between X and Y (step 2) and bypass it (step 3).
As I learn more and more about the GT, I'll keep updating this 'blog'