Always consult the official Owners Manuals first
Difference between revisions of "I/O connectivity and levels"
Jump to navigation
Jump to search
| Line 456: | Line 456: | ||
* 5CM (5-Cable Method) is a variation where you add Cabinet simulation to the setup. | * 5CM (5-Cable Method) is a variation where you add Cabinet simulation to the setup. | ||
* [http://forum.fractalaudio.com/axe-fx-ii-discussion/103454-5-cable-method-achievable.html How to set up 5CM.] | * [http://forum.fractalaudio.com/axe-fx-ii-discussion/103454-5-cable-method-achievable.html How to set up 5CM.] | ||
| + | |||
| + | ---- | ||
| + | |||
| + | |||
| + | =As effects-only device in an amp's effect loop= | ||
| + | * When using the Axe-Fx II or AX8 as an external effects-only device in the effects loop of an amp, you probably want it to send and receive LINE level signals. So use the input(s) at the rear, not Instrument. When using Input 1 (rear) on the Axe-Fx II, set Input 1 Select to Rear in I/O. | ||
| + | * Adjust I/O > Input Level for an optimal signal-to-noise ratio. | ||
| + | * Select the correct output mode in I/O. | ||
| + | * Use the physical output knob to get the required output level. | ||
| + | * Cliff: "You should NOT use Boost/Pad in this configuration." [http://forum.fractalaudio.com/axe-fx-ii-discussion/100632-lost-dynamic-axe-effect-loop-my-amp.html#post1206637 source] | ||
| + | |||
| + | =As effects-only device before an amp= | ||
| + | * When placing the device in front of an amp: | ||
| + | ** Set Boost/Pad to 12 dB (to make sure the full range of the D/A converter is used). | ||
| + | ** Turn up Output 1 Level all the way. | ||
| + | |||
| + | =Creating presets for effects-only= | ||
| + | * To make a signal go through the Axe-Fx II or AX8, connect the grid input to output using shunts. | ||
| + | * Replace the shunts with the effect blocks you need. | ||
| + | * Do not add Amp blocks or Cabinet blocks. The TUBE PRE amp type may be an exception to warm up tones. And in some cases an user cab can be useful too, as a container for special IRs (i.e. Echoplex preamp coloring). | ||
[[category:Axe-Fx]] | [[category:Axe-Fx]] | ||
Revision as of 11:50, 30 March 2017
The information on this page supplements the official manuals.
Contents
- 1 Front input secret sauce
- 2 A/D Input Level
- 3 Input 1 Mode: Left / Right / Sum L+R
- 4 USB source and USB Level
- 5 Impedance
- 6 Rear inputs
- 7 Use with multiple instruments
- 8 Use with different guitars
- 9 Use with acoustic instruments
- 10 Use with bass guitar
- 11 Use with external stomp boxes
- 12 Use with a wireless connection
- 13 Sustain/feedback
- 14 Latency
- 15 Hiss without a connection
- 16 Clipping
- 17 Gain staging
- 18 Line level
- 19 (Un)balanced audio
- 20 Simultaneous use of XLR and 1/4" outputs
- 21 Front panel level knobs
- 22 No DI needed and don't use MIC inputs on the mixer
- 23 Left/right output level differences
- 24 Phantom power protection
- 25 Headphones level
- 26 Unity gain
- 27 Multiple output signals
- 28 Humbuster cabling
- 29 Routing Input 2 to Output 2
- 30 Output level control through MIDI
- 31 Inputs and outputs
- 32 Setting the Instrument Input Pad level
- 33 Setting other Input levels
- 34 Setting Output levels
- 35 Headphones
- 36 Expression pedals and external switches
- 37 Using the AX8 with 4CM
- 38 Connecting the AX8 to an Axe-Fx II
- 39 Humbuster cables
- 40 Putting pedals between the guitar and AX8
- 41 Switching other gear
- 42 More information
- 43 Cable snakes
- 44 List of inputs and outputs on the FX8
- 45 Auditioning factory presets
- 46 Setting up the FX8 as a virtual pedalboard (PRE)
- 47 Setting up the FX8 as an effects device in an amplifier's effects loop (POST)
- 48 Setting up the FX8 with the Four Cable Method aka 4CM (PRE and POST)
- 49 PRE and POST effects
- 50 Expression pedals and external switches
- 51 True Bypass
- 52 Connecting the FX8 to an Axe-Fx II or AX8
- 53 Switching other gear (relays)
- 54 Humbuster cables
- 55 Putting pedals between guitar and FX8
- 56 Setting PRE and POST levels
- 57 Setting the Instrument Input Pad level
- 58 Clipping
- 59 Output 1 (PRE) headroom
- 60 Post Level (IN 2, OUT 2)
- 61 Preset and scene levels
- 62 Advanced level parameters
- 63 Unity gain
- 64 Axe-Fx II and 4CM tutorials
- 65 Unity gain
- 66 4CM noise and ground loop
- 67 Activating the effects loop on an amp
- 68 Presence control when power amp simulation is switched off
- 69 4CM and I/O levels
- 70 4CM snake
- 71 5CM
- 72 As effects-only device in an amp's effect loop
- 73 As effects-only device before an amp
- 74 Creating presets for effects-only

Front input secret sauce
- The front panel input (INSTR) uses a proprietary circuit and a dedicated A/D converter to lower noise ("secret sauce"). It's conditioned for guitar through hardware and software. For best results use the front input for guitar, whether wired or wireless, electric or acoustic (except when running a line level signal). The front input also has a soft clip function.
- Cliff's comments:
- "You have to set the input selection to match the input you're using. If you're using the front input then you must set the input selection to front and vice-versa. If you plug something into the front and set the input selection to rear it will get MUCH brighter. The front input is optimized for guitar level inputs and has spectral shaping and more gain than the rear input. The front input is optimized for guitar pickups. This is a combination of hardware and software processing. If you set the input source to Analog Rear this turns off the software processing part. If you are plugged into the front it will change the tone since you're still going through the hardware processing. This is why I say you must match the input selection to the input you are using. The rear inputs are standard line-level inputs and can be used with any program material. The front input, as stated above, is optimized for guitar pickups. As such it has more gain and less headroom and may clip if used for non-guitar program material. If you plug a guitar directly into the rear you may find you don't have enough signal level."
- "The spectrum of a guitar is pink(ish). Above 800 Hz or so the energy rolls off dramatically. As luck would have it, humans perceive noise above 800 Hz or so to be most objectionable as it manifests itself as hiss. So the front input pre-emphasizes the high frequencies and then does the inverse in software. This has the net effect of a flat frequency response but pushes the noise floor down by the amount of the pre-emphasis. It's an old trick, used in FM radio and vinyl records. The basic premise is to optimize the data conversion to the information content of the source."
- "A buffer (in front of the Axe-Fx II) will render the impedance stuff ineffective. It will also add (maybe considerable) noise which may defeat the low-noise advantage of the front input." source
- The AX8, Axe-Fx II XL and XL+ feature “Secret Sauce III”. Cliff: "The "Special Sauce III" uses a combination of things to get a lower noise floor. One of these things is new, premium Burr-Brown op-amps in the signal path which have extremely low noise and distortion (and are very expensive). As always I don't design stuff to be cheap, I design it to be good." source
- "The XL+ front input circuit is identical to the AX-8 except the AX-8 doesn't have the variable impedance circuitry." source
A/D Input Level
- Level in I/O > INSTR IN does NOT affect amp gain, volume level or output clipping! It optimizes the signal-to-noise ratio only. This is different from the Axe-Fx Standard/Ultra. For more information about output clipping, see Preset output level.
- Adjust INSTR IN to make the red input LED blink occasionally while strumming. Then turn it down a bit again to make it blink only occasionally ("tickle the red"). There's quite a range between orange and red. If you can't make it blink red, don't worry, but do check the status of Input 1 Mode (see below).
- The red light turns on BEFORE the front input clips. It means "Warning, you're approaching clipping" as opposed to "Warning, you ARE clipping". Red light turns on at -6dB of the point where the signal is hard limited / clipped.
- Cliff's comments:
- "For a Strat, near 100% on the input level is not unusual. I run my Strat around there. It has vintage-type pickups." source
- "To get the best noise performance it is important that the Instr In trim is set correctly in the I/O->Input menu. Set this as high as possible without clipping the input." source
- "You don't HAVE to tickle the reds. Adjust for your hottest guitar and leave it." source
- "The AFXII has digitally controlled potentiometers before and after the A/D and D/A converters. Therefore it knows what the input and output gains are. It compensates for these gains in the digital path." source
- "Full-scale is a term that indicates the maximum signal level into or out of an A/D or D/A converter, respectively. With digital converters the best performance is achieved by operating the converter such that the nominal signal level is close to full-scale. The exact voltage is unknown and irrelevant. Most digital gear will have indicators that measure the levels relative to the converter's full-scale value. For example, the input meters on the Axe-Fx indicate the input signal relative to the A/D converter's full-scale value. The "tickle the red" advice aims to operate the A/D converter near its full-scale value as the red LEDs light at 6 dB below full-scale, or -6 dBFS." source
- Tutorial by AxeFxTutorials.
Input 1 Mode: Left / Right / Sum L+R
- When using a guitar in the front input, set Input to Left (not Sum L+R). Using Sum L+R can introduce noise (from the disconnected right Input 1) and attenuates the signal level (6 dB).
USB source and USB Level
Impedance
- Input impedance.
- Output impedance: 600 Ohms AC. source
Rear inputs
- If you're using Input 1 at the rear and not the front, set the input source to “Analog Rear” (I/O). When using the front AND rear input, set it to "Stereo".
- Rear Input 1 has the same impedance as the front input (1 Mohm, for guitars) but it operates at LINE level instead of instrument level.
- The front input does not disable Input 1 left at the rear (different from Standard/Ultra). Use the menu to select either the front input or Input 1 (rear). You can leave everything plugged in.
- If you connect a microphone level source to Input 1 or Input 2 at the rear, there will be a level mismatch. You'll need to increase the signal level (or use a DI or mic preamp) to get sufficient signal strength.
- If the rear input has much less noise than the front input, it's possible that there's a hardware issue with the front input.
- Cliff's comments:
- "There is a sensor on Input 2. If you unplug the cable from it the FX Loop will not run." source
- "Input 1 on the rear is a very high impedance input (1 Mohm). It is compatible with low impedance outputs. Most people don't understand the real meaning of impedance and think you need to connect low impedance to low impedance but that's only with passive devices and is a relic of the old days when transformers were used to get the best power transfer. Nowadays we have active inputs with very high impedance which are compatible with a broad range of source impedances." source
Use with multiple instruments
- To set up the Axe-Fx for use with two instruments:
- Set Input 1 to Stereo in I/O.
- Connect one instrument to the front, and the other to rear Input 1 Right.
- Use two rows on the grid.
- Add a VOL block to each row. Set one to Input left (for the instrument that goes into the front input or rear input 1 Left) and the other to Input Right (for the instrument that goes into rear input 1 Right).
- Add an AMP block after each VOL block if necessary. You can also leave out the VOL blocks and set Amp 1 to Input Left, and Amp 2 to Input Right; this only works with the Amp blocks in the first column.
- Continue the rows to the end, adding a CAB and effects to each one if necessary, or merge them if desired. Keep the signals separated by using Balance controls.
- Also see this thread and this thread and this thread.
- Solution for connecting 3 instruments to a single Axe-Fx.
- Youtube tutorial.
- Tutorial by AxeFxTutorial.
Use with different guitars
- A preset may require adjustment when changing guitars. Here are methods to deal with this.
- IN/GTE > LEVEL: this parameter controls the loudness of the signal entering the grid. It was specifically introduced for this purpose: compensating output level differences between guitars. It works per preset only, so it needs adjustment per preset, unless the setting is stored as part of a global block. No possibility to attach a modifier.
- AMP X/Y: use different values for Input Trim in X and Y.
- Two AMP blocks.
- SCENES and SCENE CONTROLLERS: attach Input Trim in the Amp block to a Scene Controller. In the Controllers menu set the controller to the desired value for each scene. Switch scenes when switching between guitars.
- GLOBAL AMP GAIN.
- BLOCK: add a low-CPU block to every preset. Like FILTER or VOL or PEQ (PEQ and FILTER allow additional EQ-ing). Put it at the start of the grid to make it affect the amount of gain in the Amp block. Keep the block neutral and set its Level at i.e. -6 . Make it a global block, so you can easily change a setting and have it applied across all presets immediately. Attach its Bypass parameter to an external controller. Engage this block by going into I/O > MIDI and toggling EXT CTRL xx INIT VAL between 0% and 100%. Or assign a general function footswitch to the external controller’s CC and use that for toggling instead (set the switch to Global:Yes in the MFC). It works across all presets.
- Wicked Wiki: Settings for Different Guitars.
Use with acoustic instruments
- The front input can be used to connect an acoustic instrument.
- The IR of an acoustic body can add acoustic resonance to the tone. There are no acoustic IRs among the stock cabinets in the Axe-Fx II. You can find some here:
- Stick to the highest IR resolution when using acoustic IRs, Ultra-Res if possible.
- Presets for acoustic guitars with good pickups can be simple: compressor, EQ, reverb. An AMP block is not required but TUBE PRE can help to warm up the tone.
- This thread contains a nice clip and preset for a piezo-equipped guitar.
- Alternatively: use Tone Matching. Tutorials on G66.eu.
Use with bass guitar
- The Axe-Fx II provides stock bass cabs and some bass amp models.
- The tuner supports bass guitar tuning.
- Forums:
- Bass tone tutorial by Jon Symons' Sonic Drive Studio.
Use with external stomp boxes
- If you want to use an external analog or digital pedal with the Axe-Fx II, connect it between the guitar and the Axe-Fx. Remember to check Input impedance on the Axe-Fx II.
- The Axe-Fx II lets you insert a device somewhere in the routing using FXL / Effects Loop. The effects loop connections (both IN and OUT) operate at line level, so adjust levels to compensate. See FXL / Effects Loop.
Use with a wireless connection
- Connect a wireless receiver in the same way as a guitar: to the front input. This takes advantage of the front input's "secret sauce" for noise reduction. The rear inputs (both 1 and 2) operate at line level and are less suited for use with most wireless receivers.
- Cliff: "The front input has a better SNR but if you are using a wireless the better SNR of the front input won't be noticeable since the noise of the wireless will dominate." source
Sustain/feedback
- It's as easy to get your guitar to feedback with the Axe-Fx II (when monitoring through a monitor or speaker) as it is with a regular amp and cabinet. If you don't succeed, experiment with the Output Phase parameter in the I/O menu.
- Cliff: "I did some studies years ago and having a speaker in proximity to the guitar actually changes the final tone considerably. I compared the frequency response with the amp in isolation to the frequency response with the amp in proximity and measured several dB difference in the lows and mids. It was clearly audible when the recordings were played back." source
- There's no dedicated "sustainer" or feedback effect in the Axe-Fx II. Forum member Simeon created a feedback simulation preset, mimicking controlled feedback.
Latency
Hiss without a connection
- When nothing is connected to the front or rear inputs, there may be some hiss.
Clipping
Gain staging
- Cliff's comments:
- "Optimal gain staging would be with the level knob around noon. Higher than this and you risk clipping the inputs of the downstream device. With the level knob at full the Axe-Fx II will probably incinerate a Soundblaster or other low-cost stuff. The max level out of the Axe-Fx II is +20 dBu. Most pro gear can easily handle that but lots of gear cannot and the trend in newer gear is towards lower and lower maximum input levels (due to single-ended designs and low-voltage/low-power constraints). In the old days, +20 dBu was routine. Everything could put out and handle +20. Not so much anymore." source
- "The II actually has more output than the I. The II can do about +20 dBu, the I was about +18." source
- "Start with amp volume at noon. Bring up Axe-Fx volume until desired level is reached. If you need more, turn up amp. With the Axe-Fx volume all the way up you would be pushing +20 dBu into the amp which could clip the inputs to the amp." source
Line level
- Both XLR and 1/4" jack cables can be used to connect the Axe-Fx II's outputs to other equipment. These are line level connections. More information.
- Cliff: "All outputs are +4 dBu. Please see the manual for full I/O specifications." source
(Un)balanced audio
Simultaneous use of XLR and 1/4" outputs
- The XLR and 1/4" jack outputs can be used simultaneously to feed different devices.
- Cliff: "Both outputs should work simultaneously. They are actually buffered so even if you shorted one it shouldn't affect the other." source
Front panel level knobs
- Cliff's comments:
- "To place a pot after D/A requires running cables to/from the front panel. These cables can degrade signal quality and pick up noise. The pots on the front panel of the II are remote controls for the digital pots. The signal never passes through them. The digital pots also allow us to boost the level from the D/A and then attenuate it precisely to improve output SNR. The Ouput X Boost/Pad feature would be impossible without digital pots." source
- "Flutter noise when turning the level knobs is normal. The output "pot" is actually a ladder of discrete resistors that is remotely controlled by the knob on the front panel. Other products simply reduce the digital signal going into the D/A converter but this is sub-optimum as you reduce your dynamic range when doing this. The Axe-Fx II strives to keep the signal into the D/A as high as possible for optimum dynamic range and then controls the output level using a programmable output gain. The downside of this approach is that you will hear a small noise when the output switches between the resistors in the ladder." source
No DI needed and don't use MIC inputs on the mixer
- There's NO NEED to use a DI-box to connect the Axe-Fx II to a mixer or FOH snake.
- Always connect the Axe-Fx II to a LINE LEVEL input on the mixer. The output signal, balanced or unbalanced, is too hot for a MIC input.
- Cliff: "The XLR output is balanced but it's +4 dBu nominal. The problem is people connect it to a mic input which is way too sensitive for that level signal. If the board has a mic/line switch you want to set it to line level. Or if it has a pad switch turn that on. Otherwise turn the level knob way down. The thing to remember is that XLR is just a connector. It doesn't imply microphone levels. Most pro stuff like eq's, etc. have line-level XLR's."
- If only MIC inputs are available on the mixer, do this:
- Decrease the output level from the Axe-Fx II, f.e. by turning the Global EQ Gain down or by turning down the Output knob at the front.
- Or: use a DI-box to turn the line level signal into mic level. Use a stereo DI when using left and right outputs.
- Or: use a pad switch on the mixer to attenuate the incoming signal and prevent clipping.
Left/right output level differences
- Cliff: "It's inevitable that there will be mismatch in the L/R levels. The output levels are controlled by a stereo potentiometer. The tracking between the two resistors will never be perfect and gets worse as you get near the start of the curve (fully CCW). It's impossible to fix in software as the mismatch will vary from unit to unit. Also, you can't simply put a global balance control because the mismatch varies with the level knob position. The good news is this is one reason why they put faders on mixing boards. I'd hardly consider it a problem or a flaw. Simply compensate as necessary."
Phantom power protection
- Cliff: "There are blocking capacitors on the XLR outputs so you should be fine." source
Headphones level
Unity gain
- To obtain unity gain (input level = output level) when using the effects loop, set both Output Level knobs to maximum. If you would then fill the grid with shunts, you'll get exactly the same signal which you put in. (This is different from the Standard/Ultra which are louder than unity gain.)
- Unity gain is useful only when using the Axe-Fx II in a 4CM setup! In other scenarios there's no reason to crank the Output Level knobs by default.
- Cliff's comments:
- "Unity gain mode is a special mode designed for use with the 4CM. When you turn the output levels all the way up whatever you put in you get out (assuming all unity-gain blocks in the chain). If you have an amp block in the chain then you have tons of gain and therefore no longer have unity gain." source
- "With the Axe-Fx volume all the way up you would be pushing +20 dBu into the amp which could clip the inputs to the amp. Unity gain mode is only desirable for 4-cable-method." source
Multiple output signals
- The Axe-Fx II lets you send multiple output signals. For example, Output 1 is stereo and goes directly into a mixing table (signal with cabinet modeling), while Output 2 is mono and feeds a FRFR monitor or a real amp or power and a guitar cabinet (signal without cabinet modeling).
- Methods:
- Echo Out2 = Out1: enabling this setting in I/O will duplicate the Output 1 signal through Output 2. The Output 2 EQ (Global menu) lets you tailor the tone (independent of Output 1). The Output 1 knob at the front controls the level of Output 1, the Output 2 knob does the same with Output 2. This method DOES NOT WORK with presets that contain a FXL block (effects loop).
- FXL block: insert a FXL block and make it part of the routing (in series or parallel) but don't connect it to the grid output. The signal before the FXL block is sent to Output 2. This method is more flexible than the one above because the position of the FXL block determines which part of the signal is being sent. For example, placing FXL before or after a Cabinet block determines whether the Output 2 signal includes cabinet modeling or not.
Among the last presets in Bank C is a template for sending a signal to FOH (with cab simulation) and a signal to an external amp and cabinet (no cab simulation). - Left and Right: split the signal at the end of the grid into a row with Cab and a row with a shunt. In the Output Mixer pan those rows 100% left (Cab) and right (shunt). Now OUT1 Left is the signal with cabinet modeling, and OUT1 Right is the signal without cabinet modeling. source
- FXL / Effects Loop.
- Tutorial by AxeFxTutorials.
Humbuster cabling
Routing Input 2 to Output 2
Output level control through MIDI
- MIDI CCs 11 and 12 control the levels of Output1 and Output2.
- To reset them without the help of a MIDI controller, change the assignment to "none" in I/O.
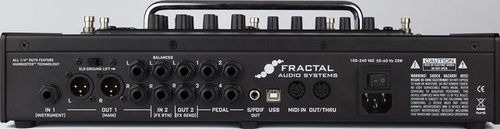
Inputs and outputs
- IN 1 (INSTRUMENT): 1/4", mono, unbalanced, 1 Megaohm (fixed), 16 dBu.
- OUT 1 (MAIN): XLR, L/R, balanced, 600 ohm, 20 dBu.
- OUT 1 (MAIN): 1/4", L/R, unbalanced, Humbuster, 600 ohm, 20 dBu. Can be used simult. with XLR Out.
- IN 2 (FX RTN): 1/4", L/R, balanced, 1 Megaohm, 20 dBu.
- OUT 2 (FX SEND): 1/4", L/R, unbalanced, Humbuster, 600 ohm, 20 dBu.
- PEDAL: 4x 1/4", TRS for pedals, TS for switches.
- S/PDIF digital out, 24-bit, 48 kHz (fixed).
- USB 2.0 type B (host).
- 5-pin MIDI IN and shared OUT/THRU.
Setting the Instrument Input Pad level
- The instrument input level can be adjusted in I/O > Levels > Instrument Input Pad. A higher value means lower input (padding). The highest value is 18 dB. Run it as low as possible because padding can increase noise floor.
- Strum the guitar hard, on the loudest pickup. If none of the CLIP LEDS on the FX8 lit up, there's no need to adjust the control.
- IMPORTANT: adjusting Input Pad DOES NOT CHANGE the amount of gain or what you hear! The pad (applied before the A/D converter) is offset by a corresponding but opposite boost at the output of the converter.
Setting other Input levels
- The nominal IN 2 (FX RETURN) level can be switched from +4 dBu (pro line level, default) to -10 dBV (consumer-grade equipment) in I/O > Levels.
- There's also a Level parameter in the Input block of each preset.
Setting Output levels
- Output levels are controlled with the OUT 1 and OUT 2 knobs on the top panel, as well as with the Global EQ Gain controls and in the blocks on the grid.
- The nominal overall OUT 1 level can be switched from +4 dBu (pro line level, default) to -10 dBV (consumer-grade equipment) in I/O > Levels.
- The Boost/Pad parameter for OUT 2 in I/O > Levels only needs to be used when putting an amp or modeler in the effects loop of the AX8.
- Cliff's comments:
- "The output doesn't go all the way to zero. This was done due to the plethora of support issues where people would say they weren't getting any sound and it was simply due to the fact that they had the knob turned all the way down. So now you get a little signal and we get less support calls." (source)
Headphones
- See Headphones.
Expression pedals and external switches
Using the AX8 with 4CM
- The AX8 will function in a 4CM setup, although the FX8 is the better choice for such a rig.
- When using the AX8 in 4CM, adjust Boost/Pad and Nominal Level in I/O > Levels to optimize the signal.
- More information: Axe-Fx II and 4CM (4 Cable Method).
- Demonstration.
Connecting the AX8 to an Axe-Fx II
- You can use the AX8 for PRE effects (plug guitar into AX8, disable amp and cabinet modeling) and the Axe-Fx II for POST effects, including amp and cabinet modeling. By adding a MIDI connection, you can switch Axe-Fx II presets from the AX8.
Humbuster cables
- Using Humbuster cables will reduce the risk of unwanted noise caused by ground loops.
- See Humbuster cables.
Putting pedals between the guitar and AX8
- You can connect a pedal between your guitar and the AX8. Connect the guitar to pedal input. Connect the pedal output to the AX8.
- Cliff's comments:
- "The XL+ front input circuit is identical to the AX-8 except the AX-8 doesn't have the variable impedance circuitry." source
Switching other gear
- The AX8 doesn't provide relays to switch external amp channels and functions. You need the FX8 to do that.
- The AX8 can send MIDI PCs and CCs when switching presets and scenes.
More information
- Part of the informaton on the wiki page Axe-Fx II connections and levels also applies to the AX8.
Cable snakes

List of inputs and outputs on the FX8
- IN [PRE] (INSTR): 1/4", mono, instrument level, unbalanced, 1 Megaohm (depending on Input Impedance setting), max 16 dBu.
- OUT [PRE]: 1/4", L/R, (L/Mono), unbalanced, Humbuster, 600 ohm, max 20 dBu. Connects to amp input.
- IN [POST]: 1/4", L/R, line level input (+4 dBu), 1 Megaohm, balanced, max 20 dBu. Connects to Effects Send on amp.
- "For most uses an unbalanced TS cable is fine. The inputs are balanced so that you can get even more hum rejection by using a TS-to-TRS cable from the amp's send." source
- OUT [POST]: 1/4", L/R, unbalanced, HumBuster, 600 ohm, max 20 dBu. Connects to Effects Return on amp.
- RELAY: 2x 1/4" TRS.
- PEDAL: 2x 1/4" TRS.
- USB 2.0 type B (host).
- 5-pin MIDI IN and shared OUT/THRU.
Auditioning factory presets
- If you put the FX8 in front of your amp, you won't experience the factory presets to their full extent. That's because some of them are configured for POST only (FX8 in the effects loop of an amp) or 4CM.
- An easy way to overcome this, is to use a patch cable to connect OUT [PRE] L MONO to IN [POST] L, and connect OUT [POST] L to your amp.
- Some factory presets are configured for stereo output amd won't sound like they should in a mono setup.
Setting up the FX8 as a virtual pedalboard (PRE)
- This is a PRE-only setup.
- Setup:
- Guitar goes into IN [PRE] / INSTR. Note: this input only feeds effect blocks designated as PRE.
- OUT [PRE] LEFT goes into the amplifier's guitar input. Use a Humbuster cable to prevent noise.
- You can use default FX8 settings. Exception: change the output mode in I/O > Audio (see manual for stereo operation)to Mono (see manual for stereo operation).
- You can use this setup to connect an FX8 to the Axe-Fx II.
- More information in the manual, including a description of the cables required.
Setting up the FX8 as an effects device in an amplifier's effects loop (POST)
- This is a POST-only setup.
- Setup:
- Guitar goes straight into the amplifier.
- Amp's effects loop SEND goes into IN [POST] LEFT.
- Amp's effects loop RETURN goes into OUT [POST] LEFT. Use a Humbuster cable to prevent noise.
- You can use default FX8 settings. Exceptions:
- Change the output mode in I/O > Audio to Mono (see manual for stereo operation).
- Change Global Looper Location to OUT POST.
- Change Global Detector to IN [POST].
- Cliff: "Are the outputs buffered for long cable runs? Yes." source
- More information in the manual, including a description of the cables required.
Setting up the FX8 with the Four Cable Method aka 4CM (PRE and POST)
- This is a combined setup, also known as Four Cable Method (4CM). You use 4CM to be able to put effects before the amp as well as in the amp's effects loop.
- Setup:
- Guitar goes into IN [PRE] / INSTR.
- OUT [PRE] LEFT goes into the amp's guitar's input. Use a Humbuster cable to prevent noise.
- The amp's effects loop SEND goes into IN [POST] LEFT.
- The amp's effects loop RETURN goes into OUT [POST] LEFT. Use a Humbuster cable to prevent noise.
- You can use default FX8 settings. Exceptions:
- Change the output mode in I/O > Audio to Mono (see manual for stereo operation).
- Change Global Looper Location to OUT POST.
- Cliff: "Are the outputs buffered for long cable runs? Yes." source
- If you have the FX8 set up for 4CM and want to change this, for example to put the FX8 before a computer, just use a jumper cable to connect OUT PRE L MONO to IN POST L, with OUT POST L going to the computer, amp or whatever. All effects will work and there's no need to change stuff in the configuration.
- More information in the manual, including a description of the cables required.
PRE and POST effects
Expression pedals and external switches
True Bypass
- The FX8 allows you to physically bypass (disable) the analog-to-digital and digital-to-analog converters between IN and OUT. Aka "True Bypass". This disables ALL processing. It will for example mute Looper playback, all effects will by disabled, it'll stop delay repeats, it'll ignore level settings etc.
- Even though the FX8 does not suck tone and is completely transparent, some users value the ability to completely bypass the A/D and D/A converters. Also, True Bypass enables you to compare gain settings, compare stuff etc.
- In each preset you can specify on the Config page if True Bypass applies to the PRE stage, the POST stage, or ALL.
- Fractal Audio:
- "On the CFG tab of the main screen, there is parameter called "BYPASS". It's values are PRE, POST, and ALL. By setting this to PRE, any time TRUE BYPASS is engaged, it will only bypass the effects block in the PRE stage".
- "TRUE BYPASS does not mute the audio, it engages circuitry that bypasses the Digital converters. The audio is routed from Input Pre to Output Pre". source
- To engage True Bypass, press (or hold) the switch assigned to True Bypass.
- "Automatic True Bypass" is a option (Global menu) that will automatically engage True Bypass when all effects are bypassed. This works per signal chain (PRE and POST), without affecting the other signal chain.
- The Axe-Fx II and AX8 do not support True Bypass.
Connecting the FX8 to an Axe-Fx II or AX8
- You can use the FX8 for PRE effects (plug guitar into FX8) and the Axe-Fx or AX8 for POST effect, including amp and cabinet modeling (plug FX8 into Axe-Fx or AX8).
- By adding a MIDI connection you can change Axe-Fx and AX8 presets from the FX8.
Switching other gear (relays)
- Relays are electrically operated switches/connectors, which can be used to switch channels on an amplifier or switch other stuff.
- The FX8 relays are controlled through:
- scenes: you can use scenes to switch amp channels through relays. This is configured on the preset's Config page.
- footswitches: you can assign footswitches to the relays per preset, for manual control. Assign the footswitch and configure it on the Footswitch page. IMPORTANT: a Relay block in the preset will disable the scene's Relay settings.
- Relay states:
- Off: nothing connected.
- Tip: tip to Sleeve.
- Ring: ring to sleeve.
- Both: tip AND ring to sleeve.
- Relay modes:
- Latching: the selected RELAY ON state remains connected and the switch LED remains ON as long as the switch is engaged. Nothing is connected when the switch is OFF.
- Auto-Off: the selected RELAY ON state remains connected only for a moment when you press the footswitch. The relay then automatically turns OFF, as does the LED.
- Connecting the relays:
- Depending on the amp, you can use TS or TRS cables.
- Cliff's comments:
- "The FX8 will short tip-to-sleeve, ring-to-sleeve, or both. The circuit is designed to handle 200mA of current. If the current generated by that voltage drop is 200mA or less, then the FX8 will not have a problem." source
- CAUTION: Do NOT connect anything to the relays jacks until you've read the warnings in the manual (repeated below)!
- Cliff's comments:
- "The relays of the FX8 are designed for use ONLY with amplifiers that use “short-to-sleeve” type switching. Do NOT connect the FX8 relays to the switch jacks of an amp that uses voltage differential switching or any other type of switching aside from short-to-sleeve, or serious damage can occur to both units. If you are not 100% sure, contact your amp manufacturer to determine whether your amp is compatible with short-to-sleeve switching. The FX8 relay jacks are compatible with TRS cables, TS cables, or TRS-to-dual-TS split cables. The relays are also fully isolated from the electrical ground of the FX8."
- "The FX8 features two TRS (Tip-Ring-Sleeve) relays that can be used to switch the channel or other functions of a connected amplifier or device. If the warning above seems stern, that’s because the last thing we want is for anyone to damage their amp or FX8. In fact, short-to-sleeve relay switched amps are quite common, and your amp may well be perfectly compatible. We need to trust and require you however, to understand how your amp works and make the right choices about connecting it to the FX8 relay jacks. Your amp manufacturer should be able to help if you read them the warning above."
- Cliff's comments:
- The relays support X/Y switching.
Humbuster cables
- Using Humbuster cables will reduce the risk of unwanted noise caused by ground loops.
- The FX8 is designed to run Humbuster cables on all of the outputs. If you are running mono, you will only need to run two Humbusters: one to the front input on your amp from Output Pre on the FX8, and one to the FX loop return from Output Post on the FX8. source
- See Cables_and_adapters_for_Fractal_Audio_devices#Humbuster_cables.
Putting pedals between guitar and FX8
- You can connect a pedal between your guitar and the FX8, in a PRE setup. Connect the guitar to the pedal input. Connect the pedal output to IN [PRE] / INSTR on the FX8. Depending on the pedal you may want to adjust Input impedance.
Setting PRE and POST levels
Setting the Instrument Input Pad level
- The instrument input level can be adjusted in I/O > Levels > Instrument Input Pad. A higher value means lower input (padding). The highest value is 18 dB. Run it as low as possible because padding can increase noise floor.
- Strum the guitar hard, on the loudest pickup. If none of the CLIP LEDS on the FX8 lit up, there's no need to adjust the control.
- IMPORTANT: adjusting Input Pad DOES NOT CHANGE the amount of gain or what you hear! The pad (applied before the A/D converter) is offset by a corresponding but opposite boost at the output of the converter.
Clipping
- A LED will lit when the signal at IN [PRE], IN [POST[, OUT [PRE] or OUT [POST] approaches clipping.
Output 1 (PRE) headroom
- This parameter can supply more headroom if the signal going out through Output 1 PRE is too hot. Downside is that the noise floor is increased. Default is 6 dB, for the least headroom and lowest noise floor. The increased headroom is offset by a corresponding but opposite adjustment internally, so “what you hear” remains the same at all settings. Maximum headroom is 12 dB.
Post Level (IN 2, OUT 2)
- This is the output level of the POST section. It can be switched from +4 dBu (pro line level, default) to -10 dBV (consumer-grade equipment).
- If you're using the FX8 in a 4CM setup, and you're experiencing hiss, try switching to another Post Level value.
- NOTE: some users report that the FX8 needs a reboot after changing the value before the changed value takes effect. source
Preset and scene levels
- The Config page of a preset provides OUT [PRE] and OUT [POST] levels controls. These operate per scene. You can use these to set the overall output level of a scene. Example: use these controls to bump the volume of a specific scene which you will use for leads.
- Also see Preset output level.
Advanced level parameters
- From the manual:
- IF YOU ARE CLIPPING THE PRE CHAIN...
- IN [PRE] PAD (Setup > I/O > Levels) – This should be set as low as possible to keep the noise floor low, but if you clip IN 1, you’ll need to increase the pad. If the input still clips with a 12dB pad (original FX8) or 18dB (FX8 Mark II), you’ll need to lower the level of your guitar or other upstream effects/device(s).
- LEVEL of your PRE effects – If the LEVEL is too hot on one or more PRE effect blocks, OUT 1 will clip. Don’t forget that the Noise Gate also has a LEVEL control.
- OUTPUT LEVEL PRE (OUT page of the preset main menu... page over from “Stompbox Mode”) – Each Scene of every preset has its own master volume setting for OUT 1 (PRE). Adjust this to normalize scenes, but watch out for clipping at out 1 and be aware that this also affects unity gain.
- OUTPUT 1 (PRE) HEADROOM (Setup: I/O: Levels) – This increases headroom on the output converter. Use this control only if you can’t address clipping by adjusting the settings above. The default is 6dB. Try 12 dB before using 18 dB as a last resort, since higher settings also increase the noise floor.
- OUT 1 GLOBAL EQ (Setup: Global: Out 1) – The Global EQ has the potential to boost signals to the point of clipping. Conversely this can also be a “quick fix” until you can adjust blocks/ or scenes as described above.
- No other controls or settings on the FX8 address IN1/OUT1 clipping.
- IF YOU ARE CLIPPING THE POST CHAIN...
- SEND LEVEL of your amp’s FX loop – Some amps have a knob or switch to vary send levels. Be sure to select the loudest channel on your amp when checking to see if this solves a possible problem of clipping at IN 2.
- LEVEL of your POST effects – If the LEVEL is too hot on one or more POST effect blocks, OUT 2 will clip.
- OUTPUT LEVEL POST (OUT page of the preset main menu... page over from “Stompbox Mode”) – Each Scene of every preset has its own master volume setting for OUT 2 (POST). Adjust this to normalize scenes, but watch out for clipping at Out 2 and be aware that this also affects unity gain.
- POST LEVEL (Setup: I/O: Levels) – SETUP: I/O: POST LEVEL can be set to +4dbu or -10dbV. This setting affects BOTH IN2 (POST) and OUT 2 (POST). +4dbu is “professional” standard. This setting gives you greater headroom, which is why this control is mentioned at all in a discussion about clipping. The increased voltage is also better for long cable runs between the FX8 and other equipment. -10dbV is the “home” standard but may also be used for music equipment. If your connected amplifier operates at -10dbV, choose this setting.
- OUT 3 GLOBAL EQ (Setup: Global: Out 3) – The Global EQ has the potential to boost signals to the point of clipping. Conversely this can also be a “quick fix” until you can adjust blocks/ or scenes as described above.
- No other controls or settings on the FX8 address IN1/OUT1 clipping.
- IF YOU ARE CLIPPING THE PRE CHAIN...
Unity gain
- Adjusting the PRE and POST Level controls in the Config page impacts unity gain.
- From the manual, chapter 15:
- Q: What does “unity gain” mean?
A: Unity gain means that the level at a device’s output is the same as the level at its input, with no change in gain. - Q: Why do I care that the FX8 is designed for unity gain?
A: The FX8 makes it EASY to achieve unity gain. This can be important because amplifier tone, distortion amount, dynamics and noise are level dependent. With unity gain:- The level of the signal from your guitar output can reach your amp input without being altered. Therefore, your guitar-amp interaction sounds and feels the same, offering a transparent playing experience while using the FX8.
- The level of your FX SEND can reach your FX return without being altered. The entire system can therefore perform optimally, without unpredictable changes to level, dynamics or noise when you engage True Bypass or bypass all post effects.
- Q: How do I set up the FX8 for unity gain?
A: You don’t need to! Just set up according the basic instructions in Section 3. A default empty preset should sound have the same level as True Bypass Mode. - Q: What might I do to inadvertently upset unity gain?
A: Many SETUP and EFFECT parameters change the gain level. Some of these are intended to change gain levels (how else is a boost supposed to work, after all?) Here is a short list of things to consider:- The LEVEL parameter of every effect increases or decreases the overall level.
- Changing MIX on certain effects changes both dry and wet levels. This is to prevent signals from “stacking up” and causing clipping. You can compensate with your ears by turning effects on and off and comparing the level with True Bypass engaged.
- If you’re going to change a block’s BYPASS MODE from the default setting of THRU, it is best to check its levels when you engage/disengage the effect BEFORE you switch to something like MUTE FX IN.
- The level parameters on the OUTPUT page of the main mode menu increase or decrease overall levels. Incorrect settings on the I/O: AUDIO page can result in gain changes.
- The NOISE GATE has a level control.
- If your rig is MONO, every BALANCE or PAN control can affect levels.
- The Global Graphic EQs affect overall level.
- The I/O LEVEL page settings DO NOT affect unity gain. Each setting is compensated internally.
- See also “Advanced Level Parameters” on page 73, which contains several tips about levels and gain.
- Q: Any last words of advice?
A: Use the TRUE BYPASS switch as a way to make sure your presets and scenes are on track. In general, it is better to be in control of your levels than to be fixated on the “concept” of unity gain. Do what sounds best to you and learn as much as you can about your gear.
- Q: What does “unity gain” mean?
Axe-Fx II and 4CM tutorials
Unity gain
- The Axe-Fx II can maintain unity gain when settings things up for 4CM. Just turn both Output knobs on the front panel fully up. This is only useful in a 4CM setup, there's no need for this when NOT running a 4CM setup.
- Cliff's comments:
- "Unity gain mode is a special mode designed for use with the 4CM. When you turn the output levels all the way up whatever you put in you get out (assuming all unity-gain blocks in the chain). If you have an amp block in the chain then you have tons of gain and therefore no longer have unity gain." source
4CM noise and ground loop
- 4CM can result in hum caused by ground loops. Humbuster cables help to prevent this.
- Cliff: "As soon as you put a power supply inside a product you are required by law to have a safety ground from the chassis to the third wire of the power cable. This can cause a ground loop. The GSP 1101 uses an internal supply and would be subject to ground loops depending upon the application. In the old days products only used 2-wire power cables and if a conductor shorted to the chassis it wouldn't necessarily blow a fuse and you could get electrocuted. Connecting the chassis to ground ensures that the circuit breaker will trip in the event that one of the power conductors shorts to the chassis. A wall-wart isolates the power supply outside the chassis inside a plastic housing which means that there is no requirement for the chassis to be connected to earth ground. The downsides of wall-warts are well known though. In certain applications (i.e. Hi-Fi) you can use a double-insulated power supply with no chassis safety ground but that is not permitted for "professional installations". With products that use internal power supplies if you encounter a ground loop you then need to either use isolation transformers or "cheater plugs" (which are dangerous). The FX8 eliminates the need for these by using a simple, inexpensive cable. Some products have dedicated ground lift switches but you are required to have at least one switch grounded and if you don't you are inviting disaster (blown output drivers, etc.)." source
- Using the Axe-Fx in a 4CM setup introduces noise because of the analog/digital conversion.
- Cliff: "It is very difficult to minimize the hiss when putting a digital processor in front of a high-gain amp due to the A/D and D/A conversions. The XL is probably one of the quietest processors made but there will still be some residual hiss when using high gain. The Output 2 Boost/Pad feature was specifically intended to minimize hiss in these scenarios by running the D/A converter as "hot" as possible and then reducing the signal level after the converter with an analog pad." source
- Javajunkie: "To get rid of the residue hiss, use the gate block as an expander. Place the gate block after the fx loop block. Use a very hi ratio, and a quick attack release time. Start with the threshold all the way down and raise it up until this hiss disappears."
- See Boost/Pad.
- Cliff's comments:
- "The very early Axe-Fx II's had more bandwidth than necessary on Output 2. The frequency response extended to hundreds of kHz. When used with certain tube amps this would cause instability in the output drivers. The solution was to limit the bandwidth to a "normal" range of 20 to 20 kHz. We provided the update for free and all units shipped after the first 100 or so had this update included. The Axe-Fx II Mark II, XL and XL+ have a redesigned output circuit that is immune from any of these issues." source
- "That hasn't been an issue since the first 100 or so units that were made years ago. The XL+ shares the same amazing low-noise architecture of the FX8. I regularly use my XL+ in 4CM as this is part of the modeling process. It's the quietest device I've ever tried in 4CM." source
- "If you increase the Output 1/2 Boost/Pad it will decrease the maximum output level and concomitantly increase the SNR by the same amount. Most guitars are well below line level so you can usually increase the Boost/Pad by 6 dB safely which will improve SNR by 6 dB. he higher the boost/pad setting the greater the SNR but the greater the risk of clipping." source
Activating the effects loop on an amp
- Some amps require inserting a dummy jack into the effects loop's Send to activate the effects loop.
Presence control when power amp simulation is switched off
- Cliff: "If you turn off power amp modeling always check the Presence control. It changes from a "classic" control to a shelving type where 5.00 is neutral. I just spent an hour trying to figure out why this preamp model I am working on wasn't matching. Forgot to set the Presence control to 5.00." source
4CM and I/O levels
- Make sure to set the required levels:
- Input 1 and Input 2 in I/O
- Output 1 and Output 2 knobs on the front panel.
4CM snake
5CM
- 5CM (5-Cable Method) is a variation where you add Cabinet simulation to the setup.
- How to set up 5CM.
As effects-only device in an amp's effect loop
- When using the Axe-Fx II or AX8 as an external effects-only device in the effects loop of an amp, you probably want it to send and receive LINE level signals. So use the input(s) at the rear, not Instrument. When using Input 1 (rear) on the Axe-Fx II, set Input 1 Select to Rear in I/O.
- Adjust I/O > Input Level for an optimal signal-to-noise ratio.
- Select the correct output mode in I/O.
- Use the physical output knob to get the required output level.
- Cliff: "You should NOT use Boost/Pad in this configuration." source
As effects-only device before an amp
- When placing the device in front of an amp:
- Set Boost/Pad to 12 dB (to make sure the full range of the D/A converter is used).
- Turn up Output 1 Level all the way.
Creating presets for effects-only
- To make a signal go through the Axe-Fx II or AX8, connect the grid input to output using shunts.
- Replace the shunts with the effect blocks you need.
- Do not add Amp blocks or Cabinet blocks. The TUBE PRE amp type may be an exception to warm up tones. And in some cases an user cab can be useful too, as a container for special IRs (i.e. Echoplex preamp coloring).