Always consult the official Owners Manuals first
Difference between revisions of "Expression pedals and external switches"
| Line 222: | Line 222: | ||
# Set Input Select in Drive and Amp blocks after Wah and Pitch to Left or Right, instead of Sum L+R. | # Set Input Select in Drive and Amp blocks after Wah and Pitch to Left or Right, instead of Sum L+R. | ||
| − | = | + | =Tips, tricks and troubleshooting= |
| + | |||
| + | ==Pedal ports: ADC levels== | ||
| + | |||
| + | The Axe-Fx III, FM9 and FM3 let you to check the ADC (Analog-to-Digital Converter) levels of the pedal ports in the [[Utilities menu]]. | ||
==Zipper noise== | ==Zipper noise== | ||
Revision as of 14:15, 17 May 2023
Contents
- 1 Remote control of Fractal Audio devices
- 2 Fractal Audio expression pedals
- 3 Expression pedal
- 3.1 Setting up an expression pedal
- 3.2 What happens if the pedal is not connected
- 3.3 Set up a global volume pedal
- 3.4 Set up a Wah pedal
- 3.5 Control the wet level of effects
- 3.6 Use a pedal to morph between clean and dirty tones
- 3.7 Use a single pedal for multiple tasks
- 3.8 Display the tuner at heel down position
- 4 External switch
- 5 Tips, tricks and troubleshooting
- 6 Videos

Axe-Fx_III,_FM9_and_FM3
FC-6 and FC-12 foot controllers
Whammy
Wah block
Volume/Panner block
MIDI/Remote menu
Controllers and modifiers
Connections and levels
Remote control of Fractal Audio devices
Fractal Audio's processors can be remotely controlled in various ways. The possibilities depend on the processor. This includes expression pedals and external switches, such as Fractal Audio's EV-1 and EV-2 pedals, connected directly to the processor or to a floor controller.

Fractal Audio expression pedals
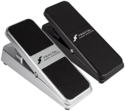
EV-1 expression pedal
The EV-1 is the large version of Fractal Audio’s expression pedal / analog volume pedal.
Product information:
"The EV-1 is an all new EXPRESSION PEDAL, perfect for use with all Fractal Audio Systems products (and many 3rd-party devices). Unlike most expression pedals it has a true linear response with planetary gearing and a long, smooth pedal throw. The EV-1 doubles as an analog volume pedal, with separate IN and OUT jacks connected to an audio-taper pot. It features a sturdy cast metal housing, comfortable non-slip rubber tread, and is available in
either Silver orBlack."
- Product Guide
- Planetary Gear Drive
- High-quality dual potentiometer rated for 1M rotations
- Durable cast aluminum chassis
- Adjustable pedal tensioner
- 3 jacks at the front: In, Out and Expression. In and Out are for volume
- Requires TRS-to-TRS cable when used as an expression pedal
- Not spring-loaded
- Built-in analog volume pedal (500K high-impedance)
"The planetary gear drive solves the dead zone problem."
"They also work as a traditional volume pedal. There are two ganged pots inside, one is a high-impedance log-taper volume pot and the other is a low-impedance linear-taper expression pot. The design is our own." [1]
"We make tour-grade equipment. The potentiometer in the EV-1 has a conductive plastic element with IP67 ingress protection. It is rated for 1,000,000 rotations and probably costs 10 times what the pot in other products cost. The housing is cast aluminum which is then powder coated for extra protection. You're getting something you can give to your grandchildren." [2]
"The EV-1s are fully made in China except for the pots which are made in USA as nothing in China or Japan met our lifespan requirement (1 million rotations minimum)."
(May 2021) "The EV-1 expression pedal will be manufactured in black only going forward."
Buy TRS-to-TRS cables directly from Fractal Audio
EV-2 expression pedal


The EV-1 is the small version of Fractal Audio’s expression pedal / analog volume pedal.
- Dimensions
- Planetary Gear Drive
- High-quality dual potentiometer rated for 1M rotations
- Durable cast aluminum chassis
- Adjustable pedal tensioner
- 1 jack at the front: expression
- In and Out jacks at the sides for volume (analog, 500K high-impedance)
- Requires TRS-to-TRS cable when used as an expression pedal
- Not spring-loaded
Pedal sizes
EV-1, Ernie Ball and Mission pedals:

EV-1, Mission and EV-2 pedals:

Expression pedal
Setting up an expression pedal
A pedal that's connected directly to the rear of the processor, can be configured on the Pedal page of the I/O menu.
If the pedal is connected through another connected device, such as an FC controller or MIDI controller, use that device's configuration menu to set up the pedal, including calibration.
Expression pedals require TRS-TRS cables.
"TRS” stands for TIP-RING-SLEEVE and describes the configuration of a 1/4" end plug or jack with three connectors. Normal guitar cables are “TS” (Tip-Sleeve) since they lack the ring required for a third contact. Expression pedals require TRS cables because full control voltage is transmitted to them on one contact (the tip), while less than full voltage is returned to on another (the ring) so the host device is able to sense and utilize the pedal position. The third contact (sleeve) is connected to ground."
It's very important to always calibrate an expression pedal for proper operation.
What happens if the pedal is not connected
If a parameter is controlled by a switch or pedal, and that pedal or switch is not connected at startup, the processor needs to know what value to use. Disconnecting a pedal that operates as a Volume pedal should not mute the device, for example.
The desired “initial” value can be set in the MIDI/Remote menu, through the Initial Value parameter.
Note: This applies only to parameters that have been assigned an "external controller". This does NOT work:
- when a parameter is assigned directly to a Pedal port on the hardware, or
- when a parameter is assigned to an External Controller which is assigned to a Pedal port.
To accomplish the same in the those cases: engage the PC RST parameter in the modifier menu.
Set up a global volume pedal
This is covered in the Owner's Manual.
Note: the FX8 lets you specify the exact position of the Volume control.
Set up a Wah pedal
This is covered in the Owner's Manual.
Control the wet level of effects
You can use an expression pedal to control the overall "wetness" (effect level of multiple/all effect blocks):
- Connect and calibrate your expression pedal.
- In the I/O menu set one of the EXTERNAL controllers to "PDL" (let's use EXT1 in this example).
- Create your preset with Reverb and Delay at their most extreme (wet) settings.
- Open the Delay block for editing. Open the modifier menu for the INPUT GAIN parameter. Set the modifier source to EXT1.
- Select the REVERB block and repeat these steps.
- Save the preset.
The pedal will now blend between full wet and full dry.
Use a pedal to morph between clean and dirty tones
Watch the video below.
Use a single pedal for multiple tasks
Method 1 (i.e. control either Wah or Whammy):
- Insert a Wah block.
- Insert a Pitch block, directly above or below the Wah in a parallel row. Connect it back to to the main row.
- In the Modifier menu of BOTH effects (Wah: Frequency; Pitch: Control): set Source to External 1. Enable Auto-Engage.
- Add a Mixer block to the main row, just after Wah and Pitch.
- Edit Mixer: enter the Modifier menu of the Gain parameter for the row that connects to the Wah. Set Source to another external controller (which will be attached to an IA-switch to switch between Wah and Whammy). Set Start Value to 100% and End Value to 0.
- Do the same for the row that connects to the Pitch block. But: set Start Value to 0% and End Value to 100%.
- Program an IA switch to switch between Wah and Whammy, using the Mixer rows. Use the CC of the external controller that you specified while editing the Mixer block, and send "127" for the Wah, and "0" for the Whammy.
- That's all. Moving the pedal should activate both the Wah and the Pitch block. But thanks to the Mixer block you'll only hear one of these effects. If you're hearing the Wah and the Whammy effects simultaneously, you need to press the IA-switch to get the Mixer block to work
Method 2 (i.e. control Volume and Wah): (source: Bakerman)
- Place a Volume block on the grid.
- Assign an IA switch to an external controller's CC.
- Assign another external controller the Wah and Volume control knobs.
- Set the first external controller as a Bypass modifier for both blocks and reverse the slope of one (start 100, end 0).
- Now the IA switch will toggle between Wah/Volume and the pedal will control both.
Method 3 (use scenes to switch the pedal to another effect, i.e. Wah, Whammy and Volume):
- Put Wah and Pitch and Volume in one column (parallel).
- Assign an external controller (pedal) to the effects. Set to Auto-Engage in Wah and Pitch.
- In Wah and Pitch turn down Level in the block's Y state.
- Scene 1 is for Wah. Set Wah to X, set Pitch to Y, bypass Volume.
- Scene 1 is for Whammy. Set Wah to Y, set Pitch to Y, bypass Volume.
- Scene 3 is for Volume. Set Wah to Y, set Pitch to Y, engage Volume.
- To make this work with effcts without X/Y support, use a Scene Controller.
Method 4 (use the Multiplexer block in firmware Ares and later):
- Read this: Multiplexer block
Method 5 (controle Volume and Wah with a expression pedal with a switch: demonstration)
- Put Wah and Volume after each other on the grid.
- Configure both blocks to be controlled by the pedal. Set the Wah to Auto-Engage.
- Attach the pedal's switch to the Bypass parameter of both blocks. Set Min/Max in the modifier menu in one block to 0/100 and in the other block to 100/0.
- The switch now switches between Wah/Volume duty.
Display the tuner at heel down position
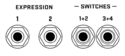
External switch
Setting up an external switch
You can connect external switches to expand the switching possibilities.
The FC-controllers and FM3 allow dual switches per port when using a TRS cable. The Axe-Fx III and FM9 limit each port to a single switch (TS cable).
tap
tuner
presets
sceners
channels
blocks
Switch presets
You can use an external switch to switch presets. This works fine if you have just a few presets to switch between. If the processor has more than one PEDAL jack, you can assign one to increment presets and the other to decrement presets. You can also use a switch to switch scenes, see Scenes.
Engage or bypass an effect
You can use an external switch to engage or bypass a specific effect. In the I/O menu assign the effect block to the switch (or pedal).
Effect bypass state
You can use an external switch to maintain its bypass state when switching presets and scenes.
- Connect the switch to a pedal port
- Assign that pedal to an External Controller
- Assign the Bypass Mode parameter of the effect to that External Controller (modifier menu: Source). Repeat this in each preset which you want to control
- Now the switch will control the effect's engaged/bypass state, regardless of the effect's stored state, and stay in sync
Switch multiple effects
It's possible to use your expression pedal for multiple purposes while staying in the same preset. Suppose you have one expression pedal and you want it to use as a wah as well as a Whammy, without switching presets:
- Insert a Wah block.
- Insert a Pitch block, directly above or below the Wah in a parallel row. Connect it back to to the main row.
- In the Modifier menu of BOTH effects (Wah: Frequency parameter; Pitch: Control parameter): set Source to the External controller that's attached to your expression pedal. Set Auto-Engage to Fast, Medium or Slow.
- Add a Mixer block to the main row, just after Wah and Pitch.
- Editing the Mixer: enter the Modifier menu of the Gain parameter for the row that connects to the Wah. Set Source to the external controller that is or will be attached to an IA-switch (which switches between Wah and Whammy). Set Start Value to 100% and End Value to 0.
- Do the same for the row that connects to the Pitch block. But: set Start Value to 0% and End Value to 100%.
- Program an IA-switch on your MIDI controller to switch between Wah and Whammy, using the Mixer rows. Use the CC of the external controller that you specified while editing the Mixer block, and send "127" for the Wah, and "0" for the Whammy.
- This is it. Moving the pedal should activate both the Wah and the Pitch block. But thanks to the Mixer block you'll only hear one of these effects. To bypass the effect hold the pedal in toe-down position. If you're hearing the Wah and the Whammy effects simultaneously, you need to press the IA-switch to get the Mixer block to work.
You don't have to use a Mixer block (available on the Axe-Fx only). Another solution:
- Do the same as above but leave out the Mixer block.
- Set Bypass mode of one block to Thru and the other block to Mute.
- Assign an External controller (attached to a switch) to the Balance parameter in each block. Set Start Value to 100% and End Value to 0 in one block, andvice versa in the other.
- Set Input Select in Drive and Amp blocks after Wah and Pitch to Left or Right, instead of Sum L+R.
Tips, tricks and troubleshooting
Pedal ports: ADC levels
The Axe-Fx III, FM9 and FM3 let you to check the ADC (Analog-to-Digital Converter) levels of the pedal ports in the Utilities menu.
Zipper noise
If moving the expression pedal creates choppy sounds or zipper noise, increase the Damping parameter in the Modifier menu.