Always consult the official Owners Manuals first
Editors
This page is under construction. Information is being added.
Contents

Software editors
Windows and Mac
Axe-Edit III, FM3-Edit and FM9-Edit are the software editors for Fractal Audio's Axe-Fx III, FM3 and FM9 guitar processors.
Download the latest versions of the editors
System requirements:
- Mac: Mac OS 10.7 or newer (Intel or M1 processors)
- Windows: Windows 7 or newer (32-bit or 64-bit)
Notes:
- Starting with firmware 19.06 for the Axe-Fx III, Axe-Edit III 1.11.00 (or greater) is required to communicate with the Axe-Fx III. Previous versions of Axe-Edit III will not work with firmware 19.06 or greater. Axe-Edit III 1.11.00 (or greater) will work with previous firmware version 3.02 and greater.
- On Windows computers, Fractal Audio's USB driver has to be installed first. Download Fractal Audio's USB drivers for Windows
- If you get the error “MSVCP140.dll is missing”, install the MS Visual C++ Redistributable Update.
- Older versions of the editors can be downloaded from the unofficial archive.
Tablet and smartphones

Currently there are no official editors available from Fractal Audio for iOS/Android tablets and smartphones. Alternative options:
- Extend the computer screen to a separate tablet (wired or wireless) using tools built in the OS, or a software utility such as Duet Display (Mac/iOS), or a combined hardware+software solution such as Luna Display. This lets you move the editor screen to the tablet and use its touchscreen for editing.
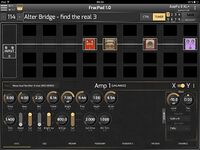
- Run FracPad, forum member AlGrenadine's mobile app for Fractal Audio's processors. It runs on Android and iOS devices. It's not officially supported by Fractal Audio.
- Use wireless MIDI connections with Macs and Windows PCs, with the computer acting as the interface between the app on the tablet or phone and the Fractal Audio device. More information
Installing and connecting
Installing
The installer is packaged in a .zip (Win) or .dmg (Mac) archive file. It may contain documents in addition to the actual program. Double-click the file and follow the on-screen instructions.
Release Notes are included with each installer download. Read them! They include information about new features, changes, and what you should be aware of before updating and using the new version. Release notes are also displayed after installation and can be found under Help | View Release Notes.
The installed version of the editor is displayed when clicking on the top-left program logo, or when selecting Help | About.
Connecting

The software editors depend on USB 2.0 (or greater) to connect to the hardware. Operation without an USB connection to the guitar processor is NOT supported (no offline editing). The connection uses the USB-B port on the hardware (not the USB-A port on the FM3).
On Windows computers, Fractal Audio's USB driver has to be installed first. Download USB drivers for Windows
To confirm that the editor is communicating with your Axe-Fx II, look for a green check mark with the word “Connected” in the upper left corner of the program window. If the “Connected” message does not appear, don’t panic. Go to Settings | Preferences to select the ports of the device, or read the Troubleshooting section below.
The editor relies on intensive two-way communication which can cause audio gaps or stutters when operating the guitar processor through its onboard user interface or through a foot controller like he Fractal Audio Systems FC-6 and FC-12. The Pause communications button in the upper left corner puts communications on hold so you can test performance without glitches. Alternatively, select the equivalent command in the Settings menu, or press the F8 key on your keyboard.
The editor can control multiple guitar processors of the same type. Click Tools | Show Available Devices to see which connected devices are detected and available. The dialog box provides Scan and Test options.
When using a USB-C to USB-A adapter on a newer Apple computer, plug the USB-C adapter into a the port on the Mac first, allow it several seconds to “wake up” and then connect a USB cable and the unit into the adapter.
Startup processes
Refresh definitions
When you first launch the editor, or for the first time after having updated your guitar processor’s firmware, the editor will likely need to refresh the information it has stored locally about the device (“definitions”). The editor detects such changes and will start the refresh process automatically. The process may run for a while. Once it completes, you may continue using the editor. You can manually force the editor to re-read block definitions by selecting Settings | Refresh After New Firmware or Settings | Preferences | Refresh. Note that installing beta versions of firmware will NOT trigger the automatic refresh process, so you'll have to do that manually.
Automatic updates
At startup, the editor checks automatically if an official update for the editor is available and if so, offers the option to download and install the update (this process can be disabled in Settings | Preferences | Options). You can also click Help | Check for Updates. Or download the latest version of the editor manually from Support.
Refresh preset and cab names
Also, at each startup the editor will fetch all Presets names and Cab names from the guitar processor. This ensures that the editor and the guitar processor are in sync. You can disable this in Settings | Preferences | Options. When disabled, you can still refresh Preset and Cab names manually by pressing the Refresh button in so-called “picker” windows (explained later).
Troubleshooting


Running Fractal-Bot and a software editor at the same time can cause conflicts. Try to avoid this.
Apple's energy saving options in some Macs can cause issues like dropped USB connections after waking up. Set them at default in System Preferences.
Google Chrome can cause issues with older editors.
"There is a known issue with Chrome seizing MIDI ports (both physical and virtual MIDI-over-USB ports) as part of some misguided MIDI over the internet idea. Since the AX-8 is USB 1.1 it only allows one connection so if Chrome grabs it then AX-8 Edit won't be able to use it. Unfortunately Google seems uninterested in fixing it." [1]
"Chrome definitely can hijack the MIDI over USB port on the AX8. When that happens, it's not enough to just close the browser, you have to ensure that it is not running in the background. Fractal Audio has tested and confirmed this." [2]
If you're experiencing issues running the Axe-Fx III, Axe-Edit III and Apple Logic, read this for a solution.
Explaining the editor window
The editor’s window can be scaled by dragging a border. Select Settings | View to snap the editor to Normal Size or Full Screen. Note that the editor has a fixed width/height ratio, so the editor may not fill your computer’s entire display in Full Screen mode.
Top

Many of the controls and commands described below have keyboard shortcuts.
Pause Communications button (title bar): see above.
Program logo: display the version of the installed editor.
"Connected!": this shows if the editor is connected to the hardware, and shows the version of the firmware installed on the guitar processor.
If you have given the guitar processor a custom name in Setup | Config, that name will appear in the upper left corner.
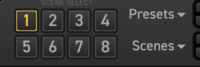
Scene buttons: press one of the numbered buttons at the top to select a Scene. Or select a Scene from a dropdown menu, or scroll through Scenes using the “+/-“ buttons. The name of the scene is displayed next to the Scenes dropdown menu, where it can be renamed too.
Presets dropdown menu: select a Preset from a dropdown menu next to the preset name. Or scroll through Presets using the “+/-“ buttons. The number and name of the preset are displayed next to the Presets dropdown menu, where it can be renamed too.
Preset name: once a preset is loaded in the editor, its name is displayed and its contents are displayed on the grid — the structure where blocks are placed and interconnected. The current scene name is displayed too.
Picture icon: create a Snapshot, or use its dropdown menu to show the Snapshot folder contents, clear the list or load a Snapshot.
Save button: save the preset. The yellow LED lits when changes to the preset have not yet been saved.
Setup button: enter the Setup menu to set global parameters for the guitar processor, including audio I/O, Global EQ, USB levels and more.
Tuner button: this pops up the Tuner.
Tap button: tap it to set the Tempo.
BPM: shows the Tempo of the current preset in BPM (Beats Per Minute).
CPU: this shows the current CPU usage as a number and meter. When the CPU usage exceeds a threshold, a red “Warning” message is displayed here.
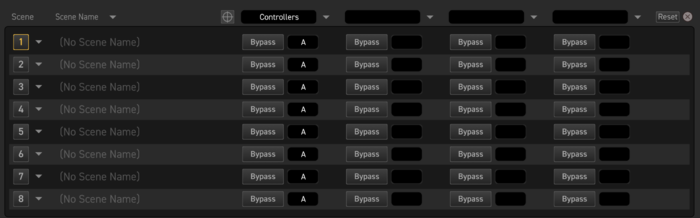
Controllers button: configure Internal Controllers, Scene Controllers and Tempo settings. Set the state of Control Switches per scene. See where Modifiers are being used. Read more about these functions in the guitar processor’s Owner’s Manuals.
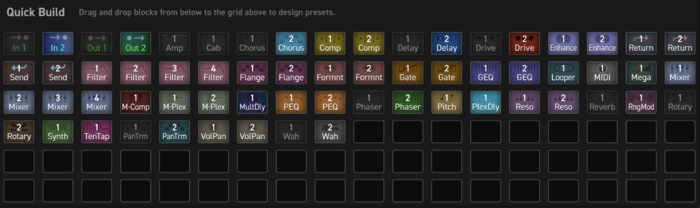
Quick Build button: this lets you insert a block from a graphical interface.
Block Info button: this changes the way blocks are displayed on the grid. By default, the full name and the block instance are shown. Pressing Block Info (or holding the ALT key) will abbreviate the block name, show the active channel and show Global Blocks.
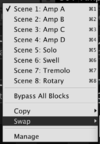
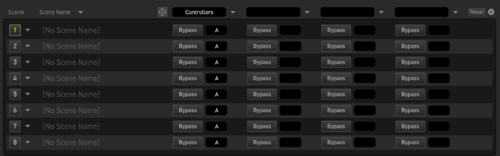
Scene Manager button: this lets you set the state of blocks across scenes, (re)name scenes, copy and swap scenes, etc.
Perform button: configure the Performance pages, globally as well as per preset.
Amp information (below the preset name): this shows the currently being used Amp Type(s) and Amplifier block channel(s).
"10" button: this configures Preset and Scene names to mask characters that do not fit on the scribble strips of the foot switches.
FC Edit: configure the onboard switches of the FM3 and FM9, and the FC foot controllers.
FC Per-Preset: same as above, but this applies to the current preset only.
Middle
The lay-out grid (middle section) shows the layout of the preset (blocks). Click any block on the grid to display its settings in the editor area, below the grid.

Bottom
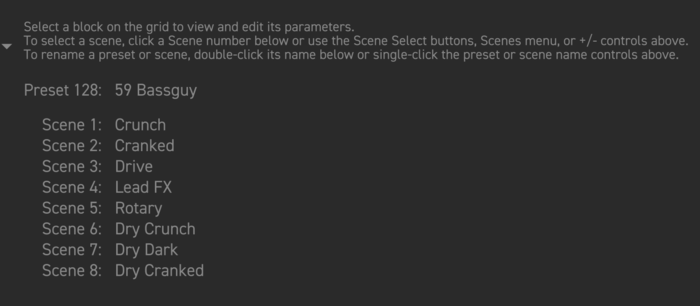
The editor area (bottom) displays either the names of the scenes, or block parameters and controls.
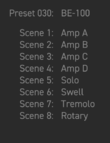
If there's no block selected (empty block), this area shows the names of all 8 scenes. Click on a number to switch scenes. Double-click the scene name to rename the scene. Note: this list disappears when a block is selected on the grid. Click on an empty spot on the grid to show the list again.
Clicking on a effect block, displays parameters and controls.

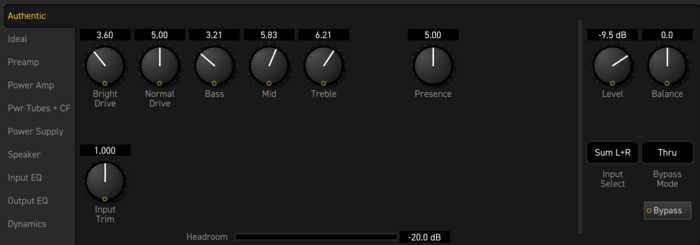
The icon at the left shows the name of the currently viewed or edited block.
Channel: this lets you select a channel of the currently selected block and lets you manage channels through its dropdown menu.
Type: (when supported by a block) this lets you select a specific type of the effect. This acts as a kind of super parameter, and changing it can cause other parameters to appear, disappear or change their values.
Library: this menu lets you save blocks and channels to your personal library on disk, recall them at will, and provides other functions.
Global Block: link, load and unlink blocks as Global Blocks. Only available in Axe-Edit.
Editor controls
The various knobs, sliders, dropdowns and switches are used to control sound parameters in the guitar processor. Changes are heard in real time while you work. Note that stuttering or light clicking can occasionally be heard while you adjust certain parameters.
Knobs:
- Click a knob and drag up/right to increase, or down/left to decrease. Fastest response is obtained with 45° Northeast/Southwest motion. Hold ⌘ (Mac) or CTRL (Win) key for finer mouse resolution.
- The default knob mode is LINEAR. You can momentarily invoke CIRCULAR knob mode by holding the ALT key. You can also change the default knob mode under Settings | Preferences | General.
- Double-click the knob or its label to set a generic default value. Important: Generic knob values will not necessarily be the same as those obtained when you reset an entire block, change its type, etc.
- Scroll (mouse wheel, trackpad, etc.) over a knob to edit parameter values. Hold ⌘ (Mac) or CTRL (Win) key for fine resolution, giving each wheel click has the same precise action as a single “tick” of the VALUE wheel on the guitar processor. The UP and DOWN arrow keys are equivalent to using the mouse scroll wheel.
Faders:
- Click and drag the fader handle. Double-click, wheel and arrow keys work the same as when operating a knob.
Switches:
- Click the switch. Double-click the label to set it to a default value (see above). Some switches may disengage automatically.
Dropdown menus:
- Click the text area of the dropdown to display a list of all options. Double-click the label to set a generic default. Click the UP/DOWN arrows to select the previous or next value. Tip: Turn any dropdown menu into a picker window (see below) by holding SHIFT and clicking the dropdown control.
Picker windows:
- This is a special selection window presented when a dropdown would be too small for the available options. Picker windows normally close once you click a selection. Tip: Turn any dropdown menu into a picker window (see below) by holding SHIFT and clicking the dropdown control.
- Use the “Pushpin” button in the upper right corner (shown at left) to keep the window pinned open. This allows you to audition multiple options before manually closing the window.
- Picker windows include a Search field which helps you filter the list to find a desired entry. You can search on item names or numbers (number matching can be disabled in Settings | Preferences | Options as desired). You can also use ARROW KEYS to navigate and the ENTER key to make selections in a picker window.
- The Cab Picker shows the names of UltraRes cabs in italics. Read more about UltraRes in the Blocks Guide.
Working with blocks
Managing blocks
Insert
- Right-click (or Control+click on the Mac) any grid slot to bring up the Grid menu. Choose a block and it will be placed on the grid. Blocks already on the grid are shown as disabled in this menu. You can also select Insert on the top-level Block menu or press Quick Build.
- A keyboard shortcut can be used to place “shunts”: ⌘+U (Mac) or CTRL+U (Win).
- You can use the Grid menu to replace any block with another of a different type

Delete
- Select a block and press the DELETE (Win) or BACKSPACE (Mac) key on your keyboard. Or select Delete in the top-level Block menu or by selecting Grid menu | Edit.
Bypass / Engage
- Double-click or select the block and press the SPACEBAR key. You can also click Bypass/Engage in the top-level Block menu or the Grid menu.
- You can bypass or engage a block across ALL scenes at once, using a shortcut key listed near the end of this document.
Swap
- Drag and drop one block onto another (or on a shunt) to swap their grid positions. All connections to and from each block will be preserved when you perform a swap.
- Hold ⌘ (Mac) or CTRL (Win) while dragging/dropping to force a block to replace instead of swap.
Move
- Drag a block to an empty grid space to move it.
Cut / Copy / Paste
- Select a block and press a keyboard shortcut (also appears on the top-level Block menu or by selecting Grid menu | Edit):
- Mac: ⌘+X / ⌘+C / ⌘+V
- Windows: CTRL+X / CTRL+C / CTRL+V
- You can copy/paste blocks across presets.
- Copy a block, then select another block of the same type before pasting and all settings of the first block will be transferred to the second (Ex: DELAY 1 and DELAY 2).
Reset
- Right-click a block and choose Edit | Reset Channel from the menu. Or select the block and press ⌘+I (Mac) or CTRL+I (Win) or choose Block menu | Reset Channel. This sets the parameters in the current channel to their default values.
- Resetting applies to the current channel only. To reset an entire block (all channels) the reset has to be executed per channel.
Disconnect
- Select a block and press ⌘+D (Mac) or CTRL+D (Win) to remove all connector cables from its input and output. Or select the equivalent command in the Block menu or Grid menu | Edit.
- You can also drag a block to any empty grid slot in another column with the same effect.
Library: discussed later.
Select a Channel
- Select a block’s channel by pressing A, B, C or D on the keyboard (or “X” for the next channel), or the bottom-left Channels dropdown menu, or in the top-level Block menu or in the Grid menu. The Channels dropdown menu also lets you copy and paste channels.
Move row or column
- Use the sliders at the bottom and left borders of the grid to move an entire row or column. Or select Block menu | Move.
Grid Navigation Mode
- When working with blocks on the grid, the editor will load data from the hardware device. If displaying the settings of blocks isn’t necessary, you can speed grid operations by enabling Grid Navigation Mode: press ⌘+SHIFT+G (Mac) or CTRL+SHIFT+G (Win). A border will appear around the grid. To quit Grid Navigation Mode, press Escape on your keyboard.
Quick Build
- Pressing Quick Build (or press the “Q” key) lets you insert a block from a graphical list of blocks (example below).
Connecting blocks
The editor makes it easy to add and remove block connections.
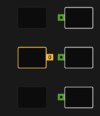
- When you select a block, notice that it displays Input and Output “Jacks” — small circular objects labeled “I” and “O”. These are used to create or remove connections to/ from the selected block.
- When you click a jack, it becomes selected and all valid destination jacks are highlighted in green.
- Click the desired jack, and the connection appears.
- You can make connections in either direction, even spanning multiple columns as desired in a single click. Just as on the device itself, if you make a connection to the jack of an empty grid location, a shunt will be inserted automatically.
- Destination jacks shown with a red X indicate that an existing connection can be removed.
- Click the red “X” and a connection will be removed.
Tips:
- You can double-click any existing connection to remove it instantly.
- To connect across an entire row, connect the output of the first block to the input of the last block.
Editing blocks
When a grid block is selected, its parameters are shown below the grid in the editor. The editor section will have a different number of “pages,” in vertical order.
With Grid Navigation Mode enabled (see above), the parameters of blocks will not be fetched and displayed (to speed things), but you can still change the positions of blocks on the grid. Press ⌘+SHIFT+G (Mac) or CTRL+SHIFT+G (Win) to enable Grid Navigation Mode and Escape to quit.
Channels
Channels give most block types four fully independent sets of parameter values that can be used to toggle sound changes at will. It works like the “channels” of an amp or some pedals.
Click the ABCD control in the editor to select the desired channel. Remember that the active channel can be set differently for each SCENE within a preset.
Click on the Channel dropdown menu for copy and paste options. You can copy/paste states between blocks of the same type, even across presets. The channel can also be toggled in the Grid menu and the top-level Block menu, and by simply pressing the A, B, C, or D key on your keyboard, or X for next channel. You also reset a channel and set a block to a specific channel across all scenes (Block menu | All Scenes).
Some of these actions can also be accomplished in the dedicated Scene Manager tool.
Library
About the Library
The Library is one of the most powerful features of the editor. It allows you to create a library on disk containing your favorite settings. A block or channel saved in the Library includes all parameter settings for all four channels of the block or just a single channel plus modifier assignments.
To use the Library, you might dial in a Delay block and then save it as “My No.1 Delay”. Then, when working later in another preset, you could recall the saved block and all its settings with just a few clicks.
It's important to note that when you recall a block or channel from the Library, it does NOT have a connection (no dynamic link) to the master copy on your computer.
Block and channel files are interchangeable between the editors for the various guitar processors (current generation). Parameters which are not supported by a specific guitar processor are ignored.
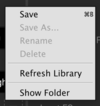
There are multiple ways to save blocks and channels to the Library. The easiest is perhaps the Library control which appears in the lower left corner of the editor whenever a block is selected. Click on the arrow and choose Save. Name the block or channel, choose between saving just the channel or the entire block, press Save and you will have created a new entry!
You can also press the keyboard shortcut (Mac: ⌘+B, Win: CTRL+B) or select the Library from the Block menu or the Grid menu.
Once you’ve recalled a block (see below) you can make and save changes, or use Save As... to create a totally new entry from the current settings. You can rename or delete an entry, or force the editor to re-read all data from disk.
Selecting Preset | Save as Blocks in Library lets you export all blocks for the current preset to the Library folder with a single command. The blocks are saved in a timestamped directory with the format YYYYMMDD-HHMMSS ("20210709-093339", for example), under which will be folders for each preset. You need to provide a name (unique within the category) whenever you save a new library entry.
Tip: When naming, keep in mind that the library is organized by type. For example, if you were saving Multidelay block settings as “Shimmer”, you could simply call it “Shimmer” instead of “Multidelay Shimmer”.
Blocks are saved as individual .blk files to your computer in: ~/Documents/Fractal Audio/(name editor)/Blocks
You can change the location of this directory in Settings | Preferences | Workspace.
You can rename a .blk file on disk, but this won’t change its name in the Library.
To recall an entry from the Library, use the Library control, the Block menu or the Grid menu. You can also drag and drop a .blk file from your computer into the editor’s grid.
Library blocks are completely interchangeable with any numbered instance of the block. For example: You can save “FILTER 1” and recall it as “FILTER 1”, “FILTER 2”, “FILTER 3” or “FILTER 4”.
You can use your operating systems’ file management to manage items in your Library (or share them with other owners). Entries are automatically organized in subfolders by type (AMP, CAB, DELAY, etc.) but this is for only for your convenience as the editor will recognize all valid files found anywhere below the Library folder.
Sharing a library between editors
The latest generation of hardware (FM3, FM9 and the Axe-Fx III) can share libraries. Where minor technical inconsistencies exist between blocks, the editors do a good job of interpolation and making them work across the devices.
To best take advantage of this, you need to configure each of your editors to point to shared folders for holding blocks and other things. You do this in Settings | Preferences | Workspace.
Exporting a block for sharing
Here are instructions for exporting a single block file for sharing in something like the The Mother of All Effects Thread.
Select the block you want to save settings for in the grid area of the editor. With the block selected, in the lower left corner of the editor you will see the block library management area for the block. It has the header Library -- it should be quite obvious.
Press the down arrow next to the Library header to bring up the library management menu. Select the Save option from the menu. You'll be presented with a dialog box. Name the block settings something descriptive. Whatever you enter here for the name of the block is what you'll see in the library selection dialog in the editor. You can also chose to save just the settings for a single channel (which can then later be loaded back into any channel on a block) or all the channels for the block. Once you've named your block and picked your save option, press the Save button.
The block is now saved to disk.
To find the file that was created, press the down arrow next to the Library header once again and select Show Folder from the menu. A system folder dialog will open to the exact location where the block files are being saved for this effect block type. The block filename on disk should look something like:
The Name You Chose for the Settings_YYYYMMDD_TIMESTAMP.blk
You can use whatever mechanism you like to share this .blk file. For example, the forum allows you to drag these files into posts where it attaches them to the post for others to download.
You can bring .blk files shared by others into your editor so you can create instances of that block with shared, saved settings in your own presets. You'll need to know the path where your editor is looking for block settings and can find this using the Preferences... > Workspace menu on the editor. Download the .blk file to your computer. Using your computer's file browser, locate the downloaded .blk file on disk. Copy that file from the download location to the location where your editor is looking for block files.
You don't need to put the file in a subfolder, but it is advantageous if you have a lot of block files saved to organize things into subfolders. By default the editor will create a subfolder for each effect block type when saving settings, i.e., Chorus blocks will have their settings saved into a Chorus subfolder.
When the editor scans for block settings it scans the entire folder tree starting from the Library setting you tell it to look in. This lets you organize block files in any way that makes sense to you, with as much subfolder hierarchy as you like.
For example, forumite iaresee likes to create a subfolder named after the forumite who shared the block settings and then, under there, a folder named after the block. This lets him remember who created the settings in addition to what block the settings apply to (and conveniently, the block file names already include the date and time stamp by default in their file name).
Example:
Editor/
    blocks/
        austinbuddy/
            Flanger/
                Deluxe Electric Mistress_20190513_231434.blk
        fremen/
            Amp/
                fremen ultra-clean_20210501_231434.blk
        Chorus/
            Standard Chorii_20210616_204455.blk
Note, after you've saved a block file to your folder you need to refresh the block settings in the editor. You can do this by selecting any block in the grid, pressing the down arrow next to the Library header, and selecting Refresh Library from the menu. The editor will rescan _all_ the block settings for _all_ the blocks found under the library path.
Forumite Leon Todd's (2112) video Tuesday Tone Tip - Blocks & Channels Library briefly discusses importing an entire library of blocks.
Global Blocks
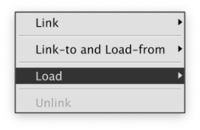
Axe-Edit III includes full support for Global Blocks, a feature found exclusively on the Axe-Fx. All operations are all supported through the Global Blocks control in the bottom-left corner of the editor.
Press Block Info, or hold the ALT key (Win) or Option key (Mac), to see which blocks on the grid are Global Blocks.
Select Preset | Unlink All Links from Global to unlink all global blocks in the current preset, which is handy when sharing a preset or when creating backups.
For more information about Global Blocks in the Owner’s Manual.
Working with scenes
Scenes provide every preset with 8 sets of saved settings for a limited set of parameters:
- Bypass State of every block in the preset
- Channel of every block in the preset
- Scene levels in every Output block in the preset
- Scene Controllers settings
- Scene MIDI block settings
- Control switches state
- Scene name
All other parameter settings remain the same across all scenes in your preset.
Select
To select a scene in the editor, simply press one of the Scene buttons at the top. You can also hold ⌘ (Mac) or CTRL (Win) and press any scene’s number on your keyboard for direct selection. Or click on Scene 1-8 below the grid, shown after loading a preset or when selecting an empty block on the grid.
Scenes dropdown menu
The Scenes dropdown menu provides handy options, such as copy/paste, swapping, engaging or bypassing all blocks. Note: The clipboard for scenes is cleared when you change presets or “revert” the current preset. @
Rename
To rename a scene, click and edit the scene name at the top, or double-click the scene name below the grid (displayed after loading a preset or when selecting an empty block on the grid).
Scene Manager
Many of these actions can be also accomplished in the dedicated Scene Manager tool.
The Scene Revert setting in the guitar processor’s own MIDI/Remote menu is ignored when switching scenes in the editor. So, if you change the bypass states of blocks and use the editor to switch to other scenes and then return to the earlier scene, those blocks’ bypass states will still be the same (not reverted to their initial stored states).
Working with presets
Load
In addition to loading presets from the guitar processor itself, you can also import (load) individual presets from disk. This allows you to load files you’ve backed up, downloaded, or saved as Snapshots.
Choose Preset | Import to display a file browser dialog. Or press CONTROL+SHIFT+⌘+I (Mac) or CTRL+SHIFT+ALT+I (Win). Navigate to a folder, select any valid preset SysEx (.syx) file for your guitar processor and open the file. The preset is instantly imported to both the guitar processor itself (buffer) and the editor, so you can audition and edit as desired. You can also drag and drop a preset file from your computer onto the preset area of the editor.
Imported presets are NOT stored in the guitar processor until you manually save the preset!
You can also open a saved Bank file (.bnk) and import a single preset from that bank (a bank file contains up to 127 presets). The process is the same.
Select Preset | Recent Presets to quickly return load one of the last 10 presets you’ve saved or loaded.
Tip: “Pin” the picker window and you can audition presets before importing one.
Save
As on the hardware, you will be notified of any unsaved changes to the preset by the yellow “Edited” LED in the Save button.
Click Preset | Save Preset, or press ⌘+S (Mac) or CTRL+S (Win), to save the current preset to the current preset slot in the guitar processor.
Click Preset | Save to New Preset Number, or press ⌘+SHIFT+S (Mac) or CTRL+SHIFT+S (Win), to save the current preset to another memory location in the guitar processor.
As a safeguard, the editor displays a warning when quitting or when changing / importing a preset without saving the changes first. You can disable this in Settings | Preferences | Options.
You can specify in Setup | Config whether switching scenes should be marked as “Edited” or not.
Export
Exporting presets allows you to save backup copies on disk, share them with others, post them on our preset sharing site Axe-Change, etc.
To export the current preset as a SysEx (.syx) file on your computer, choose Preset | Export. Or press CONTROL+SHIFT+⌘+X (Mac) or CTRL+SHIFT+ALT+X (Win). When the file browser dialog is shown, navigate to the desired location and save the preset.
Presets may include Global Blocks. Exporting a preset does NOT include the linked global data. To share the linked global data, you need to back up your System data with Fractal-Bot and include that data with the preset. Or you can unlink the Global Blocks in the preset through Preset | Unlink All Links from Global before exporting.
Exporting presets can also be accomplished in Manage Presets. When exporting from Manage Presets, the preset number will be added to the start of the filenames on disk and the preset title.
New from Template
Like many other types of programs (office, graphics, etc.) the editor allows you to create new presets from a template. Choose Preset | New from Template. The “working copy” is not the original template. When you save, you’ll be storing a preset in the guitar processor while the template file on your computer will remain unmodified.
Templates are stored in a dedicated directory. The default location is: ~/Documents/Fractal Audio/(name editor)/Presets/Templates
You can change the location of the Templates directory in Settings | Preferences | Workspace.
Create new templates using Preset | Save as Template, or by copying exported or downloaded preset files to your Templates directory. Use the operating system’s file management to delete or rename templates, but remember that the file name is independent of the name stored in the template.
Snapshots
Snapshots provide one-click export to disk functionality. This is especially handy for fast backups during editing.
When you press the Snapshot button, or press CONTROL+SHIFT+⌘+S (Mac) or CTRL+SHIFT+ALT+S (Win), a copy of your current preset (including unsaved changes) is saved as a file to the Snapshots folder on your computer: ~/Documents/Fractal Audio/(name editor)/Presets/Snapshots
You can change the location of the Snapshots directory in Settings | Preferences | Workspace. An on-screen indicator confirms that the snapshot has been saved.
Previous snapshots can be brought into the editor using Preset | Import or by selecting the dropdown menu below the Snapshot button.
Presets may include Global Blocks. Pressing Snapshot will create a backup of the preset but the linked global data will not be saved with the snapshot.
Cross-compatibility
The Axe-Fx III, FM3 and FM9 guitar processors each use their own specific SysEx (.syx) file format for presets. However, each editor can load preset files created on the other devices and convert where necessary and possible. This conversion includes:
- Adapting the preset to the grid size of the connected guitar processor, and fit the blocks in the preset on the grid
- Leaving out blocks which aren’t supported by the connected guitar processor (replaced with a shunt)
- Displaying a warning “CPU Limit - Muted“ when there’s not enough CPU power to handle all blocks
- Leaving out features and functionality which aren’t supported by the connected guitar processor.
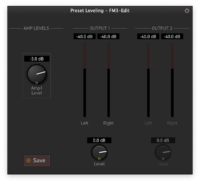
Leveling presets
This tool in the Tools menu lets you monitor the level of the current preset, and provides parameters to adjust the level. This is handy when matching preset levels. The tool can also be activated by pressing ⌘+L (Mac) or CTRL+L (Win). The meters displayed are the same as the VU meters on the zoomed-out Layout Grid on the hardware itself.
Read more about leveling in in the Owner’s Manual.