This is the wiki for products made by Fractal Audio Systems, maintained by members of the community.
FC-6 and FC-12 foot controllers
Contents
Product information
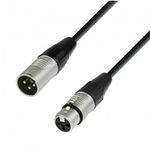
Fractal Audio's FC-6 and FC-12 foot controllers let you control the Axe-Fx III. They operate through a proprietary protocol and the FASLINK II port (XLR cable), which also provides power to the (first) FC.
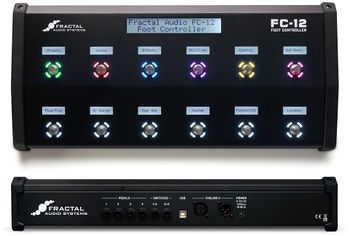
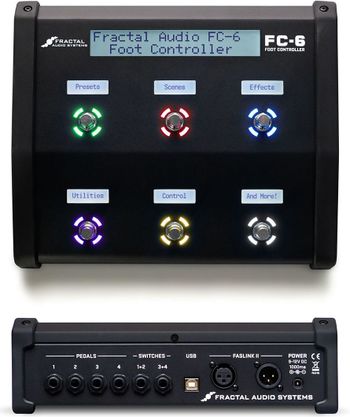
The only difference between the two controllers is the number of available switches.
![]()
Documentation:
Specifications and manufacturing
Mini displays
The main display shows up to 20 characters per row (two rows).
The mini displays show up to 11 characters.
"They are graphic displays so the number of characters depends on the size of the font." source
"The scribble strips are black/white." source
"The foot controllers use "transflective" displays that work in any light. The LED rings will wash out in intense light, no way around that. We tested them outside and they were pretty visible even in bright sunlight though. They have adjustable intensity." source
"All the displays are transflective so they don't wash out under bright light." source
"The LCDs are transflective, meaning they are visible in complete darkness to full, direct sunlight." source
"Inverse is reserved for the HOLD function." source
LED rings
"The LED rings are different colors based on function." source
Dimensions
FC-6 — 11.2″ x 9.2″ x 3.5″ (283mm x 233mm x 88mm). Weight: 6.7 lbs (3 kg).
FC-12 — 20.2″ x 9.2″ x 3.5″ (512mm x 233mm x 88mm). Weight: 11 lbs (5 kg).
"The FC-6 is roughly the size of a sheet of paper." source
"The switches are 3" apart on the FC's" source
Technical drawings:
Compatibility
FC controller, Axe-Fx III and Axe-Edit III
The FC controller and Axe-Edit III are both clients to the Axe-Fx III. Switching stuff on one client will automatically update all other clients (and the Axe-Fx III itself of course).
"We rewrote everything using a client-server approach. You can have any number of clients attached, even multiple editors, and they all update automatically when something changes (even if changed from the front panel). The foot controllers are essentially clients as well." source
Not compatible with 1st and 2nd generation Axe-Fx
The FC controllers can't be used with the Axe-Fx II. The communications protocol is completely different, and they don’t support FASLINK (version 1), MIDI or Ethernet/EtherCON.
Transmitting MIDI

The FC controllers don't have MIDI ports and can't be used by themselves to control MIDI devices directly.
However, the Axe-Fx III has a MIDI OUT port. The FC controller can initiate MIDI operations on the Axe-Fx III through Control Switches.
Also, the Axe-Fx III can transmit MIDI commands using the Scene MIDI block.
"The system has a MIDI jack. It's on the Axe-Fx III! Actions on the foot controller can cause MIDI to be transmitted to downstream devices." source
Connecting the FC controller
FASLINK II
FASLINK II is the bidirectional communications and phantom power port and protocol that links the Axe-Fx III to the FC controllers, using a single XLR (microphone) cable.
There's no need to power down the Axe-Fx when connecting the FC controller.
"The communication protocol between the III and the FC's is proprietary and not MIDI-based. The FC's are sort of "dumb terminals". All the they do is tell the III "button #3 was pressed" and the III responds by saying "light LED ring #3 blue" or "display 'My Preset' on the main LCD". This way all the configuration data is on the III and when you backup you backup the foot controller as well. It also means if a foot controller fails you don't have to reprogram a new one (which is a big deal for touring acts where the gear gets hammered on and last second change-outs are common)." source
"It's not standard MIDI. The Axe-Fx III uses a proprietary communication protocol. Devices can communicate over any physical layer by wrapping and unwrapping the comm protocol. Theoretically you can control it over MIDI, Ethernet, WiFi, RS-232, AppleTalk, Sneakernet, etc. The MIDI basics are there, of course, but to access the tuner, etc. you need to wrap and unwrap the protocol layer." source
Daisy-chaining FC controllers
You can daisy-chain up to four FC controllers using the FASLINK II "Thru" ports.
The first FC controller gets its power from the Axe-Fx III through the FASLINK II connection. Additional FC controllers have to be powered separately through their power ports, see below.
"They are phantom powered. You can daisy-chain up to four. Any daisy-chained units need their own power supply. IOW only the first unit in the chain is phantom powered." source
Two or more daisy-chained FC units can be forced to remain in sync, showing the same layouts, the same switches and switch states. This is called "mirroring".
Supplying power
If not powered through FASLINK II, the FC can be powered using a 9-12V power supply, 1000 ma, negative center, 2.5mm barrel.
Connecting pedals and switches
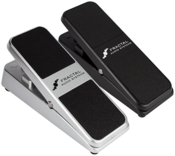
The FC controllers provide 1/4" jacks to connect up to four expression pedals (TRS cables) and four external switches (use a TS single for a single switch, and TRS for dual switches), allowing additional control.
Using the Axe-Fx III or the editor, you can assign functions to these pedals and switches, separately from the expression pedal ports on the Axe-Fx III itself.
Calibration and configuration of the pedals is done through the FC Controllers menu.
Read this: Remote control, pedals and switches
USB port
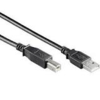
"Future expansion. Currently it does nothing but in the future we may enable it so it can be a "USB MIDI Controller". source
Updating firmware
The FC-6 and FC-12 are updated through firmware updates. Most FC features are actually Axe-Fx III features, so the firmware for the Axe-Fx III also updates the FC controllers.l
The FC controllers also rely on separate internal firmware for basic low level functions. This sometimes require an update, but only when Fractal Audio says so. Watch the FC main display during startup to see its current internal firmware version. Visit the user forum occasionally to check for updates.
The latest internal firmware for the FC controllers can be downloaded here
Installation steps:
- Unzip the firmware.
- Read the enclosed Release Notes.
- Make sure the Axe-Fx III and FC controller are connected via FASLINK II. Remove any daisy-chained units and MIDI cables from the FC.
- Make sure the Axe-Fx III and computer are conected via USB.
- Power cycle the Axe-Fx III.
- When “Initializing…” appears in the main display of the FC, press-and-hold the top left footswitch, until "Failsafe v0.01" is shown.
- Release the footswitch and wait for the Axe-Fx III to finish booting.
- Launch Fractal-Bot. Do NOT select “Axe-Fx III”. Instead, select “Utility” as follows: press-and-hold [Command ⌘] (Mac) or [CTRL] (Windows) and then click the dropdown to reveal and the hidden “Utility” option.
- Select “Axe-Fx III” under the “Select an Output Port“ dropdown.
- Ensure that the MIDI Buffer Delay slider is set to 300 ms.
- Load the .SYX file frm the unzipped folder and start the transfer.
- When the transfer is complete, power cycle the FC (disconnect and connect the cable) and verify the ynew version by watching its main display.
Installation instructions are also included in the firmware zip file.
Ttutorial video by AxeFxTutorials
Configuring the FC controller
On the Axe-Fx III or in the editor
To configure the FC controller:
- use Setup > FC controllers
- use Axe-Edit III
The Per-Preset configuration menu on the Axe-Fx III is reached through the Controllers menu.
"All configuration data is stored in the Axe-Fx III. There is no management software needed for the FC. Configuration is done via the Axe-Fx III (or Axe-Edit)." source
Reset the FC configuration
When executing Utility > Reset System on the Axe-Fx III, the FC will be wiped clean.
To restore the default layout, use Setup > FC Controllers > Reset.
Backing up the FC configuration
Use Fractal-Bot to back up and restore the settings of the FC controller(s).
Showing Preset and Scene numbers
You can configure whether preset names and scenes are preceded by a number in the main display or not.
Operating the FC controller
Assign switches
‘EZ Mode’ in Setup > FC Controllers lets you tap a switch and then configure its Tap and its Hold functions. Use other tab pages in this menu for advanced configuration, copying and more.
Things you can assign to switches:
- Presets (make sure to also set Bank Size to the correct value)
- Banks
- Scenes
- Effects (engage or bypass)
- Channels
- Tuner
- Tap tempo
- Looper controls
- Control Switches (read Modifiers, controllers and Control Switches)
- and more
Tap and Hold functions
The switches support two types of action: Tap and Hold.
To engage the Hold function, tap-and-hold the switch.
The time that a switch has to be held for the Hold function to kick in, can be set.
The Hold function of a switch is not indicated on the mini display. To see what's there, assign a switch to Reveal Hold.
Layouts
The FC controllers provide 8 layouts. Similar to "pages" and "layers" on other controllers, layouts re-map the physical switches (6 on the FC-6, 12 on the FC-12), allowing the use of the available switches for multiple tasks.
You switch to a different layout by pressing an assigned "layout" switch in the current layout or by using the Master Layout Menu (MLM).
Layout Linking is a feature that allows any footswitch to also change layouts. For example, if a switch is assigned to recall a preset, it can also switch to the programmed Scenes layout.
To load the factory default layout, use Setup > FC Controllers > Reset.
The documentation provides a number of layout examples.
"The FC series are like 12 foot controllers in one. The FC foot controllers feature 12 "layouts". Each layout has a unique, user-assignable set of switch functions. For example Layout 1 could have five preset switches, five scene switches and two switches assigned to bank up/down. Press and hold the bottom right switch and the then tap the switch above it and you enter Layout Select mode. Then tap a switch to select a new Layout. This new layout could have six channel switches and six bypass switches. Etc." source
"You can actually assign a button to Layout so you can get there with a tap. You can also assign a button to bring up a specific layout so you could have two layouts each with a button that switches to the other layout. And the way the Layout press-and-hold works is that you press one button and while holding it tap the button above. IOW, you press the bottom button with your heal and then tap the button above. Each tap (while holding the bottom button) brings up a new layout." source
Download blank layout templates for the FC-6 and F-12
Master Layout Menu (MLM)
The Master Layout Menu (MLM) shows all layouts on a single page (FC-12) or two pages (FC-6). Recall the MLM by holding the bottom right switch and tapping the switch above it (this can be disabled in the configuration). The FC-6 can display only 6 layouts at a time, so press the MLM combo switch a 2nd time to reach the remaining layouts. So even if you forgot to program other "layout" switches on your current layout, you can still "get out" of the current layout by engaging the MLM.
You can also assign the "MLM" switch to any (tap or hold) switch.
Notes:
- If the lower right switch has a Tap function, it will not be activated by the MLM Switch Combo.
- If the lower right switch has a Hold function, you can still easily execute the MLM Switch before the Hold function kicks in.

Yek's MLM tip — The 8 buttons of the Master Layout Menu (= layout 9) can't be displayed at once on the FC-6, obviously. However, here's a handy way to set up layout 9 (MLM) on an FC-6:
- Assign layouts 1-4 to switches 1, 2, 4 and 5 on page 1 of the MLM layout.
- Assign layouts 5-8 to switches 1, 2, 4 and 5 on page 2 of the MLM layout.
- Assign the MLM to switch 6 on pages 1 and 2 of the MLM layout.
- Assign the Tuner to switch 3 on page 1 of the MLM layout.
- Assign another function to switch 3 on page 2 of the MLM layout.
Per-Preset switches
The layouts (described above) are global, meaning that they apply to all presets.
If you need preset-specific switches, you can program these in the Controllers > Per-Preset menu. This menu allows you to override "global" layout switches.
Per-Preset Switch Overrides can be disabled globally.
