This is the wiki for products made by Fractal Audio Systems, maintained by members of the community.
November 2025: the wiki now also covers the AM4
Difference between revisions of "Looper block"
| Line 236: | Line 236: | ||
[[Owners_Manuals| MFC-101 Looper Control Mode Mini Manual]] | [[Owners_Manuals| MFC-101 Looper Control Mode Mini Manual]] | ||
| + | |||
[[image:LooperControlMode.png|350px|link=]] | [[image:LooperControlMode.png|350px|link=]] | ||
Revision as of 18:11, 20 April 2019

Contents
Available on which products
- Axe-Fx III: 1 block
- Axe-Fx II: 1 block
- AX8: 1 block
- FX8: 1 instance
Channels or X/Y switching
The Looper doesn't support X/Y switching or channels.
About the Looper
On the AX8 and Axe-Fx the Looper is a dedicated effect block, providing minutes of stereo or mono loop time.
On the FX8 the Looper is global.
Hardware-specific notes
Axe-Fx III
The Looper provides more than 5 minutes of stereo looping time.
"We completely rewrote the Looper. Over five minutes of stereo recording with undo." source
Axe-Fx II
- Mono — 60 seconds
- Stereo — 30 seconds
- Mono with Undo — 30 seconds
- Stereo with Undo — 15 seconds
AX8
- Mono — 4 minutes
- Stereo — 2 minutes
- Mono with Undo — 2 minutes
- Stereo with Undo — 1 minutes
Looper Control Mode is accessed using a F-switch.
FX8
The Looper in the FX8 has additional features. It's a global looper so it's always present, in every preset. It can be positioned in different locations. It can be disabled, which decreases CPU usage.
- Mono— 8 minutes
- Stereo — 4 minutes
- Mono with Undo — 4 minutes
- Stereo with Undo — 2 minutes
Locations:
- IN PRE
- IN POST
- OUT PRE
- OUT POST
The location can be set globally (Global menu) and can be overridden per preset.
If you can't hear the Looper, check the LOOPER LOCATION. It must not be set to NO LOOPER. If it is set to GLOBAL, check the GLOBAL LOOPER LOCATION (in the SETUP: GLOBAL menu) to ensure that it is not set to NO LOOPER. This may also be due to PRE/POST settings. If your rig uses only the PRE chain or only the POST chain, set LOOPER LOCATION accordingly.
Parameters
Parameters table
| Parameter | Axe-Fx III | Axe-Fx II | AX8, FX8 |
|---|---|---|---|
| Record | yes | yes | yes |
| Play | yes | yes | yes |
| Overdub | yes | yes | yes |
| Undo/Erase | yes | yes | yes |
| Once | yes | yes | yes |
| Reverse | yes | yes | yes |
| Playback Level | yes | yes | yes |
| Overdub Level | yes | yes | yes |
| Dry Level | yes | no | no |
| (Half) Speed | yes | yes | yes |
| Low Cut, High Cut | yes | no | no |
| (Record) Threshold | yes | yes | yes |
| Record 2nd Press | yes | no | no |
| Loop Quantize | yes | yes | yes |
| Trim Start, Trim End | yes | no | no |
| Crossfade | yes | no | no |
(Record) Threshold
If enabled, recording will not start until the input level passes the specified threshold, set by the Threshold parameter. If you press Record, you will see the indicator come on and then turn off. This means it is waiting for input to start recording. Once you start playing you'll see the indicator come on and you are recording.
Axe-Fx III – Use the soft knob or main Value knob to adjust the threshold value, or use the Record Threshold parameter on the Config page. When set to a value greater than -80 dB recording will not start until the input signal exceeds the set value. The Record icon will blink when the Looper is armed for recording and will turn solid when recording starts. The meter at the bottom of the page can be used to help set the Threshold. Use the soft knob or main Value knob to adjust the threshold value (or use the Record Threshold parameter on the Config page).
Crossfade
When set to ON, the loop fades out/in at the end/start of the loop.
Record
Start recording or enables overdubbing. There's no separate Overdub control on the Axe-Fx III.
What happens when you press Record a second time is user-definable, see above.
Record 2nd Press
Available on the Axe-Fx III only.
Choices are:
- Overdub – second press ends loop and enters Overdub mode
- Play – second press ends loop and enters Play mode
- Stop – second press ends loop.
Trim Start, Trim End
Available on the Axe-Fx III and AX8 only.
Use these to adjust the start and end points of the loop. The graph on the Control page provides visualization of the loop and the start/end points.
Quantize
Quantize will automatically chop your recording to the nearest beat. Recommended to use in conjunction with Threshold. Press Record, then start playing on a downbeat click. Press Record again to stop. If you stop slightly too soon or late it will automatically trim the recording to the length. Also, it will automatically start playback on the downbeat. So if you stop playback and start it up again later, it should always come back in on the beat.
Undo/Erase
On the Axe-FX III:
- when recording, this function/switch operates as Undo, removing the last recorded stack layer
- when playing the loop, this function/switch enables or disables the last Undo operation. Subsequent presses toggle the layer on and off
- when the playing is stopped, this function/switch changes into Erase, completely erasing the recorded loop
Undo/Erase requires CPU cycles during a brief moment. When used with presets with high CPU utilization, this can result in warnings or audible pops.
Dub Mix
"Dub Mix reduces the previous layer AFTER you add a new layer (press Stack then press it again)." source
(Half) Speed
When Speed is set to HALF, the virtual tape runs at half the normal speed. The speed can be also be toggled via a MIDI CC message.
Remote control
Foot switches
Assign the Looper controls (such as Play and Record) to foot controller switches for remote control. Some functionality requires a latching switch, for other stuff a momentary switch is required.
You can also assign Looper Record/Play to an external switch, for easy access at all times.
MIDI CCs
The Axe-Fx II uses these MIDI CCs for remote control.
- Record: 28
- Play: 29
- Once: 30
- Dub: 31
- Rev: 32
- Bypass: 33.
- Half: 120
- Undo: 121
The Axe-Fx III does not have pre-set MIDI CCs. These can be selected in the MIDI menu.
MFC-101: Looper Control Mode
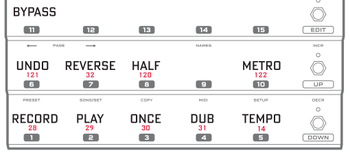
The MFC-101 has a Looper Control Mode. This mode is enabled by pressing and holding the Reveal switch on the MFC-101. The MFC-101 will display "LOOPER CONTROL MODE" for two seconds and the red LED will be lit on the Reveal switch. This mode is disabled by selecting the Reveal switch on the MFC-101. In Edit > Setup you can select if this requires short or long pressing-and-holding. You can also disable Looper Control Mode altogether.
MFC-101 Looper Control Mode Mini Manual

FX8 and AX8
The AX and FX8 allow the onboard switches to be assigned to Looper functionality.
FC controllers
The FC controllers for the Axe-Fx III provide built-in Looper switching functionality.
Surviving preset switching
The loop buffer will be erased when switching presets, unless Spillover is enabled.
To survive preset switching, both presets must have the Looper, set to the same mode.
Using the Looper to tweak sounds
Put it before before the Amp block, and record a "unamped" guitar tone. Now keep playing it back while adjusting amp settings. You'll hear the differences in real time.
Alternatively, use it to compare two sounds. Place it after the Amp block and record. Start tweaking. When you want to hear the original tone, play back the sample.
Assigning a dedicated output to the Looper
The Output blocks / effects loops on the Axe-Fx III make it easy to send the Looper's output to a specific output for further routing and processing.
Panning the Looper
Panning the Looper to one side when starting playback