Always consult the official Owners Manuals first
I/O connectivity and levels
Jump to navigation
Jump to search
The information on this page supplements the official manuals.
Contents
- 1 Inputs and outputs
- 2 Setting the Instrument Input Pad level
- 3 Setting other Input levels
- 4 Setting Output levels
- 5 Headphones
- 6 Expression pedals and external switches
- 7 Using the AX8 with 4CM
- 8 Connecting the AX8 to an Axe-Fx II
- 9 Humbuster cables
- 10 Putting pedals between the guitar and AX8
- 11 Switching other gear
- 12 More information
- 13 Cable snakes
- 14 List of inputs and outputs on the FX8
- 15 Auditioning factory presets
- 16 Setting up the FX8 as a virtual pedalboard (PRE)
- 17 Setting up the FX8 as an effects device in an amplifier's effects loop (POST)
- 18 Setting up the FX8 with the Four Cable Method aka 4CM (PRE and POST)
- 19 PRE and POST effects
- 20 Expression pedals and external switches
- 21 True Bypass
- 22 Connecting the FX8 to an Axe-Fx II or AX8
- 23 Switching other gear (relays)
- 24 Humbuster cables
- 25 Putting pedals between guitar and FX8
Inputs and outputs
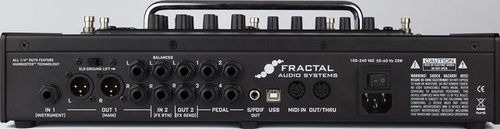
- IN 1 (INSTRUMENT): 1/4", mono, unbalanced, 1 Megaohm (fixed), 16 dBu.
- OUT 1 (MAIN): XLR, L/R, balanced, 600 ohm, 20 dBu.
- OUT 1 (MAIN): 1/4", L/R, unbalanced, Humbuster, 600 ohm, 20 dBu. Can be used simult. with XLR Out.
- IN 2 (FX RTN): 1/4", L/R, balanced, 1 Megaohm, 20 dBu.
- OUT 2 (FX SEND): 1/4", L/R, unbalanced, Humbuster, 600 ohm, 20 dBu.
- PEDAL: 4x 1/4", TRS for pedals, TS for switches.
- S/PDIF digital out, 24-bit, 48 kHz (fixed).
- USB 2.0 type B (host).
- 5-pin MIDI IN and shared OUT/THRU.
Setting the Instrument Input Pad level
- The instrument input level can be adjusted in I/O > Levels > Instrument Input Pad. A higher value means lower input (padding). The highest value is 18 dB. Run it as low as possible because padding can increase noise floor.
- Strum the guitar hard, on the loudest pickup. If none of the CLIP LEDS on the FX8 lit up, there's no need to adjust the control.
- IMPORTANT: adjusting Input Pad DOES NOT CHANGE the amount of gain or what you hear! The pad (applied before the A/D converter) is offset by a corresponding but opposite boost at the output of the converter.
Setting other Input levels
- The nominal IN 2 (FX RETURN) level can be switched from +4 dBu (pro line level, default) to -10 dBV (consumer-grade equipment) in I/O > Levels.
- There's also a Level parameter in the Input block of each preset.
Setting Output levels
- Output levels are controlled with the OUT 1 and OUT 2 knobs on the top panel, as well as with the Global EQ Gain controls and in the blocks on the grid.
- The nominal overall OUT 1 level can be switched from +4 dBu (pro line level, default) to -10 dBV (consumer-grade equipment) in I/O > Levels.
- The Boost/Pad parameter for OUT 2 in I/O > Levels only needs to be used when putting an amp or modeler in the effects loop of the AX8.
- Cliff's comments:
- "The output doesn't go all the way to zero. This was done due to the plethora of support issues where people would say they weren't getting any sound and it was simply due to the fact that they had the knob turned all the way down. So now you get a little signal and we get less support calls." (source)
Headphones
- See Headphones.
Expression pedals and external switches
Using the AX8 with 4CM
- The AX8 will function in a 4CM setup, although the FX8 is the better choice for such a rig.
- When using the AX8 in 4CM, adjust Boost/Pad and Nominal Level in I/O > Levels to optimize the signal.
- More information: Axe-Fx II and 4CM (4 Cable Method).
- Demonstration.
Connecting the AX8 to an Axe-Fx II
- You can use the AX8 for PRE effects (plug guitar into AX8, disable amp and cabinet modeling) and the Axe-Fx II for POST effects, including amp and cabinet modeling. By adding a MIDI connection, you can switch Axe-Fx II presets from the AX8.
Humbuster cables
- Using Humbuster cables will reduce the risk of unwanted noise caused by ground loops.
- See Humbuster cables.
Putting pedals between the guitar and AX8
- You can connect a pedal between your guitar and the AX8. Connect the guitar to pedal input. Connect the pedal output to the AX8.
- Cliff's comments:
- "The XL+ front input circuit is identical to the AX-8 except the AX-8 doesn't have the variable impedance circuitry." source
Switching other gear
- The AX8 doesn't provide relays to switch external amp channels and functions. You need the FX8 to do that.
- The AX8 can send MIDI PCs and CCs when switching presets and scenes.
More information
- Part of the informaton on the wiki page Axe-Fx II connections and levels also applies to the AX8.
Cable snakes

List of inputs and outputs on the FX8
- IN [PRE] (INSTR): 1/4", mono, instrument level, unbalanced, 1 Megaohm (depending on Input Impedance setting), max 16 dBu.
- OUT [PRE]: 1/4", L/R, (L/Mono), unbalanced, Humbuster, 600 ohm, max 20 dBu. Connects to amp input.
- IN [POST]: 1/4", L/R, line level input (+4 dBu), 1 Megaohm, balanced, max 20 dBu. Connects to Effects Send on amp.
- "For most uses an unbalanced TS cable is fine. The inputs are balanced so that you can get even more hum rejection by using a TS-to-TRS cable from the amp's send." source
- OUT [POST]: 1/4", L/R, unbalanced, HumBuster, 600 ohm, max 20 dBu. Connects to Effects Return on amp.
- RELAY: 2x 1/4" TRS.
- PEDAL: 2x 1/4" TRS.
- USB 2.0 type B (host).
- 5-pin MIDI IN and shared OUT/THRU.
Auditioning factory presets
- If you put the FX8 in front of your amp, you won't experience the factory presets to their full extent. That's because some of them are configured for POST only (FX8 in the effects loop of an amp) or 4CM.
- An easy way to overcome this, is to use a patch cable to connect OUT [PRE] L MONO to IN [POST] L, and connect OUT [POST] L to your amp.
- Some factory presets are configured for stereo output amd won't sound like they should in a mono setup.
Setting up the FX8 as a virtual pedalboard (PRE)
- This is a PRE-only setup.
- Setup:
- Guitar goes into IN [PRE] / INSTR. Note: this input only feeds effect blocks designated as PRE.
- OUT [PRE] LEFT goes into the amplifier's guitar input. Use a Humbuster cable to prevent noise.
- You can use default FX8 settings. Exception: change the output mode in I/O > Audio (see manual for stereo operation)to Mono (see manual for stereo operation).
- You can use this setup to connect an FX8 to the Axe-Fx II.
- More information in the manual, including a description of the cables required.
Setting up the FX8 as an effects device in an amplifier's effects loop (POST)
- This is a POST-only setup.
- Setup:
- Guitar goes straight into the amplifier.
- Amp's effects loop SEND goes into IN [POST] LEFT.
- Amp's effects loop RETURN goes into OUT [POST] LEFT. Use a Humbuster cable to prevent noise.
- You can use default FX8 settings. Exceptions:
- Change the output mode in I/O > Audio to Mono (see manual for stereo operation).
- Change Global Looper Location to OUT POST.
- Change Global Detector to IN [POST].
- Cliff: "Are the outputs buffered for long cable runs? Yes." source
- More information in the manual, including a description of the cables required.
Setting up the FX8 with the Four Cable Method aka 4CM (PRE and POST)
- This is a combined setup, also known as Four Cable Method (4CM). You use 4CM to be able to put effects before the amp as well as in the amp's effects loop.
- Setup:
- Guitar goes into IN [PRE] / INSTR.
- OUT [PRE] LEFT goes into the amp's guitar's input. Use a Humbuster cable to prevent noise.
- The amp's effects loop SEND goes into IN [POST] LEFT.
- The amp's effects loop RETURN goes into OUT [POST] LEFT. Use a Humbuster cable to prevent noise.
- You can use default FX8 settings. Exceptions:
- Change the output mode in I/O > Audio to Mono (see manual for stereo operation).
- Change Global Looper Location to OUT POST.
- Cliff: "Are the outputs buffered for long cable runs? Yes." source
- If you have the FX8 set up for 4CM and want to change this, for example to put the FX8 before a computer, just use a jumper cable to connect OUT PRE L MONO to IN POST L, with OUT POST L going to the computer, amp or whatever. All effects will work and there's no need to change stuff in the configuration.
- More information in the manual, including a description of the cables required.
PRE and POST effects
Expression pedals and external switches
True Bypass
- The FX8 allows you to physically bypass (disable) the analog-to-digital and digital-to-analog converters between IN and OUT. Aka "True Bypass". This disables ALL processing. It will for example mute Looper playback, all effects will by disabled, it'll stop delay repeats, it'll ignore level settings etc.
- Even though the FX8 does not suck tone and is completely transparent, some users value the ability to completely bypass the A/D and D/A converters. Also, True Bypass enables you to compare gain settings, compare stuff etc.
- In each preset you can specify on the Config page if True Bypass applies to the PRE stage, the POST stage, or ALL.
- Fractal Audio:
- "On the CFG tab of the main screen, there is parameter called "BYPASS". It's values are PRE, POST, and ALL. By setting this to PRE, any time TRUE BYPASS is engaged, it will only bypass the effects block in the PRE stage".
- "TRUE BYPASS does not mute the audio, it engages circuitry that bypasses the Digital converters. The audio is routed from Input Pre to Output Pre". source
- To engage True Bypass, press (or hold) the switch assigned to True Bypass.
- "Automatic True Bypass" is a option (Global menu) that will automatically engage True Bypass when all effects are bypassed. This works per signal chain (PRE and POST), without affecting the other signal chain.
- The Axe-Fx II and AX8 do not support True Bypass.
Connecting the FX8 to an Axe-Fx II or AX8
- You can use the FX8 for PRE effects (plug guitar into FX8) and the Axe-Fx or AX8 for POST effect, including amp and cabinet modeling (plug FX8 into Axe-Fx or AX8).
- By adding a MIDI connection you can change Axe-Fx and AX8 presets from the FX8.
Switching other gear (relays)
- Relays are electrically operated switches/connectors, which can be used to switch channels on an amplifier or switch other stuff.
- The FX8 relays are controlled through:
- scenes: you can use scenes to switch amp channels through relays. This is configured on the preset's Config page.
- footswitches: you can assign footswitches to the relays per preset, for manual control. Assign the footswitch and configure it on the Footswitch page. IMPORTANT: a Relay block in the preset will disable the scene's Relay settings.
- Relay states:
- Off: nothing connected.
- Tip: tip to Sleeve.
- Ring: ring to sleeve.
- Both: tip AND ring to sleeve.
- Relay modes:
- Latching: the selected RELAY ON state remains connected and the switch LED remains ON as long as the switch is engaged. Nothing is connected when the switch is OFF.
- Auto-Off: the selected RELAY ON state remains connected only for a moment when you press the footswitch. The relay then automatically turns OFF, as does the LED.
- Connecting the relays:
- Depending on the amp, you can use TS or TRS cables.
- Cliff's comments:
- "The FX8 will short tip-to-sleeve, ring-to-sleeve, or both. The circuit is designed to handle 200mA of current. If the current generated by that voltage drop is 200mA or less, then the FX8 will not have a problem." source
- CAUTION: Do NOT connect anything to the relays jacks until you've read the warnings in the manual (repeated below)!
- Cliff's comments:
- "The relays of the FX8 are designed for use ONLY with amplifiers that use “short-to-sleeve” type switching. Do NOT connect the FX8 relays to the switch jacks of an amp that uses voltage differential switching or any other type of switching aside from short-to-sleeve, or serious damage can occur to both units. If you are not 100% sure, contact your amp manufacturer to determine whether your amp is compatible with short-to-sleeve switching. The FX8 relay jacks are compatible with TRS cables, TS cables, or TRS-to-dual-TS split cables. The relays are also fully isolated from the electrical ground of the FX8."
- "The FX8 features two TRS (Tip-Ring-Sleeve) relays that can be used to switch the channel or other functions of a connected amplifier or device. If the warning above seems stern, that’s because the last thing we want is for anyone to damage their amp or FX8. In fact, short-to-sleeve relay switched amps are quite common, and your amp may well be perfectly compatible. We need to trust and require you however, to understand how your amp works and make the right choices about connecting it to the FX8 relay jacks. Your amp manufacturer should be able to help if you read them the warning above."
- Cliff's comments:
- The relays support X/Y switching.
Humbuster cables
- Using Humbuster cables will reduce the risk of unwanted noise caused by ground loops.
- The FX8 is designed to run Humbuster cables on all of the outputs. If you are running mono, you will only need to run two Humbusters: one to the front input on your amp from Output Pre on the FX8, and one to the FX loop return from Output Post on the FX8. source
- See Cables_and_adapters_for_Fractal_Audio_devices#Humbuster_cables.
Putting pedals between guitar and FX8
- You can connect a pedal between your guitar and the FX8, in a PRE setup. Connect the guitar to the pedal input. Connect the pedal output to IN [PRE] / INSTR on the FX8. Depending on the pedal you may want to adjust Input impedance.