Read the Owners Manual first!
Presets
Contents

Factory presets
Read this: Factory presets
Guidelines for creating presets
- Stick to the same grid layout / routing if possible, to simplify viewing and editing, and to increase preset switching speed.
- Re-use effect blocks with preferred settings and levels, through Global Blocks or saved/recalled effects from the editor's Block Library.
- Assign External controllers in a consistent way.
- Effects before Amp and Drive blocks should not be set to stereo.
- Be aware that certain effect blocks sum the signal to mono (Amp, Drive, mono Cab).
- Check your settings (I/O, and blocks) for correct mono and stereo operation to prevent phase cancellation.
- Make sure that the blocks maintain unity gain in engaged and bypassed states.
- Set Mix, Level and Bypass parameters correctly when placing effects in parallel rows.
- Make sure that the overall preset level matches that of other presets and does not clip when engaging a volume boost, Wah, etc.
- Make sure that Spillover between scenes works as expected.
- Check the preset’s noise gate settings. Turn it off when not needed to save CPU.
- Adjust the desired Input impedance in the Input block if needed and supported by the processor.
- Use a consistent way to boost the level for leads.
- Make sure that effect blocks are set to the correct X/Y state or Channel in each scene.
- If Tempo is set to “Preset”, set the preset's tempo settings.
- When using one Amp block on an Axe-Fx: always use AMP 1, not AMP 2.
- When using two Amp blocks on an Axe-Fx: put them in parallel, never in series.
- Make sure that CPU usage stays below the limit. Note that CPU usage can vary, depending on the X/Y state or channel of effect blocks.
- Mute scenes which are not being used.
- Use a consistent naming scheme for presets.
- Use a consistent naming scheme for scenes, if the processor supports it.
- Choose a preset title that fits on the hardware displays.
- AX8 and FX8: assign switches to effects in the preset.
- FC-6 and FC-12 controllers and FM3: program per-preset switches.
- FRFR: enter the desired low-pass and high-pass settings in the Cab block.
Loading presets
Load preset files from disk
Preset files on disk have a .syx file extension. Bank files, which contain multiple presets, also have the .syx file extension.
How to load a preset file from disk into the hardware:
- import the file into the (connected) editor
- drag and drop the file onto the (connected) editor
- use the editor's Preset Manager
- use Fractal-Bot
- use a MIDI librarian such as Snoize SysEx Librarian or MIDI-OX
- use FracTool.
You can use the editor or Fractal-Bot to transfer entire banks to the hardware. The editor lets you open a Bank file and import a single preset from that file.
The hardware is always ready to receive presets.
After loading a preset from disk into the hardware, the preset resides in a temporary buffer. It's not yet saved on the hardware.
Switch presets on the hardware
Switch presets in one of the following ways:
- use the tools on the hardware
- use the editor
- use FracPad
- use a Fractal Audio controller (MFC-101 MIDI foot controller or FC-6 and FC-12 foot controllers)
- use a 3rd-party MIDI controller.
The Ignore Redundant PC parameter in the MIDI menu determines what happens if the unit receives a MIDI Program Change for a preset that already is loaded. If Ignore Redundant PC is ON, and the desired scene (set via PC mapping) is different than the current scene, the preset is not loaded but the scene is changed.
Transfer presets between different processors
Presets are device-specific. This means that you can't share presets between the various types of processors.
There are various ways around this:
- the editor's Block Library lets you share effect block files between Axe-Fx II models, AX8 and FX8.
- AlGrenadine's FracTool lets you convert presets on-the-fly and load them on another device, or save the converted preset to disk. FracTool leads you load Axe-Fx II presets into the Axe-Fx III, but not the other way around.
- you can export a preset to a CSV file, which will contain all parameter values. The editors offer this functionality.
(Yek) "When I transferred all my presets from the original Axe-Fx II to the XL, I kept a log of changed parameter values. These are the ones you may want to check before and after transfer:
- COMP – TYPE and SUSTAIN and MIX and AUTO
- PEQ – FREQ TYPE (bands 1 and 5), GAIN (all bands), LEVEL
- GEQ – 16k slider, LEVEL
- TREMOLO – LFO PHASE and START PHASE and WIDTH and TYPE
- MIXER – BALANCE
- CHORUS – LFO PHASE"
"Any blocks that have X/Y on the XL but not on the Mark II will not import the bypass state as that is stored differently. You need to manually adjust the bypass state after import." source
Default scene
The processors let you specify which scene should be recalled upon loading a preset. More information
Preset switching can cause an audio gap
(about the FM3) "There will still be a brief silence between changing presets." source
"With any device that features flexible routing you have to mute, switch then unmute. This takes time. The reason is that if you don't do this then you'll end up with sound from one of the blocks that may have moved to a different position possible causing a loud pop or other artifact. For example, if you have a simple amp->cab->delay preset then you switch to a preset that has delay->amp->cab the sound from the delay will get amplified during the switch so you have to mute everything, wait for the signals to decay, rearrange the blocks, then unmute. Products with a fixed routing can switch faster since they don't have to worry about rearranging blocks. The Axe-Fx amp modeling is also far more intricate and complex than other products and this requires muting the amp modeling for a short time to allow the bias points to settle." source
"Our modeling is very detailed and whenever the amp model changes the "virtual circuit" needs to be reconfigured. We can switch quickly but often this causes clicks and pops due to the reconfiguration. So the amp block needs to run silently for a bit so things will settle. Then we unmute the block. This mute period is what you are hearing. Most other products just use a fixed algorithm and change the input/output EQ and gain. With this type of algorithm you can switch quickly without clicks and pops but, of course, you don't get the realism and detail." source
(Axe-Fx III) "Channels can be thought of as a preset for an individual block. For example, you can think of the Delay block as being a stand-alone delay pedal (or rackmount processor) with four presets. Scenes store the bypass state and channel for each block. By using scenes and channels you can use a single preset for an entire song, an entire set or even the entire show. Since the routing doesn't need to change things switch fast and smooth. When switching presets the processor has to assume the routing might have changed and therefore has to clear all the buffers, mute the audio, etc. which takes time and interrupts the audio." source
Also read this:
- Switching channels can cause an audio gap
- Switching scenes can cause an audio gap
- X/Y switching can cause an audio gap
Prompt on edit preset change
The Axe-Fx III, FM3 and editor (optionally) prompt before changing presets if the current preset has been edited. This makes sure you do not lose edits. Note that the prompt doesn't appear when changing presets via MIDI.
This feature can be turned on/off in Setup > Global.
Spillover between presets
Read this: Spillover
Preset is empty
If a preset shows up empty, it was probably created with firmware that is more recent than loaded on your hardware. Update your unit's Firmware.
Managing presets
Export to disk
To export a preset (or bank) to disk for archiving or sharing:
- select Export in the editor
- use the editor's Preset Manager
- use Fractal-Bot
The preset or bank will have the .syx filename extension.
Do not not share IRs which are protected by an EULA, license, copyright etc.
If the preset has Global Blocks, it's recommended to unlink there before exporting a preset. If not, the preset is only usable if you enclose your System Data file.
Preset-Cab bundle
A Preset-Cab bundle is a single file containing a preset and one or more IRs.
You can save and load Preset-Cab bundles with the editor.
Warning: do not not share IRs which are protected by an EULA, license, copyright and such.
Move and swap presets
You can move or swap a preset by using Store > Swap on the hardware, or by using the software editor's Preset Manager.
The Axe-Fx III doesn’t provide the option to swap presets on the hardware itself.
Besides the factory presets, there are presets and preset collections available from various sources.
The main sources for free presets are:
There also are many commercial or donation-based offerings (presets and/or Tone Matches), such as:
Delete presets
The hardware does not provide a Clear or Delete/Erase tool for single presets. You can clear a preset slot by overwriting it with another empty preset.
The Utility menu on the hardware provides a command to delete ALL presets. Be careful!
You can use the editor to clear single or multiple presets.
Print a presets or user cabs list
In the software editor, select Tools > Export as Text > Preset List.
Export preset settings to CSV
In the software editor, select Export Preset as CSV.
When executing this command, the editor writes a file to disk that contains a list of the parameter values of each block in the current preset. It’s a CSV file which means: Comma Separated Values. That’s a basic common database format that can be read or imported by any text editor, spreadsheet and database application.
You can also use this feature to see if a preset has changed, by dumping a preset before and after editing.
This command is available as a menu command only in AX8-Edit and the Axe-Fx editors. In FX8-Edit, hold down Ctrl+Alt+Shift and click Import (Mac: Command+Alt+Shift).
(Re)name a preset
Axe-Fx III and FM3:
- covered in Section 5 of the Owner's Manual.
Axe-Fx II:
- X: Insert a character at the current cursor position
- Y: Delete the character at the current cursor position
- A: Select an upper-case character
- B: Select a lower-case character
- C: Select a number
- D: Move the cursor
- < >: Move the cursor
- Value: Select any character from the character set
FX8 and AX8:
- Value/NAV: Move the cursor
- A: Select an upper-case character
- B: Select a lower-case character
- C: Select numbers and symbols
When renaming a preset in the software editor, make sure to press ENTER in the name field, before saving the preset.
Preset size
(Axe-Fx III) "A preset in the III is four times the size of a preset in the II. One preset easily does the work of four or more." source
In rare cases a preset can get too large (too many bytes). This is not the same as overloading the CPU. There's no warning or checking mechanism for this. If this happens, certain values won't get stored, or revert to zero upon recall. These are rare cases, which seem to occur mostly when the user uses a VERY large number of modifiers/controllers.
CPU usage
Read this: CPU usage
Preset levels
Level control
- The Input block has a Level control. It allows sending a lower or higher level into the effects grid which i.e. can be used to compensate for guitars with varying output levels.
- Each preset has an Level control in the Output block, and in the FX Loop block (Axe-Fx III and AX8 only). Level in the Output block and FXL block is saved per scene.
- All effect blocks have Level controls.
There are systemwide level controls too.
- The Global EQ provides gain controls for each output.
- OUT knobs on the top/front panel.
- Some processors let you switch the nominal output of the device between +4 and -10 dB.
If the red “Out Clip” LED blinks, the signal in the digital domain is too hot (loud). Severe clipping will cause digital audio distortion (crackle) which you want to avoid. This kind of clipping is not related to amp distortion.
Read this: Main output level
Important:
- The OUT level knobs on the top/front panel have no effect on output clipping, because they control the analog circuitry and are placed after the digital-to-analog converter.
- Clipping always occurs at the digital-to-analog output stage.
- You can't clip an individual block.
- Digital clipping does NOT harm the unit.
- There is NO relationship between I/O > Input and output clipping. The Input Level parameters in the I/O menu only control the signal-to-noise ratio at the input stage and do NOT affect gain in the signal chain.
You can reduce the digital signal level in any block by turning down its Level. Recommended are: the Amp block's Level control or the Output block's Level controls.
If your unit's output is clipping heavily during a gig, you don't need to adjust the preset. Just enter the Global EQ and turn down Gain to solve this temporarily. Use the OUT knob on the top/front panel to compensate for loss of volume.
The Axe-Fx III and FM3 feature meters which display the level of each effect block. This is extremely helpful for finding the cause of an interrupted signal.

VU meters: leveling presets
You probably want to match the (output) levels of all your presets. If you want to do this by ear, don't do it at low volume level and don't use headphones. The reason: you may think that your high-gain preset needs to be turned down compared to your clean preset. But when playing live, that high-gain preset is compressed (has no peaks) while the clean is tone is very dynamic. Really, the only proved way to match levels by ear is to do this at gig level, and preferable with the band playing or using a backing track.
Another approach: measure and match preset levels using the VU meters. These show the relative loudness of the preset. To view the VU meters:
Axe-Fx III and FM3 — Zoom out from the layout grid
Axe-Fx II — Utility menu
AX8 — Page to the right
These readouts can be used to help set preset levels to the same apparent volume. For convenience, the level of the Amp blocks can be set from this page.
"Don't be afraid to turn up the Amp level. The VU meters are calibrated such that there is 12 dB of headroom at the red line when the Output Level knob is at maximum." source
"ITU-R is a standard for loudness measurement. Broadcasters use it to monitor the apparent loudness of program material and comply with regulations, i.e. making sure commercials aren't louder than the programming. The measurement includes a simple head model and hearing perception model to give a fairly accurate indication of relative volume." and: "Be aware that the VU meter is offset by 20 dB, so when the meter reads 0 it’s actually -20 dB. This means that the "0" mark does not indicate clipping. This allows for sufficient headroom. When playing you'll see the meters bounce around. The meters give you a general idea of the loudness of the current preset, to get you in the ballpark. Try strumming the strings in a consistent way. Adjust the Amp level(s), aiming for an average level around 0 dB." source.
A third method:
- Select a preset with a really clean amp. Why? As Jay Mitchell explains: "Clean presets have the greatest crest factor (ratio of peak to average energy) and will therefore cause digital clipping at lower average levels (which determine your perception of volume) than gainier presets. For that reason, it is important to reference the levels of all other presets to that of the cleanest one set so that it never causes the (device) to clip with the Level control set to maximum. Once you have set this level you then need to set other presets to match it. Otherwise, your cleaner presets will either clip or be much softer than the others."
- Disable all effect blocks (especially compressors) except Amp and Cabinet.
- If you use a boost in the preset, enable it.
- Select your loudest pickup and hit the strings hard.
- Turn down Amp Level until the clip LED doesn't light anymore.
- Turn the level down another 8 dB. This creates sufficient headroom for unforeseen circumstances.
- This is now your reference level for all presets.
- If this method causes volume loss, compensate by turning up the overall volume level on the front panel or on your amplifier.
"All Fractal Audio products use floating-point processing. In fact the Axe-Fx III uses 64-bit floating-point in many places. It's impossible to clip internally. The AX-8 and Axe-Fx II use 40-bit in many places and are also impossible to clip internally.
If you are clipping the output, which is the final fixed-point signal to the converters (all audio converters use fixed-point), then your internal signals are far too high. If you use the VU meters and set your output to 0 dB you are guaranteed 12 dB of headroom at the converters with the output level knob all the way up. I've never witnessed a palm mute that was more than a few dB hotter than nominal.
Go into the Layout menu and press the Zoom hotkey. This will display VU meters for the two main outputs. Adjust the level of the Amp block (using the Block Level knob with the Amp block selected) so that the signal hovers around the 0 dB marker. If you do this it's impossible to clip the outputs.
The factory presets are all adjusted for roughly 0 dB on the VU meters. Even with the output level knob all the way up I never get anywhere even close to clipping.
We could've taken a conservative approach and built in a lot of headroom so that clipping the converters was impossible but then you lose dynamic range. The approach taken optimizes the dynamic range of the converters (so you aren't wasting bits) thereby ensuring maximum fidelity and lowest noise. It does require that the user adjust their presets correctly to avoid overflowing the converters but the VU meters make this task trivially easy." source
Section 7 of the Axe-Fx III Owner's Manual also discusses setting preset levels.
Vol Inc and Vol Dec
Volume Inc(rement) and Volume Dec(rement) present a convenient way to adjust preset levels on the fly (without manual editing). These commands let you adjust the preset level in steps of 1 dB while playing. Adjustments are saved automatically.
To make this work, assign these commands to switches on your foot controller, using their MIDI CCs. The MFC-101 MIDI foot controller and FC-6 and FC-12 foot controllers have dedicated commands for this purpose.
Notes:
- Make sure that a single press sends just one command, not a double one
- Axe-Fx II and AX8: Vol Inc and Vol Dec only affect the signal through Output 1, not Output 2, unless Echo Output 1 is set to Output 2 in I/O AND the preset doesn't contain a FX Loop block (AX8 or Axe-Fx II)
- Axe-Fx III and FM3: there are separate Vol Inc/Vol dec commands for Outputs 1 and 2
- They work per scene
Note that other unsaved changes to the preset will get saved too, when Vol Inc or Vol Dec is triggered.
The FC-6 and FC-12 foot controllers for the Axe-Fx III provide an alternative for Vol Inc and Vol Dec: adjust Amp Level in steps.
Boost the output level
Methods to boost the signal level, i.e. for leads:
- Add a Filter block at the end of the signal chain, set to "Null" with Level at e.g. 3 dB, and its Bypass assigned to a switch.
- Use a PEQ or GEQ block with its Level turned up and assign the block's Bypass to a switch.
- Use a pedal or switch to turn up the Input Drive, or Input Trim, or Master Volume, of the Amp block.
- Boost the level at the input of the grid, using the Level parameter in the GTE/IN menu.
- Create a global "Boost" switch without having to modify each preset (source: M@) as follows. Set the CC of an IA switch on the floor controller to OUT1 VOLUME. Set the OFF value to (for example) "111" (unboosted level) and set the ON value to "127" (boosted level). If you're using Output 2 as well, don't forget to add a second CC for OUT2 VOLUME, or assign OUT2 to the same CC as OUT1.
- Use a scene for increased output level.
- Use an expression pedal.
- Assign a modifier to Level in the Cab block.
- Configure a block for X/Y switching or channels.
- Tutorial by AxeFxTutorials
- Tutorial by AustinBuddy
- Connect an external volume knob through an external controller
Routing the signal on the grid
Series and parallel routing
You can put effect blocks in series (in a single row) or parallel.
Axe-Fx III – extensive routing possibilities, using the 6x14 grid
FM3 – extensive routing possibilities, using the 4x12 grid
Axe-Fx II and AX8 – extensive routing possibilities, using the 4x12 grid
FX8 – a single row and the possibility to place an effect in parallel with another effect. You can adjust the placement of effect blocks in the preset configuration (Config page). Examples are provided in the FX8 manual. The first PRE and first POST effect are always in series
Parallel routing is a common method in traditional analog rigs to avoid loss of tone. There's no need to use parallel routing to prevent loss of tone quality when using Fractal Audio gear. But parallel routing makes it possibe to have e.g. independent delay and reverb paths, or lets you place effects after a specific effect, not affecting the main signal. Also, on the Axe-Fx II, III and AX8, it allows you to put more effects in a preset, overcoming the limit of the maximum number of columns.
You don’t want to place "100% wet” effects in a parallel path, such as Tremolo or Compressor, because dry signal will still be going through the main path and affect the effect.
More information: discussion discussion discussion
When running an effect in series, using its Mix parameter (if available) may affect the level of the dry level too. This is not the case with effects in a parallel row, when Mix is set to 100% (fully "wet") and using Level or Input Gain to dial in the desired effects level. So: when using effects in parallel, always set Mix at 100%, and use Level to dial in the desired amount of effect. With effects featuring an Input Gain parameter, you can also keep Level at 0 and use Input Gain to dial in the desired amount of effect. Also, setting Mix at 100% avoids creating "double" direct signal paths, which would result in undesirable increase of volume.
If an effect is placed in parallel, bypassing that effect may pass "direct" signal, which, when merged with the main signal, may increase the overall signal level and comb filtering. To prevent this, select a suitable Bypass Mode: Mute Out or Mute In. Do not use Mix 0% / Thru Mute FX In / Mute FX Out.
The FX8 automates all this, using "smart" controls: Mix, Level and Bypass are automatically adjusted when moving an effect from series to parallel, and vice versa.
When two (or more) parallel rows pass direct signal, the loudness of that signal increases.
Bakerman: "Decibels use a logarithmic scale. You need to double the voltage (paths of identical signal) to see a ~6 dB increase. 1 to 2 is doubling. 2 to 4 is doubling. 2 to 3 (voltage gain of 1.5) is only a ~3.5 dB increase." source
"Don't think in terms of dB. Assume you are putting 1V in (for convenience). If you add two rows you get 2V out. That's a 6 dB increase. If you add three rows you get 3V out. That's a 9.5 dB increase. If you add four rows you get 4V. That's 12 dB." source
GM Arts: "Here's a bit of trivia to cover the comments we often see along the lines of: when I combine two blocks in parallel into a single block, it gets louder... The two signals sum, so it's necessary to reduce the output levels of the two blocks so they combine without volume boost. For an equal mix, each block must be set to -6dB. What's not so apparent is what levels to use for unequal mixes, so here they are. This applies to combining two blocks that each have the same level into a single block without volume change." source
-6dB    -6dB

-5.5dB  -6.6dB

-5dB    -7.2dB

-4.5dB  -7.9dB

-4dB    -8.7dB

-3.5dB  -9.6dB

-3dB    -10.7dB

-2.5dB  -12dB

-2dB    -13.7dB

-1.5dB  -16dB

-1dB    -19.3dB
-0.5dB -25dB
Scott Peterson shows how to build a parallel path
PRE and POST routing
PRE and POST refers to the position of effects before or after the Amp block and/or Cab block.
Read this: Position of the Cab block on the grid
"Sonically speaking, the main reason to care about PRE vs. POST is that a given effect will sound different when placed BEFORE or AFTER your amp’s preamp—the place where distortion occurs. How does this difference sound? If you’ve ever switched the sequence of traditional DRIVE and WAH pedals, you’ve heard an excellent example. In the case of wah before overdrive, the resonant filter of the wah “excites” the overdrive in a cool way while still retaining a natural overall tone. When the wah follows distortion, you might hear a more dramatic filtered sweep—with heavy distortion it can get almost synth-like—which might be considered less “classic.” It’s not surprising then that Wah would traditionally be a run as a “PRE” effect between guitar and amp. The amp’s distortion follows the wah effect. Many other effects fall in this same category. A different example is found in overdrive with reverb and delay. In the natural world, reverb and echo occur because of open spaces around your guitar amp – like a club or concert hall. These effects would therefore NOT be heard before a distorted amp, but after it. Recording studios often add these kinds of effects at the console—after the mic has picked up the distorted sound from the guitar amp. If you wanted to simulate this natural sounding reverb or delay these effects would likely be run “POST.” This is not to say that delay or reverb before distortion is a “no-no.” Many “legendary” tones came from echo units in front of an amp—but this effect is very different from “POST” delay—not only tonally, but also in terms of dynamics. The good news is that the FX8 allows you to experiment easily and find what combinations of pre- and post-effects work best for you. Creativity begins where tradition ends."
The FX8 is designed for PRE and POST hardware routing. There are 3 supported ways:
PRE — effects between guitar and Amp
POST — effects after the Amp. I.e. in a real amp's effects loop, or added in a studio
Four Cable Method (4CM) — combination of PRE and POST
PRE and POST chains depend on the way the FX8 is connected and is configured on the preset's CFG page. The PRE/POST effects configuration per preset is indicated at the top of the screen:
8/0 — all blocks are PRE
0/8 — all blocks are POST
Any other value indicates a mix of PRE and POST
"The paradigm for the FX-8 is that if you put the typical effects in the "Post" section then the level out of the Post section is the same as the level in. Therefore your effects loop is running at unity gain and the volume won't change if you bypass all the effects." source
The FX8 manual contains diagrams.
Bypass mode of an effect block
MUTE IN – when the block is bypassed, its inputs are muted, silencing the both wet and dry but allowing effect “tails” to ring out or “spill over”. Use this for time-based effects in parallel.
MUTE OUT – when the block is bypassed, all audio is totally silenced at the outputs. Effect tails are silenced immediately, but the input is still “listening” so tails may be heard when you engage the effect.
MUTE FX IN – when the block is bypassed, the inputs of its internal processor are muted, but the dry is unaffected. This allows effect “tails” to ring. LEVEL and BALANCE controls continue to operate when the block is bypassed. Use this for time-based effects in series when you want spillover.
MUTE FX OUT – when the block is bypassed, the outputs of its internal processor are pulled, but dry signal is totally unaffected. With this setting, signals can enter a reverb or delay before it is engaged.
MUTE – when the block is bypassed, both wet and dry are totally silenced.
THRU – when bypassed, the block is completely disengaged. None of its parameters have any effect on the sound; it behaves exactly as if it were never there in the first place.
The settings are explained through diagrams in the Owner's Manual:

To set a block's Bypass state in all scenes of a preset, use the editor.
"A bypassed block does nothing more than copy the input to the output. Any perceived changes in sound are just that, perceived." source
"FX bypasses are done as fades but much shorter that 500 ms. More like 20 ms." source
The Bypass Mode parameter on the Axe-Fx II, AX8 and FX8 can be attached to a controller. The controller will then control the block's state: engaged or bypassed. You can also use the I/O menu to switch the effect through the corresponding INIT VALUE parameter. The Axe-Fx III and FM3 provide a dedicated Bypass parameter for this purpose.
The engaged/bypass state of an effect block can be different per scene (when not connected to a controller). Read this: Scenes
When putting blocks in parallel rows, it's important to set Mix, Level and Bypass correctly. The FX8 features "smart" Level, Mix and Bypass controls. These are automatically adjusted when moving an effect from series to parallel or vice versa.
When switching between two Amp blocks in parallel rows, make sure to set their Bypass Mode to Mute, to prevent bleed-through of dry signal from the bypassed Amp block.
Bypassing a block does NOT lower CPU usage. CPU usage only decreases when removing the block from the grid.
Mono and stereo signal
Read this: Mono versus stereo
Routing tools
Editing parameters
Reset a block
In Edit mode:
Axe-Fx III and FM3 — press the Reset soft button. This resets the current channel only
Axe-Fx II — click BYPASS twice (not EFF.BYPASS) or press-and-hold it
FX8 — click ENTER twice
AX8 — click SHIFT, then press EDIT twice
Or use the software editor to initialize the entire block, or just X, Y or a channel.
More information about defaulting the parameters in an Amp block
Recall Effect
The Recall Effect function lets you copy the parameters of an effect block from another preset into the current preset. The Axe-Fx II, FX8 and AX8 have this feature, the Axe-Fx III and FM3 do not.
Axe-Fx II — on the Recall screen, press PAGE RIGHT to get to the Recall Effect page
AX8 and FX8 — set one of your function switches to SINGLE PRESET/BANK, press the switch, press PAGE
Follow the instructions in the manual to load a preset. Once the "RECALL" page is visible, press the <PAGE> button. This will take you to the "EFFECT" screen. From here you can load any effect block to your current preset from any other preset on the unit
Recalling an effect:
- changes the engaged/bypass state of the selected effect
- always includes the X and Y settings (if applicable)
- includes modifier settings
- does not include Global Block linking
If the recalled block settings don't match the ones in the block from which they were copied (source preset), there's an issue with the preset version. To solve this, save the source preset (this will update it to the latest specs), then perform the recall operation again.
To recall internal controller values only, such as Envelope or LFO, scroll to Control when using Recall Effect.
Global Blocks
Global Blocks let you change a parameter value in all presets with the same instance of that Global block.
An alternative way to adjust parameters across multiple presets, is FracTool's Batch Setter.
Channels or X/Y switching
Read this:
Block Library
Read this: Block Library
Scenes
Read this: Scenes
PERFORM screen
The PERFORM screens on the Axe-Fx III allows fast access to max 10 often-used parameters, which you can choose yourself. There's a Global Perform screen and a Per-Preset one. You must use Axe-Edit III to configure the screens.
Mix parameter
The Mix parameter determines the amount of "wet" signal in a block. At "100" the signal is totally wet. This is usually used with effects such as Tremolo and Compressor. At "0", the signal stays completely dry (no effect), with the exception of the Drive block.
Mix at 50% results in both wet and dry being at -6 db in comparison to their maximum output levels (except the Delay block because of the "Delay Mix Law"). Compensate by adjusting Level.
(M@) "When turning up Mix in a block, the dry signal decreases. The table below shows wet/dry dB levels at various settings for blocks like Reverb, Pitch, etc. which do NOT use a constant power algorithm (like DRIVE). The Delay also uses a different method. In a rig where unity gain matters, these numbers are used to know how much to adjust Level for a given Mix setting."
MIX SETTING / WET LEVEL / DRY LEVEL / WET/DRY DIFF

0 / -∞ / 0.00 / -∞

5 / -26.02 / -0.45 / 25.58

10 / -20.00 / -0.92 / 19.08

15 / -16.48 / -1.41 / 15.07

20 / -13.98 / -1.94 / 12.04

25 / -12.04 / -2.50 / 9.54

30 / -10.46 / -3.10 / 7.36

35 / -9.12 / -3.74 / 5.38

40 / -7.96 / -4.44 / 3.52

45 / -6.94 / -5.19 / 1.74

50 / -6.02 / -6.02 / 0.00

55 / -5.19 / -6.94 / 1.74

60 / -4.44 / -7.96 / 3.52

65 / -3.74 / -9.12 / 5.38

70 / -3.10 / -10.46 / 7.36

75 / -2.50 / -12.04 / 9.54

80 / -1.94 / -13.98 / 12.04

85 / -1.41 / -16.48 / 15.07

90 / -0.92 / -20.00 / 9.08

95 / -0.45 / -26.02 / 25.58

100 / 0.00 / -∞ / ∞
The formula for an exact calculator is:
- DRY LEVEL=(LOG((100-MIX)/100))*20
- WET LEVEL =(LOG(MIX/100))*20
Global Effects Mix
The Effects Mix parameter in the Global menu lets you control the overall wetness of effect blocks that have a Global Mix parameter.
The parameter simply multiplies the Mix value in the presets.
"Global Reverb and Effects Mix are relative. If set to 0% the mix is set by the preset. If set to, say, -10% the mix would be 10% less than the preset mix.” source
Global Reverb Mix
There's a separate global parameter for reverb: Reverb Mix. Note that Reverb is also affected by the Effects Mix parameter.
The parameter simply multiplies the Mix value in the presets.
Adjusting this control may not have the desired effect if the Reverb block is placed in a parallel row with its Mix parameter set to 100%.
"Global Reverb and Effects Mix are relative. If set to 0% the mix is set by the preset. If set to, say, -10% the mix would be 10% less than the preset mix.” source
Modifiers, controllers and Control Switches
Read this: Modifiers, Controllers and Control Switches
List of controllable effect parameters in the AX8
Waveforms
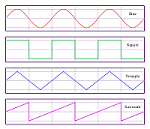
Look up the explanation of waveforms and graphs in the Owner's Manual and Wikipedia
Sounds
Crossfading sounds
There are several ways to crossfade sounds.
Scene scontrollers: use Scene controllers with a damping value of several hundreds of milliseconds.
Sequencer: use the Sequencer internal controller. (source: Bakerman):
- Set it to something like 16 steps, Rate just over 1 Hz, Values increasing in steps of 10% and have it sit at 100% for the last 6 steps.
- Place a volume block in each signal chain and assign Seq to turn chain B up and chain A down.
- Use several hundreds of milliseconds of damping.
- Assign one switch to Sequencer Run control and a second switch to bypass both volume blocks. You'll want them engaged before/during the crossfade.
- Use Mute Bypass mode for the Vol block in chain A, Thru Bypass mode for the one in chain B.
Now you can be playing sound A, hit switch 1 and get the 8-9 second crossfade, then hit switch 2 within the next 4-5 seconds before the sequencer restarts. If you wait too long you'll hear it fade back quickly to A (then B gradually again) but whenever you hit it you'll hear sound B regardless of what the sequencer's doing. After that you can always stop the sequencer and switch back to sound A; it will just be instant instead of a crossfade.
Pedal: Use a pedal to crossfade between i.e. two AMP blocks:
- Assign the Level parameter of one AMP block to an external controller.
- Do the same with the other AMP block, using the opposite curve (or reversed Min/Max values) and using the same external controller.
- Assign the external controller to a pedal.
Comparing sounds
- Use X/Y switching or Channels
- Use FracPad
- Use Scenes
- Use Snapshots in the software editor
Troubleshooting
No sound
Read this: Troubleshooting
Corrupt preset at startup
A corrupt preset can cause problems at startup or when scrolling through presets.
To solve a startup issue:
Axe-Fx III and FM3 – Hold HOME on startup. The Axe-Fx III or FM3 will boot with an empty initialized preset in location 000. When holding both EDIT and HOME at startup, the system settings are also bypassed at startup
Axe-Fx II – Press and hold RECALL on startup
AX8 and FX8 – Press ENTER when the splash screen is displayed
So solve the issue with the corrupt preset:
- overwrite the preset on the hardware with another preset, or
- clear the preset in the editor.
Issues with Effect recall or copy-and-paste
When using Recall Effect or copy-and-paste in the editor doesn't deliver the expected results (different sound), there may be a mismatch between the preset versions. To solve this, save the source preset to update it to the latest specs, then perform the recall or copy/paste operation again.